
Instructions / Assembly


6
Details
Details applicable to each configuration are shown below.
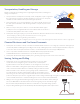
Vertical Installation
Vertical Installation of Suntuf, for side or end walls as an example, is essentially the same as with roofing / canopy applications. Fastener
spacing and application is the same, except that fasteners are to be installed in the corrugation valleys (as opposed to the crests).
Closure strips are not required for vertical installations, unless the structure is totally enclosed and energy efficiency is a concern.
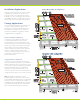
I
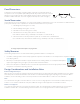
Bottom Closure Detail
beam
rafter
closure
strip
overhang:
1" min. - 3" max.
H
Detail at Seam
Use sealant
if pitch is less
than 1 ½"
per foot
G
Overlap Detail
2" x 3"
purlin
horizontal
closure strip
NOTE: Total overlap of both
panels combined should be
minimum of 4", 8" maximum
overlap 2" min. to 4"
max. past screwline
screw line
centered on purlin
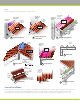
D
Ridge Detail
Suntuf
ridge cap
ridge board
rafter
2" x 3" purlin
amount of
pitch in inches
12"
how to measure pitch
existing brick
or masonry
counter flashing
4" minimum
neoprene
washered
fasterners
2" x 3"
purlin
ridge
board
rafter
Suntuf Wall
Connector
A
Head Flashing Detail
B
Head Flashing Detail
at Sided Wall
C
Sidewall Flashing Detail
existing house
cladding and
structure
rafter
2" x 3"
purlin
neoprene
washered
fasterners
existing house
cladding and
structure
rafter
post
horizontal
closure strip
line of Suntuf
side ridge
under siding
2" x 3"
purlin
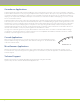
existing house
cladding and
structure
end rafter
2" x 3" purlin
Suntuf
panel
E
Flashing Detail
F
Rake Detail
Suntuf
panel
2" x 3" purlin
rafter
Suntuf Wall
Connector
ridge
board
Suntuf Side
Ridge
Suntuf Side
Ridge