
User's Manual

Installing the Car DVR
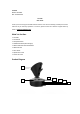
1. Insert the TF card into the micro SD card slot.
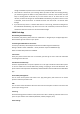
2. Stick the car mount onto your car windshield (ideally right in the middle).
3. Fix the Car DVR onto the mount via the magnet.
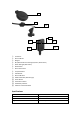
4. Connect the USB cable to the micro USB port of the dash cam, run the cable along the edge
of the windshield, tuck it away in the seams, all the way to the USB port of the power bank
(Keep away from the airbag area).
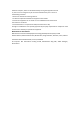
5. Insert the power bank (with charger) to the cigarette lighter, connect the USB 2.0 to the USB
port of power bank.
6. Start your car to turn on the Car DVR. Connect it with your phone (refer to the “VAVA Dash
App” section) and open the VAVA Dash App to view a real-time feed. Adjust the dash cam to
achieve the ideal shooting angle.
7. Open the snapshot button rear cover, and pull out the cell box, then put the button cell into
the box. Cover the rear cover and press once, you can hear a click sound and then the
snapshot button connect to the dash cam. (If no any respond, please take out the button cell
and put it into the box again or long press the button for 5 second to reset the button.)
Note:
The dash cam supports up to a 128GB Class 10 TF card. Do not remove or insert a TF card
when the camera is working.
Stick the Snapshot Button with a 3M adhesive tape on the dashboard or besides the steering
wheel. Do not put it on the airbag.
Please don’t connect the devices which have Quick Charge function.
Park Mode
1. When your car is running, the car charger provides power to the Car DVR and charges the
power bank simultaneously. When your car is not running, i.e. engine being shut down, the
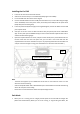
The Best Mounting Position
Power Bank / Car Charger
GPS