Table of Contents About Your SRC-3200 ..................................................................... 1 Introduction...................................................................................... 1 Battery............................................................................................. 3 Touch Screen .................................................................................... 3 Description of Keys ............................................................................
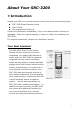
About Your SRC-3200 Introduction Unpack your SRC-3200 Smart Remote Control, and check the following items: SRC-3200 Smart Remote Control User’s Guide Pre-programmed Code List Contact our distributor immediately, if any of the above items is missing or damaged. Keep the original package, in case you need it for shipping your SRC-3200. For optional accessories, contact your distributor directly.
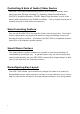
Controlling 8 Sets of Audio/Video Device Your SRC-3200 can simultaneously control up to 8 sets of devices, each having at most 59 keys including TV, Satellite, Video Recorder/Player, DVD/VCD, Amplifier/Receiver, CD/MD, Radio/Tape Recorder, or any other device with a frequency from 20KHz to 445KHz. You no longer need a pile of remote controls or bear with inconvenience Smart Learning Feature You can set the SRC-3200 through the Smart Learning function.
Battery Installing Battery Press the button at the back of the SRC-3200 remote control, and the battery compartment will pop out automatically. Install four AAA batteries into the battery compartment correctly. And then put the battery compartment back. Cautions: 1. Make sure the anode (+) and cathode (-) of the battery match the polarity indicated in the battery compartment. 2. DO NOT mix different types of batteries or old and new batteries. Always use fresh batteries.
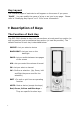
Key Layout The 2 default pages of each device will appear on the screen if you press “PAGE”. You can modify the name of a key or an icon in any page. refer to “Modifying Key Layout” on P. 21 for more information. Please Description of Keys The Function of Each Key The SRC-3200 divides its keys into two sections: a touch panel key section (or soft key section) and a mechanical key section (or hard key section).
“REC” Key Protect To avoid starting the recording function or pressing the record key by mistake, you need to press the REC key for more than 2 seconds in the general operating mode before the recording function takes place. Soft/Hard Key Protect If a soft key or a hard key is pressed for more than 30 seconds under a general operating mode, the remote control will complete its transmission and end its operation, and then will enter a power-saving mode after 90 seconds.
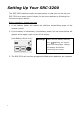
Setting Up Your SRC-3200 The SRC-3200 features simple and easy setup, so that you can set up your SRC-3200 as a smart control center for the home devices by following the instructions given below: Before operation, please note that 1. A low battery power will reduce the effective transmitting range of the remote control. 2. If your battery is exhausted, a low battery power icon as shown below will appear at the upper right corner of the screen.
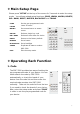
Main Setup Page Please press “SETUP” at the top of the screen for 2 seconds to enter the setup mode. You will see related setup functions: CODE, LEARN, MACRO, DELETE, DEL. BANK, RESET, BUZZER, BACKLIGHT and TRANS. CODE Set the pre-programmed code LEARN Learn IR codes MACRO Set normal macro or smart macro DELETE Delete a single key code DEL.
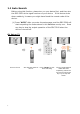
1.1 Auto Search Before using this function, please turn on your device first, and then aim the SRC-3200 at the signal receiver of your device. If the device shuts down suddenly, it means you might have found the remote code of the device. (1) Press “AUTO” after you enter the setup page, and the SRC-3200 will start outputting the codes stored in the database one by one. Press any key to stop the output operation of the SRC-3200 when the device is turned off. EX.
(2) Please press the key, and test whether the device can be turned on or not. If the code is correct, jump to Step (4) to save data and exit, or go on next step. (3) Press the key one by one to take the previous code and repeat step (2) process until you find the correct one that can turn the TV on. (4) Make sure you press “OK” to save the setup, and go back to the operation page. 1.2 Input Code (1) Open the code list and look for the brand of your home device.
(4) Press the key after inputting a code to test whether or not the code is correct. If correct, the TV will be turned on. If incorrect, please enter another code number until you find the correct one. (5) After you confirm the code is correct, press “EXIT” to exit. If code is correct, TV will be turned off (6) Confirm code To avoid repeating the input or forgetting which codes you have entered, you can inquire to review code number.
2. Learning For SRC-3200, we have built in an auto-guide system to help users in operation of Learning function. (The auto-guide system only works for the Soft keys setting, refer to the P4 for detailed illumination) Notes: Before operation, please note that you are required to keep 2-4 inches distance away between SRC-3200 and the original remote and put them in a line (as shown on right side).
(2) When the key starts flashing, please press the corresponding learnt key from the original remote in order to transmit its IR code to SRC-3200. (3) As long as the flashing key has learnt the IR code, the auto-guide system will assign next key automatically. Please repeat Step (2) process until all desired soft keys has been learnt.
3. Macro The Macro function allows you to send buttons continuously by pressing a Marco key. In other words, you can set a Macro key to substitute a complicated procedure as described below: A Normal Macro key can store up to 60 commands, however a Smart Macro key can only store up to 16 commands and total 10 sets will be allowed. Both Normal and Smart Macro key can be assigned in any button (except the device button) as a desired Macro key. Note: Max. number of learning macro will be 10.
3.1 Normal Macro At first, you need to confirm the input of remote codes which are successful before setting the Normal Macro. (1) Press “SETUP” and “MACRO” to enter the setup mode, and then press “MACRO KEY” to start the setup. (2) Now, you can see the blinking “MACRO” icon at the top of the screen, and select a key for the Macro key (we recommend you to select a less frequently used key). After that, start to pressing desired buttons one by one to be saved into the Normal Macro key.
* Press “CLEAR” to clear a selected number * Press “ENTER” to confirm the set delay time. * Press “EXIT” to cancel the delay time setup and return to the Macro setup page. c. If it is not necessary to set a delay time, the default setting is 0.4 second between 2 buttons. (4) Continue to input desired buttons until you press “EXIT” to exit. At the moment, the “OK” key will appear. Make sure you press “OK” to save your setup.
(5) Let us take a look at an example of setting a MACRO. For instance, the procedure for viewing DVD at home is given as follows: a. Power on the TV. b. Switch TV screen to the video mode. c. Power on the DVD. e. Start playing the DVD disk. Operation Procedure Required Setting Process on SRC-3200 1. Enter the setup page, and press “MACRO KEY” to start the setup. 2.
3.2 Smart Macro Before starting the Smart Macro, you should gather all required original remote controls. (1) After you enter the Macro setup page, press “LEARN” to start the setup. (2) Before operation, please note that you are required to keep 2-4 inches distance away between SRC-3200 and the original remote and put them in a line. During learning, please hold pressing every learnt key of the original remote until the message has popped up on the screen of SRC-3200 and hear a beep (refer to P.
(4) At first, please take required original remotes and aim it sequentially at the Learning eye of SRC-3200 (refer to P9 Learning function) and press desired buttons to transmit its IR code to the SRC-3200 in order to save in the Smart Macro key. (See the illustrations for clear concept at right side ) Send the learnt key to the blinking Macro key (ex.
(7) Let us take a look at an example of setting a MACRO. For instance, the procedure for viewing DVD at home is given as follows. a. Power on the TV. b. Switch TV screen to the video mode. c. Power on the DVD. e. Start playing the DVD disk. Operation Procedure Required Setting Process on SRC-3200 1. Enter the Marco setup page, and press “LEARN” for the Smart Macro setup. Power on the TV. 2. Press the “TV” device key and select as the Smart Macro key. (You also can assign this key freely). 3.
4. Delete a Key Code (1) Press “DELETE” after entering the setup mode. A desired device page will appear. You can delete any desired key code in the device, or switch to different device page for further deletion. (2) For the key code deletion, select the desired key and press it until you hear a beep and see “OK” message on the screen so as to complete the operation. Continue to delete another key code until you press “EXIT” to exit this operating mode.
6. Modifying Key Layout The SRC-3200 provides you a function to change the content in a touch key, and each key includes 3 to 4 types of different contents. With a simple and easy operation, you can display the content of the desired key and complete personalized control page. (1) It is not necessary to enter the setup page. Press and hold the “PAGE” key for 2 seconds to enter the Layout setup page. (2) The name of device starts blinking at the top of the screen. It means you have entered the setup page.
(4) Press “EXIT” to exit the setup page. And then press “OK” to confirm and save the setup and return to the main page. If you do not want to save the setup, just press “EXIT” to return to the main page.
7. Transmission The “TRANS” function will copy all data to another SRC-3200. Before using the function, you need to purchase a SLC-2080 USB cable (optional) for connection. operation. Please comply with the following instructions to complete the (1) Connect the transmitting end to the receiving end by the transmission line properly. (2) At the transmitting end, press “SETUP” to enter the setup mode. And then press “TRANS.” to start the transmitting operation.
8. Function Lock The function will lock part of important setup keys. If it is enabled, you will not allow entering the CODE/LEARN/MACRO/DEL functions anymore, but the original settings are unlimited even after you press “RESET”. (1) Enter the setup mode and select a desired device (such as TV). (2) Press and hold the PAGE key for 4 seconds. When you hear a beep, it represents you have completed the setup. (3) Press “EXIT” to exit the setup page.
10. Key Buzzer (1) Press “BUZZER” after you have entered the setup mode, and the setup screen will appear. Three different sound frequencies are represented by 1 to 3, and the (“MUTE”) key at the bottom is to mute all pressed keys. (2) Select the desired sound by the numeric key, and the selected one will blink. Press “EXIT” to exit after you have completed the setup.
11. Backlight (1) Press “BACKLIGHT” to enter the setup mode. The numbers “1” to “7” represent seven colors of backlight, and the number “0” represents no backlight. (2) Select a device (such as TV) to set its backlight. Press a desired numeric key as you wish. If the operation is completed, the numeric key will blink, and then press “EXIT” to exit.
Appendix A Features Eight-in-One This feature allows you to integrate up to 8 devices. Two Ways to Integrate Devices Learning type and Pre-programmed code library. 59 Keys in Each Device Each device has 59 keys available in 2 pages. Changeable Device Key Layout Normal Macro Function The function allows you to save up to 60 buttons, including time delays between two keys. Smart Macro Function The function only allows you to save up to 16 keys but setting up by the Learning directly.
Specifications Model SRC-3200 Battery 1.5V 4 X AAA Alkaline Batteries (SUM-4) Dimensions ( W x H x L) 64 x 23 x 220 mm Weight (without batteries) 8.
Appendix B Optional Accessory SLC-2080 USB Cable Transmission Line The SLC-2080 is an optional USB cable that enables a transmission of system setup between PC and SRC-3200. Besides, with the transmit cable, the SRC-3200 also can duplicate the user setup data from one unit to another. Upgrade Tools: Upgrade firmware and flash memory, or upload/download files. Please attend to Sunwave website: www.sun-wave.com to get driver and Upgrade Tool on your PC.
Appendix C Troubleshooting Problem Solution LCD shows no screen when touched. 1. The batteries may be dead. Replace the batteries. IR Learning fails. 2. Check if the batteries are installed properly. 1 .DO NOT use the learn function near an incandescent lamp. 2. Memory capacity is full (59 keys for each device.) 3. Learning process may not be completed when battery low in the SRC-3200 or the original remote. 4.
Problem Solution An “ERROR” message displayed during operation 1. No code was saved in the pressed key or the operation is wrong. The SRC-3200 can’t control desired 1. Check if the desired device on the SRC-3200 is selected. devices. 2. Move closer to the device. The maximum operating distance is approximately 30 feet. 3. Make sure that you are aiming the SRC-3200 directly at the device and there is no obstruction between the SRC-3200 and the device. 4.