
Owner's Manual


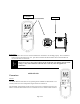
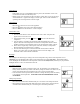


Table Of Contents

Page 2 of 6
FEATURES/SPECIFICATIONS
Easy Access Thermostatic Control
Battery Powered Transmitter and Receiver
Low battery Indication
Child Proof Lock-out
16 Security Codes
6 hour Shut Down (Optional)
Quick Disconnect Wiring Assembly
Reset Button
WARNING
Turn appliance OFF and allow to cool before installing or servicing. DO NOT connect
110-120 VAC wiring to the millivolt gas control valve. The remote operator must be installed
exactly as outlined in these instructions. Read all instructions completely before attempting
installation. Follow instructions carefully during installation. Any modification of
components will void the warranty and may cause a fire hazard.
WARNING
Turn appliance OFF (at the appliance or remote receiver) if you are away from your house
for a long period of time.
INSTALLATIONS
Receiver:
The remote receiver may be wall mounted or installed in the appliance per the
appliance homeowner’s manual. Refer to the Homeowner’s Manual for
special installation instructions. If wall mounted, the remote receiver must be
installed in a junction box with cover plate provided. Failure to follow the
installation instructions found in the appropriate Homeowner’s Manual will
void the warranty and may cause a fire hazard.
Installing Batteries:
The remote receiver uses four (4) “AA”- size batteries. To install batteries,
1. Open the battery door by pressing the two tabs located on the door.
2. Install the batteries as indicated in the receiver cover.
3. Close the battery door until the door tab snaps in place.
4. To install the receiver into a wall junction box, snap wall cover plate to
the receiver and install the receiver with the screws provided to the
junction box.
5. The batteries should be replaced at least once every 6 months or when the battery indicator flashes.