
Owner's Manual

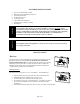

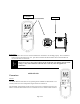
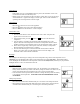


Table Of Contents

Page 3 of 6
Connecting the Receiver to your appliance:
This system comes with an 22 inch wire assembly. Insert the white terminal to the back of the receiver. The
terminal wire block can only be installed one way. Do not force the terminal plug onto the receiver.
Connect the wiring terminal two (2) ¼” female spade terminals to the appliance. Refer to the appropriate
Homeowner’s Manual for proper wiring connections to the appliance. Your appliance may have other options to
connect wiring from receiver. Connect to the two (2) 1/4“ female spade wiring terminals. Wire can be no longer
than 20 feet.
WARNING
Make sure that the wires do not contact the appliances any place other than at the terminals.
Exposure to temperatures higher than 250℉(105℃) may cause the receiver to malfunction or
cause a fire hazard.
Transmitter
:
Installing Batteries:
The remote transmitter uses two (2) “AAA” batteries. To install batteries,
1. Press down the battery door and remove the battery door.
2. Install uses two (2) “AAA” batteries batteries as indicated on transmitter.
3. Close the battery door by snapping in place.
4. The batteries should be replaced when the battery indicator flashes.
5. When both batteries are installed, the transmitter will initialize for 10 seconds and then
is ready for use.
Setting Privacy (DIP) Switch on Receiver and Transmitter:
The remote receiver and transmitter privacy (DIP) switches are preset at the factory. In the
event of activation or interference from other nearby transmissions, reset the code using the
following procedure:
1. Slide the code switches on the transmitter or receiver to your choice of ON or OFF
position. Switches #1, #2, #3 and #4 are preset to “ON” for both the transmitter and
receiver.
2. The switches on the transmitter and receiver must match in order for the system to
work.
3. To check, touch either the On or Off button on the transmitter and the receiver indicator
light will blink. If not repeat step 2.
4. The system is now ready to operate.