
Install Instructions


The optics are
working properly.
Close the freezer
door.
Light pulses twice
followed by a one
second delay and
then repeats
Press in the emitter
flapper door to
unblock the optics
beam
2.)
Faulty Status LED
No lamp
Replace boards
Open the freezer
door to see the
diagnostics "status"
LED.
1.)
Light pulses twice
followed by a one
second delay and
then repeats
Press in the freezer
door switch. When
the icemaker is in
harvest mode the
status LED will flash
every second.
Icemaker is in
harvest mode
There is an
obstruction blocking
the beam. Check
flapper door on the
emitter.
Move to step 2
The optic boards are
faulty.
Move to step 2
The optics are faulty.
Replace both optics
boards.
Status LED is on
steadily.
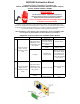
LED Status
Possible Cause
Action
Diagnostic Test Procedures for Icemaker Optics Boards
Step Number
ADC9102 Instruction Sheet
Icemaker Optics Diagnostic Procedure for
4389102, W10290817, W10193840, W10193666, 4389102R, 4388635, 2255114,
2220402, 2220398, 2198586, & 2198585
If there is no ice production or low ice production, always check the temperature of the
freezer. The temperature must be between 0° F and 5° F for several hours to achieve proper
ice production. Some models recommend 5° F or colder for 24 hours. Water will not flow into
the icemaker until the icemold has reached operating temperatures.
When updating the control boards, replace both boards to ensure compatibility. Make
sure to replace the old Icemaker Tech Sheet with the new Tech Sheet.
Replace all parts and panels before operation
WARNING !
Electrical Shock Hazard - Unplug the refrigerator or
disconnect the power before servicing the refrigerator.
Failure to replace protective coverings can result
in death or electrical shock!