
Install Instructions


1.)
2.)
3.)
4.)
5.)
6.)
7.)
8.)
9.)
10.)
11.)
12.)
WARNING !
Electrical Shock Hazard - Unplug the refrigerator or disconnect the power before servicing the refrigerator.
Replace all parts and panels before operation.
Failure to replace protective coverings can result in death or electrical shock!
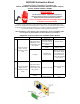
Replace both optics
boards.
Actions
Sensor boards are working
Replace both optics
boards.
3 pulses repeated once indicates
optics and relay are good but the
icemaker is not being sensed or
is inoperable.
Check the icemaker components,
circuits, and connections.
Unplug refrigerator for 5 minutes to
reset boards. Plug refrigerator back in
and repeat tests.
Steady light for 5 seconds
indicates the relay and optics are
good and the receiver board
senses the icemaker is active.
With the freezer door closed, plug in the refrigerator or reconnect power.
Wait 5 seconds to a maximum of 50 seconds. Then open the freezer door to watch the LED.
No light showing on receiver board.
4 pulses repeated
once, indicates a
failed relay.
With insulated jumper in place, plug in refrigerator or reconnect power.
● The ice bin must be on the door and the level of the ice must be below the notched openings.
● The icemaker must be in harvest mode immediately after the water fill cycle.
Diagnostic results, if the status light …
Close the freezer door to align the optic sensors. A harvest cycle will begin in about 5 seconds.
Open the freezer door and look at the icemaker rake. If "T" to "H" is properly jumped and the icemaker won't run, then stop this test and check the
icemaker.
Unplug the refrigerator or disconnect the power.
Remove the jumper wire before the fingers on the rake reach the 10 o'clock position. Reinstall the icemaker or place a catch cup under the fill spout.
There will be 4 to 5 ounces of water that will flow in step 10.
Plug in refrigerator or reconnect power.
Listen for the water fill and disconnect the power immediately after fill.
Steps for testing.
2 pulses repeated
once indicates the
optics have failed..
ADC9102 Instruction Sheet
These procedures are for use by a trained service technician. This is not a "DIY" project. This service requires training in the use and
handling of active circuits, test cords and test equipment. Untrained repair can damage the control boards, damage the icemaker, or cause
harm to the person doing the repair.
Sealed Unit Parts Co.,Inc. www.supco.com info@supco.com
SEALED UNIT PARTS CO.,INC
www.supco.com
info@supco.com
REV.10 26 2012
Run the diagnostic test procedures on the front page first.
● Use an insulated piece of solid copper wire for the jumper listed below. Dull the ends of the wire before jumping. This will help to prevent
damage to the module circuits.
Instructions:
● Follow each of the steps below to set the icemaker for the test.
● For this test the icemaker control must be in the "ON" position.
Disconnect power or unplug appliance.
Slide the icemaker out and remove the module cover.
Use an insulated jumper and jump "T" to "H" on the module to bypass the bimetal to start a harvest cycle.