
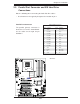
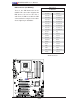
User's Manual


3-4
C2SEA/C2SEE User's Manual
Question: How do I update my BIOS?
Answer: It is recommended that you not upgrade your BIOS if you are not expe-
riencing problems with your system. Updated BIOS fi les are located on our web
site at
(http://www.supermicro com/support/bios/). Please check our BIOS warning
message and the information on how to update your BIOS on our web site. Also,
check the current BIOS revision and make sure it is newer than your current BIOS
before downloading. Select your mainboard model and download the BIOS fi le to
your computer. Unzip the BIOS update fi le and follow the readme.txt to fl ash the
BIOS.
Also, the SPI BIOS chip used in the motherboard cannot be removed. To repair or
replace a damaged BIOS chip, please send your motherboard back to our RAM
department.
Question: What's on the CD that came with my motherboard?
Answer: The supplied compact disc has quite a few drivers and programs that will
greatly enhance your system. We recommend that you review the CD and install the
applications you need. Applications on the CD include chipset drivers for Windows
and security and audio drivers.
Question: How do I utilize the onboard HD sound?
Answer: The onboard HD sound available on the C2SEA/C2SEE can be enabled
with the audio driver software that was included in your motherboard package. When
activated, sound will be routed through the jacks next to the LAN Port according
to the audio connection descriptions listed on Page 2-8. You must also set the HD
Audio setting to "Auto" in the Advanced Chipset section of the BIOS setup.
Question: I installed my microphone correctly, but I can't record any sound.
What should I do?
Answer: Go to <Start>, <Programs>, <Accessories>, <Entertainment> and then
<Volume Control>. Under the Properties tab, scroll down the list of devices in the
menu and check the box beside "Microphone".
Question: After I have installed 4 pieces of 1GB Memory, why does the BIOS
only detect about 3.145 GB of memory during POST?
Answer: Because the chipset does not support memory remapping, and PCI-E
memory requires a great deal of memory, so there is a memory hole located around
the 4GB memory address.
Question: How do I connect the ATA100/66 cable to my IDE device(s)?
Answer: The 80-wire/40-pin high-density ATA100/66 IDE cable that came with your
system has two connectors to support two drives. This special cable must be used
to take advantage of the speed the ATA100/66 technology offers. Connect the blue
connector to the onboard IDE header and the other connector(s) to your hard