
User's Manual


2-4
SUPER PIIIDM6/PIIIDM4/PIIIDM3/PIIIDME User's Manual
Installation
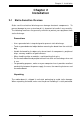
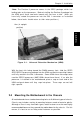
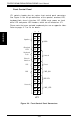
Figure 2-2. DIMM Installation
To Install: Insert module vertically and press down until it
snaps into place. Pay attention to the two notches.
Note: Notches
should align
with the
receptive points
on the slot
DIMM Slot
Side View of DIMM Installation into Slot
DIMM
PC100
Notches
PC100
Notches
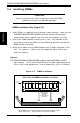
2-4 Installing DIMMs
CAUTION
Exercise extreme care when installing or removing DIMM
modules to prevent any possible damage.
DIMM Installation (See Figure 2-2)
1. Insert DIMMs as required for the desired system memory. Note that the
PIIIDM6/PIIIDM4/PIIIDM3/PIIIDME interleaves memory for increased
performance, which requires you to install two modules at a time.
2. Insert each DIMM module vertically into its slot. Pay attention to the
two notches along the bottom of the module to prevent inserting the
DIMM module incorrectly.
3. Gently press down on the DIMM module until it snaps into place in the
slot. As stated in 1 above, you must populate either two or four
banks of memory.
Support
The PIIIDM6/PIIIDM4/PIIIDM3/PIIIDME supports registered DIMMs and ECC
type memory. PC133 and PC100 memory are both supported but will
result in the same perfomance, as the memory bus runs at 100 MHz.