
User's Manual


3-11
Chapter 3: Setup and Installation
Note: For an optimized memory bandwidth, it is recommended that you populate the
memory modules in sets of four (4) DIMMs for the CPU’s.
DIMM Installation
Caution: Exercise extreme care when installing or removing DIMM modules to prevent any
possible damage.
Installing DIMM Memory Modules
1. Power down the blade module (see "Powering Down a Blade Unit" on page 3-1).
2. Remove the blade from the enclosure and the cover from the blade (see
"Removing/Replacing the Blade Cover" on page 3-2).
3. Remove the air shroud that covers the DIMM slots.
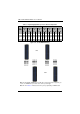
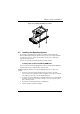
4. Insert each DIMM vertically into its slot, starting with slots A1 and A2. Pay attention
to the notch along the bottom of the module to prevent inserting the DIMM
incorrectly (see Figure 3-14).
5. Gently press down on the DIMM until it snaps into place in the slot. Repeat for all
modules (see Table 3-1 for installing DIMMs into the slots in the correct order).
6. Replace the air shroud and the blade cover and install the blade module back into
the enclosure.
7. Power up the blade unit (see "Powering Up a Blade Unit" on page 3-1).
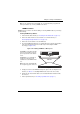
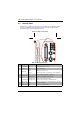
Figure 3-14. Installing a DIMM into a Memory Slot
To Install: Insert module vertically
and press down until it snaps into
place. Pay attention to the bottom
notch.
To Remove: Use your thumbs to
gently push each release tab
outward to free the DIMM from the
slot.
Note: The notch should align with
the receptive key point on the slot.
Side View
Top View
Notch
Release Tabs