
Specifications

Installation
900079-02J, 05/2019
Innovative Hearth Products
DRL3000 Linear Direct-Vent Gas Fireplaces
51
11. Make valve electrical connections.
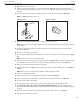
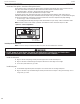
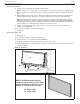
12. Remove the pilot hood assembly to access the hex pilot orifice (Figure 47). Remove and replace the pilot
orifice with the one provided with the kit. Exercise extreme care to prevent damage to or breakage of the igniter
assembly.
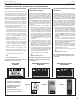
13. Remove the burner orifice from the manifold and replace it with the one provided in the kit (Figure 51).
NOTE: See Table 5 for burner orifice sizes.
Figure 47 - Pilot
Figure 48 - Orifice
Pilot
Orifice
Pilot
Hood
14. Apply pipe joint compound or Teflon
®
tape to all pipe fittings before installing.
NOTE: Ensure propane resistant compounds are used in propane applications, do not use pipe joint compounds
on flare fittings.
15. Reinstall the control compartment access door and gasket. Secure using the twelve (12) screws removed
previously (Figure 45).
16. Reinstall the air shutter adjustment lever.
17. Place the burner assembly into position. Replace the screws securing the burner to the burner brackets (Figure
45).
NOTE: Ensure the air shutter clears the pilot bracket.
18. Turn ON the gas supply to the fireplace and relight the appliance (Page 65). With the main burner ON, use a gas
leak test solution to test the new pressure regulator assembly and all gas line joints for leaks (Page 38).
19. Attach the conversion information label to the rating plate.
20. Locate the valve test ports (Figure 1). Using a manometer, test the inlet and manifold gas pressures (Table 3 and
Table 4).
NOTE: Always test pressures with the valve regulator control at the highest setting.
21. Reinstall the media and glass door .
22. Relight the main burner and verify proper burner ignition and operation (Page 38).
23. Inspect the pilot system for proper flame. The pilot flame should engulf the flame sensor (Figure 32).
24. Turn OFF the gas supply to the fireplace.
25. Turn ON the gas supply to the fireplace. Use a gas leak test solution to test the NPT plugs for leaks.
26. Read Flame Appearance and Sooting and Air Shutter Adjustment Guidelines before proceeding. Before
adjusting the air shutter, allow the burner to operate for at least thirty (30) minutes while continuously observing
the flame.
27. Adjust the air shutter using the lever located just under the door, slightly right of center (Page 39).
28. Reinstall barrier. Reinstall the surround.