
Use and Care Guide


INSTALLATION (New Pump)
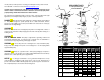
1. Set your new pump in the bottom of the sump basin off to one side. The pump should be
placed on a solid foundation. Do not place the pump directly on the ground or sandy or
rocky surfaces. Sand and small stones may clog or cause damage to your pump.
2. Make sure the float switch will swing freely from the bottom to top without coming in
contact with the side of the sump basin. Contact with the side of the sump basin may
cause the switch to malfunction. See figure below.
3. It is highly recommended to install a full flow, swing type check valve (not included)
as close to the discharge outlet on the pump as possible. A new check valve will
greatly increase the life of your pump. The check valve should be the same size as
the pump discharge.
4. Connect the pump and check valve together using schedule 40 PVC pipe and
fittings. You can also use DWV or ABS pipe, as this is not a pressure installation.
Corrugated drain hose is intended for temporary use and should not be used in a
permanent installation. Although there are many types of pipe that work adequately
for this installation, PVC is recommended.
5. Test your installation after you have completed setting up the pump. Plug the cord
from the pump into the piggyback plug of the float switch, then plug that into your
grounded outlet. The pump should not run at this point. If the pump runs, the
switch is stuck in the upright position or the pump is plugged directly into the outlet
and not through the piggyback switch plug. Fill the sump basin with water using
buckets or a hose. When the switch floats to the upright position, the pump will turn
on. The switch will turn off the pump when it reaches the down position. You may
adjust the switch to meet your particular needs. Remember the switch must swing
freely without touching the sides of the sump basin. NOTE: The cut out (turn off)
setting is the only adjustment available on vertical type switches.
TROUBLESHOOTING
PROBLEM POSSIBLE CAUSES HOW TO CORRECT
If the pump does not
start or run
Pump is not plugged in, switch or
breaker is off
Plug pump in or turn on
switch/breaker
Check for blown fuses or tripped circuit
breakers or tripped GFCI outlets
Replace fuse, reset breaker, reset
GFCI outlet
Float switch is defective Check and replace if necessary
Motor thermal protector tripped Allow pump to cool. Pump will reset
Float switch is stuck or obstructed
Remove obstruction or position pump
so it will not become stuck
The pump starts and
stops too often
Backflow of water from discharge
hose/pipe
Install or replace check valve
Float switch is defective Replace float switch
If the pump runs but
moves little or no water
Clogged intake screen Clean or replace screen
Clogged discharge hose/pipe Remove clog
Frozen discharge hose/pipe Allow hose/pipe to thaw
Pump is air locked
Clean out airlock hole with a paper
clip or pipe cleaner
Low line voltage
Check wire size and increase if
necessary
Check valve is stuck in the closed
position
Inspect, repair or replace if necessary
Check valve is installed backwards
Make sure check valve is installed in
the correct direction of flow
Worn, damaged or clogged pump parts
Inspect for wear, damage or clog and
clean or replace if necessary
Discharge head exceeds pump
capacity
If pumping height is over 25’, the
pump will not move water. See
performance chart
Pump does not
shut off
Float switch is obstructed or stuck Remove obstruction
Defective Float Switch Replace switch
Vertical Switch Installations
Wide Angle Switch Installations
4 5
A
. Grounded Outlet. A GFCI outlet
is strongly recommended.
B. Full-flow swing type check valve
C. Discharge Pipe
D. Sump basin. Min. 14” diameter
E. Position pump so the float switch
operates freely without touching
the sides of the basin.