
Ice Maker User Manual


EPSON Stylus COLOR 500
Ink Jet Printers 6/96 EPSON Stylus COLOR 500 - 11
Set the lever to the position that best suits the paper or other
media you plan to use, as shown in the following table.
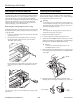
The thickness adjustment lever is in the left back corner, as
shown in the following illustration.
Change the thickness adjustment lever when you print on thick
paper (such as envelopes or labels) or if your documents smear.
Use the table below to set the lever for your media type. If a
document is smeared, set the thickness adjustment lever to the
+ position (regardless of the paper type) and print it again.
Using Special Paper and Other Media
When using special coated paper, glossy paper, transparencies,
or envelopes, keep the following in mind:
■ Make sure the printable side of the paper is face up.
■ Do not touch the printable surface of the paper; hold the
sheets by their edges. The moisture and oils on your hands
can reduce print quality.
■ Use special coated paper within one year of purchase. Use
high-quality glossy paper and transparencies within six
months.
■ Make sure the paper thickness and adjustment levers are in
the correct position for the paper you are using.
■ After printing on high-quality glossy paper or
transparencies, remove each sheet from the output tray
immediately. Make sure each sheet is dry before stacking.
■ You can print on sheets of labels in the printer; just follow
the instructions for loading plain paper.
■ Return unused sheets and envelopes to their original
package as soon as possible after you finish printing.
Unfavorable storage conditions—especially high
temperature, humidity, and direct sunlight—can damage
the media.
■ Follow any other special loading procedures identified in
the following sections.
Loading Special Papers and Transparencies
You can load up to the following number of sheets in the sheet
feeder:
■ 70 sheets of special coated paper. (If you load legal-size
special coated paper for 720 dpi, do not load it more than
halfway to the arrow on the left edge guide of the sheet
feeder.)
■ 50 sheets of transparency film with one sheet of plain paper
beneath the last transparency in the stack
■ 30 sheets of high-quality glossy paper with a sheet of plain
paper beneath the last sheet in the stack; to avoid printing
on the plain paper, print the document one page at a time.
If you load a single sheet of glossy paper, place a sheet of
plain paper beneath it and print one page at a time.
Note:
If you load multiple sheets of glossy paper, the minimum top margin
is 1.2 inches (30 mm). To print with a smaller top margin, load and
print glossy paper one sheet at a time.
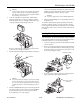
Follow these steps to load special paper or transparency film:
1. Lower the output tray at the front of the printer and slide
out the extension. If you are going to load long paper (legal
size, for example), pull up the paper support extension.
2. Insert the stack of paper into the printer and adjust the left
edge guide to the paper’s width while the lock lever is in
the down position; then set the lock lever up to secure the
left edge guide.
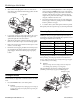
3. Remove the stack of paper and fan it. Then tap it on a flat
surface to even the edges.
4. Reinsert the stack of paper gently straight up and down,
and then rest it against the paper support. This ensures that
the paper is properly loaded in the paper path.
Paper type Paper thickness lever position
Standard paper (plain, coated,
or glossy)
Plain paper
Transparency film Plain paper
Envelopes or labels Thick paper
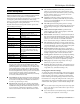
Paper type
Thickness adjustment
lever position
Standard paper (plain, coated, or glossy) 0
Transparency film 0
Envelopes or labels +
Previously smeared documents +
thickness adjustment lever