
User`s manual


Chapter 4: AMI BIOS
4-1
Chapter 4
BIOS
4-1 Introduction
This chapter describes the AMI BIOS Setup Utility for the C2SEA/C2SEE. The AMI
ROM BIOS is stored in a Flash EEPROM and can be easily updated. This chapter
describes the basic navigation of the AMI BIOS Setup Utility setup screens.
Starting BIOS Setup Utility
To enter the AMI BIOS Setup Utility screens, press the <Delete> key while the
system is booting up.
Note: In most cases, the <Delete> key is used to invoke the AMI BIOS setup screen.
There are a few cases when other keys are used, such as <F1>, <F2>, etc.
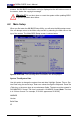
Each main BIOS menu option is described in this manual. The Main BIOS setup
menu screen has two main frames. The left frame displays all the options that can
be congured. Grayed-out options cannot be congured. Options in blue can be
congured by the user. The right frame displays the key legend. Above the key
legend is an area reserved for a text message. When an option is selected in the
left frame, it is highlighted in white. Often a text message will accompany it. (Note:
the AMI BIOS has default text messages built in. Supermicro retains the option to
include, omit, or change any of these text messages.)
The AMI BIOS Setup Utility uses a key-based navigation system called hot keys.
Most of the AMI BIOS setup utility hot keys can be used at any time during the
setup navigation process. These keys include <F1>, <F10>, <Enter>, <ESC>, arrow
keys, etc. (Note: Options printed in Bold are default settings.)
HowToChangetheCongurationData
The conguration data that determines the system parameters may be changed by
entering the AMI BIOS Setup utility. This Setup utility can be accessed by pressing
<Del> at the appropriate time during system boot.
Starting the Setup Utility
Normally, the only visible POST (Power On Self Test) routine is the memory test.
As the memory is being tested, press the <Delete> key to enter the main menu of
the AMI BIOS Setup Utility. From the main menu, you can access the other setup