
Datasheet


6-4
SUPERSERVER 5013C-MT User's Manual
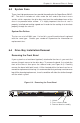
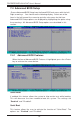
Serial ATA Drive Installation
1. Mounting a Serial ATA drive in a drive carrier
The Serial ATA drives are mounted in drive carriers to simplify their instal-
lation and removal from the chassis. These carriers also help promote
proper airflow for the Serial ATA drive bays. For this reason, even empty
carriers without Serial ATA drives installed must remain in the chassis. To
add a new Serial ATA drive, install a drive into the carrier with the printed
circuit board side toward the carrier so that the mounting holes align with
those in the carrier. Secure the drive to the carrier with six screws (see
Figure 6-4).
Accessing the Drive Bays
Serial ATA Drives: Because of their hotswap capability, you do not need to
access the inside of the chassis or power down the system to install or replace
Serial ATA drives. Proceed to the next step for instructions.
CD-ROM Drive: For installing/removing a CD-ROM drive, you will need to gain
access to the inside of the 5013C-MT by removing the top cover of the chassis.
Proceed to the "CD-ROM Drive Installation" section later in this chapter for
instructions.
Note: Only a "slim" CD-ROM drive will fit into the 5013C-MT.
Figure 6-4. Mounting a Drive in a Carrier