
User`s manual


Chapter 2: Server Installation
2-3
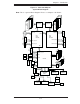
Check the SATA disk drives: Depending upon your system's confi guration, 2.
your system may have up to four SATA drives already installed. If you need
to install or remove an SATA drive, please refer to the appropriate section in
Chapter 6.
Check the airfl ow: Cooling air is provided by the chassis fan and the power 3.
supply fan. The system component layout was carefully designed to promote
suffi cient airfl ow throughout the chassis. Also note that all power and data
cables have been routed in such a way that they do not block the airfl ow
generated by the fan. Please keep this in mind when rerouting or adding/
removing cables.
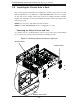
Supplying power to the system: The last thing you must do is to provide input 4.
power to the system. Plug the power cord from the power supply unit into a
high-quality power strip that offers protection from electrical noise and power
surges. It is recommended that you use an uninterruptible power supply
(UPS).
2-4 Preparing for Rack Mounting Setup
The box your chassis was shipped in should include two sets of rail assemblies,
two rail mounting brackets and the mounting screws you will need to install the
system into the rack. Please read this section in its entirety before you begin the
installation procedure outlined in the sections that follow.
Choosing a Setup Location
Leave enough clearance in front of the rack to enable you to open the front •
door completely (~25 inches).
Leave approximately 30 inches of clearance in the back of the rack to allow for
•
suffi cient airfl ow and ease in servicing.
This product is for installation only in a Restricted Access Location (dedicated
•
equipment rooms, service closets and the like).