R 24 LED COLOR TV SC-2411 R
TABLE OF CONTENTS Preparations Guide Safety Information................................................................................................................2 Important Safety Instructions.................................................................................................3 Install And Connect TV TV Bracket assemble............................................................................................................4 TV Buttons and Terminal Interface.............................
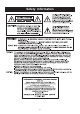
Safety Information 2
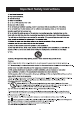
Important Safety Instructions 3
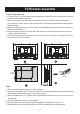
TV Bracket assemble Fix the TV on the wall 1.First,put the TV on the table smoothly and put some soft cloth on the table to avoid getting scratched the screen. 2.Use a screw driver to take off the screws which are fixed on the bottom stand (the direction of the arrow, refer to the photo1).please be careful when tating off the bottom stand). 3.Make one bracket which can fix on the wall according to the size of arrow direction of photo2 and photo3. 4.
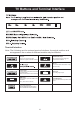
TV Buttons and Terminal Interface Terminal Interface Note: The following are the various terminal interface, the actual position and arrangement, the number of different models may be different.
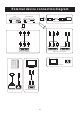
External device connection diagram DVD Set-top boxes HDMI HDMI HDMI input connection R INPUT INPUT INPUT VIDEO Y L Pb Pr VIDEO Y Pb Pr input connection AV input connection TV connection AV input connection OUTPUT R VGA input connection R L AV output connection 6 L
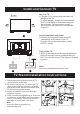
Install and Connect TV Set your TV 1.Put your TV in a place that can bear the weight of the TV. To avoid danger, please do not assemble the TV near water or extreme heat(such as a furnace, light source,or candle.) Do not block the ventilation on the back of the TV. Connect antenna and power 2.Connect the antenna cable to the RF connection on the back of the TV. Plug the TV into the wall power outlet( AC120~ 60Hz). 3 Turn on the TV 3.While in standby mode the power indication light will be red.
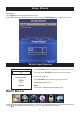
Setup Wizard 8
Setup Wizard Auto Scan Press button to select the antenna type. Press ▼ / ▲ button to select go to next step and press ENTER/> button to start auto scan. Select Input Source Source Select TV AV Component HDMI PC Media Press SOURCE button to display the input source list, Press ▼ / ▲ or SOURCE button to select the input source you want to, Press ENTER button to enter the input source, Press EXIT button to quit. Note: Picture for reference purposes only.
TV Main Menu Operation Picture Menu Press M ENU to enter the main menu, Press button to select. Press ENTER / ▼ to enter. Press M ENU again to exit or back to parent menu. Press ▼ / ▲ button to select among Picture Mode /Brightness/ Contra st / Color / Tint / Sharpness / Color Temperature/ Advanced Settings. Press ENTER / ▼ to enter. Press button to adjust. Press M ENU again or back to parent menu. Sound Menu Press M ENU to enter the main menu, Press button to select.
TV Time Menu Press M ENU to enter the main menu, Press button to select. Press ENTER / ▼ to enter. Press M ENU again to exit or back to parent menu. Press ▼ / ▲ button to select among Sleep Timer / Time Zone / Daylight Saving Time / Time Format / Auto Clock / Clock. Press ENTER / ▼ to enter. Press button to adjust. Press M ENU again or back to parent menu.
TV 8-9.
TV 13
TV Lock Menu Press M ENU to enter the main menu,Press button to select . Press ENTER / ▼ to enter. Press M ENU again to exit or back to parent menu. Press ▼ / ▲ button to select among Change Password / System Lock / Input Block / US Rating / Canada Rating /RRT Setting / Reset RRT Press ENTER / ▼ to enter. Press button to adjust. Press M ENU again or back to parent menu. Hotel menu Enter your 4-digital password. Default password is 0000,and if forget what you set, please call the service center.
TV Channel Menu Press M ENU to enter the main menu, Press button to select. Press ENTER / ▼ to enter. Press M ENU again to exit or back to parent menu. Press ▼ / ▲ button to select among Air/C able / Auto Scan / Favorite / channe list / Show/Hide / Channel Number / Channel Label . Press ENTER / ▼ to enter. Press button to adjust. Press M ENU again or back to parent menu. PC PC Menu Press ▼ / ▲ button to select among H-Pos / V-Pos / Clock / Phase / Auto. Press ENTER / ▼ to enter.
16
8-9.
18
19
SC-2411 1366X768 AC 100-240V~ 50/60Hz 2*5W 31W Accessories User manual, Remote control, Batteries2xAAA 20
Remote Controller Arrow Keys TTS/AD 23 24 26 25 R TTS/AD 23. 24. 25. 26. TTS/AD function Press to skip forward in the storage mode or USB mode.
22