SUPROCK TECHNOLOGIES WMR+ MANUAL Suprock Technologies, LLC Phone: 603-686-9954 Email: inquiries@suprocktech.
Table of Contents FCC Warning.................................................................................................................................................. 3 Introduction .................................................................................................................................................. 4 Connecting your WMR to PC/Acheron Software .......................................................................................... 7 Rescan USB..........................
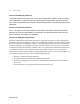
FCC Warning FCC Part 15.19 Warning StatementTHIS DEVICE COMPLIES WITH PART 15 OF THE FCC RULES. OPERATION IS SUBJECT TO THE FOLLOWING TWO CONDITIONS: (1) THIS DEVICE MAY NOT CAUSE HARMFUL INTERFERENCE, AND (2) THIS DEVICE MUST ACCEPT ANY INTERFERENCE RECEIVED, INCLUDING INTERFERENCE THAT MAY CAUSE UNDESIRED OPERATION. FCC Part 15.21 Warning StatementNOTE: THE GRANTEE IS NOT RESPONSIBLE FOR ANY CHANGES OR MODIFICATIONS NOT EXPRESSLY APPROVED BY THE PARTY RESPONSIBLE FOR COMPLIANCE.
Introduction The WMR is the gateway that our Asphodel protocol based wireless and coaxial based devices use to connect to a PC or LAN network, including, but not limited to: Digital Coaxial Vibration Sensor in wired or wireless mode Motes Digital Coaxial Strain Gages Torque monitoring systems Microtelemetry based devices The WMR+ is designed for smaller systems of up to 4 devices.
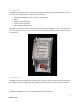
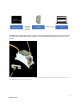
The WMRs have been designed with a convenient dual-purpose SMA connection as the sensor interface. It accepts either coaxial cable for wired devices, or a standard SMA 2.4Ghz whip antenna for wireless devices. Figure 2 Example coax vibration sensor connected to WMR in wired configuration; both power and data to and from sensor are transmitted via a single SMA coaxial connection.
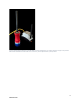
Figure 3 Example wireless vibration mote with WMR in wireless configuration. For wireless connection simply screw provided SMA antenna to WMR and connect USB to PC. Pictures may not be representative of actual product.
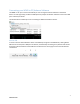
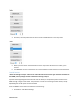
Connecting your WMR to PC/Acheron Software The WMR+ is set up to connect automatically to a PC running the Acheron Software. If the device doesn’t connect right away, the Rescan USB option will prompt the Acheron software to rescan the USB ports and find your device. The devices Menu includes options for connecting to USB and TCP device versions.
Connecting Devices The WMR is used to connect Wireless or Coax devices to the Acheron software, the settings below are for initial setup of wireless and coaxial devices. Once these settings are in effect, it is not necessary to go into the menu to change them as long as the same type of device is being connected to the WMR. Wireless Devices *Once the settings in steps 1 and 2 are set and confirmed correct for the type of device connected to the WMR, one may simply connect to the device starting at step 3.
4. Click Scan, this will provide the user with a list of available devices in the drop menu. 5. When you have chosen the desired device in the drop menu above the Scan button, press connect. 6. The WMR will connect to the device and a new tab will be created in Acheron with that device. Coaxial Devices *Once the settings in steps 1 and 2 are set and confirmed correct for the type of device connected to the WMR, one may simply connect to the device starting at step 3.
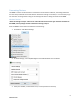
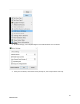
2. In device settings, ensure PA/LNA bypass and enable DC Power are unchecked. 3. If they are unchecked, check them. If they already are, exit and proceed to next step.
4. Click Scan, this will provide the user with a list of available devices in the drop menu. 5. When you have chosen the desired device in the drop menu above the Scan button, press connect. 6. The WMR will connect to the device and a new tab will be created in Acheron with that device. Basic WMR Controls The WMR basic controls are related to identifying and connecting with remote devices. The WMR can scan and connect to remote devices it sees in the environment.
On the right side of the program there is a button named menu, it contains important device and firmware update settings for different devices. Rename device (set user tag) If the PC you are using is monitoring more than one device, it can be helpful to set easily identifiable tags on the devices being used. Procedure involves 3 quick steps: 1. In the top right corner, click “Menu” then “Set User Tag 1” from the drop-down. 2. In the “New Tag” window, type in desired name.
3. If you are satisfied with the name entered, click yes to save to NVM and reset device. Confirm that the device name you entered appears in the device tab. If not, please repeat steps 1-3. Your new user tag will be displayed as the device tab for easier reference. Update Firmware Suprock tech sensor firmware gets updated from time to time to improve functionality or adding new features. Updating firmware is a simple affair and can be done directly from the program.
1. Click update firmware – Latest Stable 2. 3. 4. 5. The program will check for new firmware If new firmware is found, the program will download the firmware and install Once installed, your device will reboot with new firmware. This is normal. If device has latest firmware, Acheron will inform the user that latest firmware is already present Advanced Actions The Advanced Actions section is for recovery/diagnostics and should only be used under the direction of Suprock Tech personnel.
PA/LNA bypass and Output DC voltage and enabled for Coax devices and disabled for wireless devices, respectively. Auto-connecting (Pairing) a WMR to a WM The WMR has the ability to “pair” with a WM to automatically connect to the device. This option can be exercised from the WMR menu under “Device Settings”. Refer to the previous section for WMR setting information. Typically, the Auto Connect option is used after a hardware setup has been established by the installer.
Advanced WM Device Management The WMR also contains options for the user to manage the WM device. Connect (No Streaming) There is the option to connect to a WM device without streaming. This option is a development option, but also can be used in scenarios of connecting to a WM when power supply is not ideal, to save the power consumption of the module while internal settings are modified.