
Owner's manual


5
UNPACKING INSTRUCTIONS
ASSEMBLY REQUIREMENTS
Parts Supplied
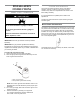
View of Unassembled Grill Parts
Using a utility knife, cut the tape to open the top aps of the 1.
carton. .
Remove the Assembly/ Installation Instructions and Use and 2.
Care Guide.
Remove the cardboard panel on the top. Remove the corner 3.
supports on the top of the inside of the carton. Remove the
foam from the two sides.
Remove the bread warmer and the rotisserie spit 4.
Remove the foam packaging from the top and sides of the grill 5.
head assembly.
Remove the four corner supports from the inside of the carton. 6.
Using two or more people, remove grill head assembly from 7.
carton with the foam underneath the grill head assembly.
Remove the plastic bag from the grill head.8.
Remove screws (with hang tags attached) located on either 9.
side of the grill head.
Excessive Weight Hazard
Use two or more people to move and install grill.
Failure to do so can result in back or other injury.
Open hood remove and open the box which contains grill 10.
component parts. Remove all packaging materials and set
component parts aside.
Remove wrapped avor grids from top of box. Open box and 11.
remove contents and set aside.
Dispose of/recycle all packaging materials.12.
A
B
C
D
E
F
G
H
I
A. Hood assembly
B. Back trim
C. Left trim
D. Right trim
E. Bread warming rack
F. Grates
G. Flavor grids
H. Door assembly
Not shown:
Package of small components