USE AND CARE MANUAL For Model FM35PHLP Patio Heater Stop! Missing a part? DO NOT RETURN PRODUCT TO STOREFOR YOUR SAFETY: 1. Read this Manual before attempting to assemble or operate your heater. 2. Follow safety instructions. 3. Check for leaks according to the directions in this Manual before operating your heater, even if purchasing an assembled heater. 4. Keep this Manual for future reference. 5. Contact 1-800-229-5647 should you need assembly assistance or have any questions.
Table of Contents General Safety Instructions............................................................................... 3-5 Components & Hardware................................................................................. 6 Assembly Process............................................................................................ 7-8 Gas Requirement............................................................................................. 8 Pre-Operation Leak Testing....................
General Safety Instructions IMPORTANT SAFETY INFORMATION - This manual contains important information about the assembly, operation and maintenance of this patio heater. General safety information is presented in these first few pages and is also located throughout the manual. - Keep this manual for future reference and to educate new users of this product. This manual should be read in conjunction with the labeling on the product.
General Safety Instructions ! ▲ DANGER ! ▲ Improper installation, adjustment, alteration, service or maintenance can cause injury or property damage. Read the installation, operating and maintenance instructions thoroughly before installing or servicing this equipment. ! ▲ DO NOT use the heater in garages, breezeways, sheds or any enclosed area. Never operate the heater in enclosed areas as this could lead to a carbon monoxide buildup, which could result in injury or death.
General Safety Instructions ! ▲ DANGER ! ▲ CARBON MONOXIDE HAZARD - This heater is a combustion appliance. All combustion appliances produce carbon monoxide (CO) during the combustion process. This product is designed to produce extremely minute, nonhazardous amounts of CO if used and maintained in accordance with all warnings and instructions. Do not block air flow into or out of the heater.
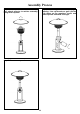
Components & Hardware 1 10 2 11 3 12 4 13 5 14 6 1. Cap nuts (3 pcs) 2. Reflector 3. Washer 4. Emitter 5. Wire guard 6. Access panel 7. Base 8. Cast iron ring weight 9. M6x20 bolts (4 pcs) 10. 3/16 Stainless bolts (4 pcs) and washers (4 pcs) 11. Post with burner assembly 12. 3/16 Stainless bolts(4 pcs) 13. M5x10 bolt and washer (1pc) 14.
Assembly Process Step 1 - Attach post onto housing, using four bolts and washers. Keep the access panel open. Step 2- Attach weight to base, using four bolts. Step 3 - Attach emmitter assembly to post using four bolts and washers. Step 4 - Insert ends of wire guard into holes in the post flange.
Assembly Process Step 5 - Place washers onto emitter bolts, then attach reflector to emitter assembly, using three cap nuts. Step 6 - Rotate regulator toward opening in housing. Line up threads on gas cylinder with those on the regulator. Insert and rotate cylinder clockwise until tight. Step 7- Close access panel.
Gas Requirements L.P. GAS INSTALLATION Gas Heaters that are set to operate with L.P. gas come with a high capacity hose and regulator assembly. (Note: Only use the pressure regulator and hose assembly supplied with the heater or a replacement pressure regulator and hose assemblies ). This assembly is designed to connect directly to a standard 1 lb. L.P. cylinder. L.P. Cylinders are not included with the heater. L.P. Cylinders they can be purchased separately at an independent dealer. L.P.
Pre-Operation Leak Testing GENERAL INFORMATION Although all gas connections on the heater are leak tested prior to shipment, a complete gas tightness check must be performed at the installation site due to possible shifting during shipment, installation or excessive pressure unknowingly being applied to the unit. Periodically check the whole system for leaks and immediately check the system if the smell of gas is detected. BEFORE TESTING 1. Do not smoke while leak testing. 2. Extinguish all open flames. 3.
Operation Do not attempt to "Light" the Heater if the odor of gas present!! BEFORE TURNING GAS SUPPLY ON: 1. Your heater was designed and approved for outdoor use only. Do NOT use it inside a building, garage, or any other enclosed area. 2. Make sure surrounding areas are free of combustible materials, gasoline,and other flammable vapors or liquids. 3. Ensure that there is no obstruction to air ventilation. 4. Be sure all gas connections are tight and there are no leaks. 5.
Operation Note: If pilot fails to remain lit, all valves should be closed and wait at least 5 minutes before attempting to light. If you experience any ignition problem please consult the "Troubleshooting" section in this manual. Caution: Avoid inhaling fumes emitted from the heater during initial use. Smoke and odor from the burning of oils used in manufacturing can cause some smoke and odor. Both smoke and odor will dissipate after approximately 30 minutes.The heater should NOT produce thick black smoke.
Care and Maintenance To enjoy years of outstanding performance from your heater, make sure you perform the following maintenance activities on a regular basis: Keep exterior surface clean. Use warm soapy water for cleaning. Never use flammable or corrosive cleaning agents. While cleaning your unit, be sure to keep the area around the burner and pilot assembly dry at all times. Do not submerge the control valve assembly. If the gas control is submerged in water, DO NOT use it. It must be replaceed.
Troubleshooting BEFORE CALLING CUSTOMER SERVICE If the heater does not function properly, use the following checklist. If the problem is: And this condition exists: Cylinder valve is closed Then do this: Open valve Blockage in orifice or pilot tube Clean or replace orifice or pilot tube Pilot won't light Air in gas line NOTE: Heater operates at reduced efficiency below 40 and 5 .
LIMITED WARRANTY Sure Heat Mfg warrants that the components of this appliance are warranted free from defects in material and workmanship for one year from the date of purchase. Sure Heat Mfg. at its option, will repair or replace this product or any component of the product found to be defective during the warranty period. Replacement will be made with a new manufactured product or component. if the product is no longer available, replacement may be made with a similar product of equal value.