WARNING Improper installation, adjustment, alteration, service or maintenance can cause injury or property damage. Read the installation, operation and maintenance instructions thoroughly before installing or servicing this equipment. Modular Island Grill - Main Grill Module DANGER Failure to follow these insructions could result in fire or explosion that could cause property damage, personal injury or death. DANGER DO NOT use gas grill for indoor cooking or heating.
Grill Operation 1-2-3 Before Grilling. Step 1 Step 2 Step 3 Keep your grill a safe distance away from your property.* Always Perform a Leak Test.* Keep children away from the grill. During Grilling. (To avoid tripping safety valves, please follow these instructions carefully!) Step 1 Step 2 Step 3 First open lid and turn gas tank on slowly. Turn only one knob on at a time when lighting the grill. Use protective gloves when grill gets hot. After Grilling.
Table of Contents For Your Safety....................................................................................................4 Grill Features.......................................................................................................6 Grill Assembly......................................................................................................7 Gas Requirements..............................................................................................
For Your Safety Congratulations on your new barbecue grill purchase! You've made the right choice. In this manual, you will find assembly instructions, suggestions for grilling and helpful hints, as well as guidelines for the safe operations, proper care and use of your grill. Our expert staff strives to provide you with an easy to assemble product.
Safe Locations For Use Of This Outdoor Grill ! DANGER ▲ Never use this outdoor grill inside any building, garage, shed or breeze way, or inside any boat, trailer or recreational vehicle, to prevent a possible fire and to prevent the possibility of carbon monoxide poisoning or asphyxiation. ! WARNINGS ▲ Do not use this appliance under overhead combustible surface or covered area (e.g., awnings, umbrellas, porches or gazeboes).
Grill Features 1 8 9 2 10 3 11 12 4 13 5 14 6 15 7 1. Roll top grill hood 9. Bread warming rack 2. Rotisserie kit 10. Rear Infrared burner 3. Grilling/cooking surface 11. Inside Light 4. Control knob: Rear infrared burner 12. Granite working surface 5. Control knob: Main burner 13. Light switch 6. Control knob: Searing burner 14. Push button igniter 7. Grill cart with roll out LP tank tray 15. Tilt out trash can 8.
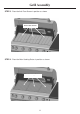
Grill Assembly STEP 1 - Place the Searing Burner Heat Shield in position as shown. Searing Burner Heat Shield STEP 2 - Place the Flavor Grids in position as shown.
Grill Assembly STEP 3 - Place the Anti-Flare Screen in position as shown. Anti-Flare Screen STEP 4 - Place the Main Cooking Grates in position as shown.
Grill Assembly STEP 5 - Place the Bread Warming Rack in position as shown. Bread Warming Rack STEP 6 - Unscrew the igniter push button cap and feed the "AA" battery into the igniter module with the Positive (+) end facing out. Screw the cap back into place on the igniter module.
Grill Assembly STEP 7 - Remove any labels and additional packing material from the grill. Be sure to remove all foam packing material out of all areas. Congratulations! Your grill is now fully assembled. Please proceed and read the Gas Requirements and Operation portion of the Use and Care Manual before attempting to hook up the LP gas cylinder or operating your grill.
Gas Requirements GENERAL INFORMATION Never attach an unregulated gas line to the appliance. Connection to an unregulated gas line can cause excessive heat or fire. Verify the type of gas supply to be used, either Natural Gas (N.G.) or Liquid Propane (L.P.), and make sure the serial plate agrees with that of the supply. Conversion kits are available separately for an additional cost which will enable you to convert your grill from L.P. to N.G. or to convert your grill from N.G. to L.P.
Gas Requirements L.P. GAS INSTALLATION Perfect Flame™ Gas Grills that are set to operate with L.P. gas come with a high capacity hose and regulator assembly. (Note: Only use the pressure regulator and hose assembly supplied with the grill or a replacement pressure regulator and hose assemblies specified by the manufacture). This assembly is designed to connect directly to a standard 20 lb. L.P. cylinder. L.P. Cylinders are not included with the grill. L.P.
Pre Operation Leak Testing GENERAL INFORMATION Although all gas connections on the grill are leak tested prior to shipment, a complete gas tightness check must be performed at the installation site due to possible shifting during shipment, installation or excessive pressure unknowingly being applied to the unit. Periodically check the whole system for leaks and immediately check the system if the smell of gas is detected. BEFORE TESTING 1. Do not smoke while leak testing. 2. Extinguish all open flames. 3.
Grill Location Do not use the grill in garages, breezeways, sheds or any enclosed area. Never operate the grill ! WARNING in enclosed areas as this could lead to a carbon monoxide buildup, which could result in injury or ▲ death. Place the grill on a level surface. Avoid moving the grill while it is in operation. NOTE: The grill will operate best if it is not facing directly into the wind.
Lighting the Grill Do not attempt to "Light" the grill if the odor of gas present!! BEFORE AND AFTER LIGHTING 1. Ensure your grill is located on a level surface. 2. Keep the gas grill area clean and free from combustion materials, gasoline, and other flammable vapors and liquids. 3. Ensure nothing is obstructing the flow of combustion and ventilation air. 4. Ensure the ventilation of the cylinder enclosure are free and clear of debris. 5. Visually check burner flames.
Using the Rotisserie Burner The grill rotisserie system is designed to cook items from the back using infrared heat. The rotisserie burner is an infrared type which provides intense searing radiant heat. Preferred by chefs over other cooking methods, this intense heat sears in the natural juices and nutrients found in quality cuts of meats. Remove the warming rack from the grill when using the rotisserie to prevent warping from the intense heat of the infrared unit.
Rotisserie Lighting ROTISSERIE LIGHTING Open the lid. Push and turn the control knob for the rotisserie counter-clockwise to the “HIGH” position. Continue push the knob and wait 5 seconds. You’ll hear a snapping sound. If the burner does not light in 4 seconds, turn the control knob to "OFF" and wait 5 minutes before trying again. Once lit, turn the control knob to the desired setting. (See Fig. 27) Fig.
Bottom Infrared Cooking Tips Even with an expert chef, infrared cooking can be quite a challenge. If you follow these simple suggestions, you will soon be making juicier, more savory foods than you have ever experienced before. In general, foods will cook in less time then they would take an ordinary grill. If you rotate food regularly (about every 2 minutes), extreme charring is avoided. Infrared grills work by producing concentrated heat which quickly sears the meat.
Care and Maintenance ! WARNING ▲ HOOD SHOULD NOT BE CLOSED FOR LONG PERIODS WHEN INFRARED BURNER IS IN USE. INFRARED BURNER CLEANING After each use, it is necessary to burn the bottom infrared burner with the hood open for at least five minutes to vaporize any food drippings or particles. Failure to perform this step will damage the burner. It may occasionally be necessary to brush, blow, or vacuum accumulated ash from the burner surface. Do so carefully and only when the burner is cool.
Care and Maintenance GRANITE MAINTENANCE Outdoors can be very harsh on the granite of your grill. There are things visible that can affect the granite like dirt and pollen and things not visible like UV Rays.
Care and Maintenance STAINLESS STEEL After initial usage, areas of the grill may discolor from the intense heat given off by the burners, this is normal. Purchase a mild stainless steel cleaner and rub in the direction of the grain of the metal. Specks of grease can gather on the surface of the stainless steel and bake on to the surface and give a worn appearance. For removal, use a non-abrasive oven cleaner in conjunction with a stainless cleaner. NOTE: Always scrub in the direction of the grain.
Troubleshooting Guide Problem Possible Solution Grill will not light 1. Push the igniter button and check for sparks. 2. If there is a spark, check to make sure gas is supplied to the burner. a. Purge the line of any trapped air. b. Check to see if you can match-light the burner. c. Check to see that the other burners operate. d. Visually check the electrode and wire while pushing the igniter button. If a spark occurs anywhere but the ignitor trip, the ignitor must be replaced.
Troubleshooting Guide Problem Low heat, LP gas Possible Solution The propane regulator assembly incorporates an excess flow device designed to supply the grill with sufficient gas flow under normal conditions, yet control excess gas flow. Rapid changes in pressure can trgger the excess flow device, providing a low flame and low temperature. If the tank valve is turned open to allow gas flow while a burner valve is open, the surge of pressure will cause the device to activate.