
Installation Guide


SURESILL™ WATER MANAGEMENT GUIDE
FOR WINDOWS AND DOORS
*1
© Copyright 2004 – 2010-2016 SureSill, Ltd. All rights
reserved.
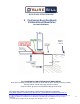
STEP 7
Install waterproofing
HEADFLASH™ ASSEMBLY
Measure the exterior width of the window/door, including any brick
mold, and cut the DrainShield
TM
to that measurement. Check fit with
end caps before gluing. Remove any labels from contact surfaces.
Apply Wet-R-Dry
TM
PVC cement to contact
surfaces on both End Caps and
DrainShield
TM
(shaded area).
Slide End Caps fully in
place. Wipe excess PVC
cement. Hold glued parts
for 1 min for PVC cement
to dry.
Weep Holes
SureSill
TM
Sloped Sill Pan™
Channel Plate
End Cap
End Cap
THE SURE
LEVEL OF
PROTECTION
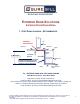
SLOPED SILL PAN™ ASSEMBLY
Apply Wet-R-Dry
TM
PVC cement to contact
surfaces on both End Caps and Channel Plate
(shaded area).
Slide End Caps fully in
place. Wipe off excess
PVC cement.
Page 1 of 3
SAF – Henkel/OSI BUTYLFLASH; DuPont™ FlexWrap™, DuPont™ StraightFlash™, DuPont™ StraighhtFlash™ VF
SEALANT – Henkel/OSI® QUAD®MAX™; LOW EXPANSION FOAM –QUAD®FOAM by Henkel/OSI®
RECOMMENDED
PRODUCTS
Cut the channel plate ¼” smaller than the rough opening. Check
the fit with end caps before gluing them. See Sill Pan Assembly
DETAIL on page 3.