
Installation Guide


STEP 4 DETAIL
To prevent air and water infiltration seal
between the back of the sill pan and the back
of the jamb/sill and between the jamb and the
rough opening.
Installation Details
SureSill™ Water Management Guide
*1
SureSill, HeadFlash and HeadFlash-Flex are Patent Pending Technologies made only by Suresill, Ltd. SureSill
TM
, HeadFlash
TM
, HeadFlash-Flex
TM
, Wet-R-Dry
TM
, and DrainShield
TM
, are the exclusive trademarks of SureSill, Ltd.
© Copyright 2004 – 2016 SureSill, Ltd. All rights reserved. WMG H 105 20071201R Page 3 of 3
.
STEP 4
Apply S
S
S
u
u
u
r
r
r
e
e
e
S
S
S
i
i
i
l
l
l
l
l
l
B
B
B
o
o
o
n
n
n
d
d
d
TM
2
2
2
0
0
0
0
0
0
0
0
0
sealant at
jambs and head.
STEP 7
Install waterproofing
in shingle-fashion,
including over jamb
flashing and head
flashing.
Provide free drainage
for SureSill.
NOTE *1: Recommended rough opening
size is ¾” larger then the window/door
frame. This is a generic Water
Management Guide and it is not
intended to alter Window and Door
Manufacturer’s (OEM)
recommendations. Please notify SureSill
prior to installation if any steps are
contradictory to OEM’s installation
instructions. SureSill recommends that
OEM approves the rough opening size,
the installation method and all products
used prior to installation.
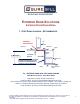
SEALING AGAINST AIR AND WATER INFILTRATION
FRONT SIDE
BACK SIDE
SILL PAN ASSEMBLY
DETAIL REMOVE LABELS FROM CONTACT SURFACES.
AS PART OF THE SILL PAN ASSEMBLY APPLY SEALANT
ALONG THE EDGE OF END CAP. WITHOUT PROPER
ASSEMBLY THE SILL PAN WILL LEAK. SURESILL™ IFS™
SHOULD BE INSTALLED AT THE SAME TIME A WINDOW OR
DOOR IS BEING INSTALLED.
1. APPLY CONTINUOUS BEAD OF
SEALANT BETWEEN THE BACK
EDGE OF THE SILL PAN AND THE
SILL OR JAMB, AND BETWEEN THE
BACK EDGE OF END CAPS AND
THE JAMB TO PREVENT ANY AIR
AND WATER INFILTRATION.
2. APPLY CONTINUOUS LOW
EXPANSION FOAM OR SEALANT
BETWEEN THE JAMB AND THE
ROUGH OPENING ON THREE SIDES
(TWO VERTICAL SIDES AND ON
TOP) TO PREVENT AIR AND WATER
INFILTRATION.
NOTE *2 : THE BEAD OF SEALANT
SHOULD BE CONTINUOUS AND TOOLED
FLAT. SOME SEALANTS MAY HAVE
ADVERSE REACTION WITH CERTAIN SELF
ADHERING FLASHING PRODUCTS.
PLEASE VERIFY COMPATIBILITY WITH
THE MANUFACTURER. THE FOAM AND
THE SEALANT SHOULD OVERLAP AND
HAVE AN AIR-TIGHT JOINT.
DOOR OR
WINDOW
ROUGH
OPENING
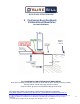
Sealing the Sill Pan to WRB
STEP 1 DETAIL - Seal the front lip of the Sill Pan to WRB or to
Drainage Skirt. Seal between the sill pan and the rough opening
by applying sealant on the bottom of the rough opening and 6”
on the sides as indicated. This should provide a barrier against
both moisture and air infiltration between the sill pan and the
rough opening. Use 5/8” thick bead of sealant.
6”