
Use and Care Manual


1
INSTALLATION INSTRUCTIONS
SELF-ADHESIVE WALL COVERING
Read all instructions carefully prior to starting installation.
Always inspect the self-adhesive tiles upon opening the box,
to check for defects.
Put the tiles in the room where you plan to install them
(at least 6 hours prior), so they acclimate to the temperature
and humidity. Place them horizontally on a flat surface.
The temperature in the room where the tiles will be installed
must be between 50 °F/10 °C and 82 °F/28 °C.
If you plan to ax the self-adhesive tiles on rough or porous
walls, or if you have any doubts about their adhesion, we
recommend first installing three tiles and letting the adhesive
dry for 24 hours to validate.
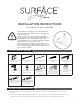
1. TOOLS & MATERIALS REQUIRED
Measuring tape Spirit level Pencil Utility knife Caulking gun
Drill
Bi-metal hole saws
Drywall saw
or oscillating saw
Paint brush and roller
(if the surface is porous
and needs to be sealed)
Sealer/primer
(for porous walls)
Construction adhesive
Bathroom silicone sealant
(for shower
or bath installation)
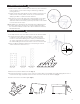
2. BEFORE STARTING INSTALLATION
2.1 Check that all the tiles in the dierent boxes are the same color and have the same batch number, to ensure a
uniform tone.
2.2 The tiles will have slight shade and pattern variations for a natural look. It is recommended that you mix tiles from
the dierent boxes and lay them out in the order you plan to install them prior to starting the installation.