
Manual

Axess Quick Start Guide Page 1
Connections
1. Connect Network. The Axess supports 10/100 Ethernet using the cable supplied, or
other suitable unshielded twisted pair (Cat 5) cabling.
2. Connect Powered Equipment. Connect the devices to be powered On and Off to the
8 receptacles located on the rear panel. If the connected equipment has a Power
switch, leave it in the On position to allow the Axess to control the power.
IMPORTANT: Ensure that the total combined load of all controlled devices does not
exceed 15/20 Amps (SX-AX15/SX-AX20).
3. Connect Serial Port (Optional). The Axess has a 9 pin D subminiature connector for
RS-232 serial control. The connector is configured as DCE for direct connection to a
laptop or other terminal device. Default serial parameters are 115,200 bps, 8 data, no
parity, 1 stop bit (115200,8,n,1).
4. Connect Power Mains. Connect power to the unit by plugging the power cord into a
120V AC, 15 (20) amp wall or floor receptacle. Do not plug the unit into a re-locatable
power tap.
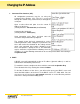
Web Browser Access
Factory Default IP Address
Factory Default Security
Credentials
192.168.0.254
Role
Username
Password
Administrator
admin
admin
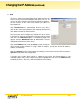
To access the Axess from the default IP Address, the PC must be on the same local network
(IP address of 192.168.0.nnn). If it is not, change the IP address using one of the methods
described below.
After pointing a web browser to the IP address of the Axess, enter the Administrator Username
and Password to access the power control.