Hardware Installation Guide SX-AX15 SX-AX20 Web-Enabled Power Conditioning and Energy Management System For Axess Firmware Version Q110630.286 and SCU Version Q110630G.127 SurgeX • 517 North Industrial Drive, Zebulon, NC 27597 Customer Service: 800-645-9721 • Technical Support: 800-645-9721 • Fax: 919-269-0454 • www.surgex.
Table of Contents I. INTRODUCTION 3 II. INITIAL SET-UP SETUP AND CONTROL UTILITY (SCU) COMMAND LINE INTERFACE (CLI) SETTING THE IP ADDRESS 5 5 5 6 III. INSTALLATION 120 VOLT CONNECTIONS ETHERNET CONNECTIONS RS232 (SERIAL) PORT CONNECTION DIAL LINE EXPANSION 9 9 9 9 9 9 IV. LED INDICATORS 10 V. WEB SERVER HEADER CONTROL STATUS DEVICE VIEW OUTLET STATUS GROUP VIEW GLOBAL VIEW AUTOPING VIEW 10 10 11 11 11 12 12 12 13 VI.
Table of Contents VIII. EMAIL NOTIFICATION 29 IX. SNMP 30 X. FIRMWARE UPGRADES 30 XI. FRONT PANEL RESET BUTTON 30 XII. SETUP AND CONTROL UTILITY (SCU) 31 XIII. COMPLIANCE STATEMENTS 32 XIV.
I. Introduction The SurgeX® Axess SX-AX15/SX-AX20 is a single rack-space, 120V, 15/20 Amp, AC power conditioner that can be controlled over a network or the internet. The Axess incorporates SurgeX Advanced Series Mode® power conditioning and surge elimination, as well as SurgeX Impedance Tolerant® EMI/RFI filtering. The simple web server structure allows basic control of the outlets (and groups of outlets) and viewing of status information all from the Device View page.
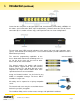
I. Introduction (continued) Located on the rear panel are the input power cord, circuit breaker (15A or 20A), 8 NEMA 5-15 AC outlets, Serial connection (DCE, 9 pin D-subminiature), Network connection (RJ-45), Phone connection (RJ-11; modem versions only), and Expansion Ports for cluster configurations. The two front panel LEDs provide indication of AC power (red) and surge protection status (green).
II. Initial Set-Up Setup and Control Utility (SCU) 1. The Axess Setup and Control Utility (SCU) utility provides the easiest means to find and configure your Axess for use. The SCU can: 2. Automatically discover multiple Axess units on a local network. 3. Add additional Axess units not on the local network. 4. Download existing configurations from installed Axess units. 5. Save existing configurations for later use or as backup. 6. Open saved configurations for change management. 7.
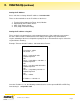
II. Initial Set-Up (continued) Setting the IP Address Axess units have a factory default IP address of 192.168.0.254. There are four methods to set the IP address of the Axess: 1. 2. 3. 4. Terminal Client software via Telnet, Serial, Modem. Automatically from a DHCP Server ARP / Ping (factory default) SCU (Setup and Control Utility) Setting the IP address using CLI These are the basic commands to set the network parameters.
II. Initial Set-Up (continued) Setting the IP address from a DHCP Server A DHCP server will automatically assign an IP address (dynamic address) as well as Subnet Mask and Gateway to the Axess. To enable this feature, configure the Axess with the command set ipmode dhcp Then reboot the Axess by entering the command reboot To find the IP address of the Axess, query your DHCP server and locate the MAC address of the Axess in the DHCP server’s IP / MAC table.
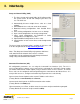
II. Initial Set-Up (continued) Setting the IP address using the SCU To access the Axess with the SCU from the default IP Address, the PC must be on the same local network (IP address of 192.168.0.nnn). Click File/Discover to automatically discover any Axess units on the same local network as the computer. Discovered units will be listed in the Select list box. Next select the unit to configure by clicking once on its name in the list box.
III. Installation The SurgeX Axess is designed to be installed in a 19 inch equipment rack and requires one unit (1-U) of rack space. Use the screws provided to secure the removable rack brackets to the Axess. Next, use the four thumbscrews to secure the rack ears to the rack rails. Connect power to the unit by plugging the cord into a 120V AC, 15/20 Amp wall or floor receptacle. Do not plug the unit into a relocatable power tap. 120 Volt Connections The Axess has a total of 8 receptacles.
IV. LED Indicators There are two LED indicators located on the front panel. Their function is as follows: Self Test (Green): Power (Red): When illuminated, the surge suppression circuitry is functioning correctly. When illuminated, the Axess is connected to a live wall or floor outlet. V. Web Server The Axess web interface provides the easiest means of operating the outlets and monitoring the current status of the units. One or more outlets can be simultaneously controlled with a few mouse clicks.
V. Web Server (continued) Control The Control panel provides the control buttons to change the status of one or more outlets. Once one or more outlets have been selected, click on the On, Off, or Cycle button. Cycle will perform a timed change in outlet state; either Reboot (On-Off-On), or Cycle (Off-On-Off), depending on the current state of the outlet. The Cycle timer box allows specification of the time, in seconds, of all cycle or reboot operations. Entries of 1 to 99 seconds are valid.
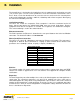
V. Web Server (continued) Outlet Status Outlet Status is indicated by a colored text box. The color indicates the current status of the outlet, and the text indicates the function being performed. High current and high voltage alarms are highlighted in red; low current and low voltage alarms are highlighted in yellow. Group View The Group View displays the status of a single group. Groups are two or more outlets linked together for simultaneous control.
V. Web Server (continued) AutoPing View The AutoPing View displays the 16 AutoPing channels, their programmed action, and current status. The status column displays the current status of each AutoPing. The numeric column displays the number of times each AutoPing has been triggered. A numeric counter other than 0, with the status reporting OK, indicates that there have been previous AutoPing triggers but that the current status is OK.
VI. Command Line Interface (CLI) Protocol The Command Line Interface provides complete setup of all functions of the Axess. The CLI may be accessed either via the network interface using Telnet, or via the serial port or modem (for models with internal modem option) using a terminal emulator program. Some commands of the CLI require administrative rights; these are indicated in the following tables.
VI. Command Line Interface (CLI) Protocol (continued) User Commands Command Description Admin get users Return a list of all current users. Yes get user Returns the selected user’s details. Yes add user Add a user to the root Axess user table. 16 users maximum. 20 Characters max. Yes Fact Def Note: the new user’s password will default to the same as the username. Users default to no rights to any outlets. Add user rights to outlets and groups.
VI. Command Line Interface (CLI) Protocol (continued) Device Commands Command Description Admin Fact Def get devices get all This command displays a list of connected devices and their current status. No get device <#1‐#16 | devname> Get device information. Displays the device name and all outlet names and current status. Yes Axess set device <#1‐#16 > name Set the name of the selected Axess. 20 characters max. get cycle Get or set the cycle time in seconds.
VI. Command Line Interface (CLI) Protocol (continued) Device Commands (continued) Command Description Admin get voltage Get the measured line voltage of the local Axess. Yes get device <#1‐#16 | devname> voltage Get the measured line voltage of the selected Axess. Yes set main a vcalibration Set the voltmeter calibration. From 105.00 to 150.00 in 0.01 V increments.
VI. Command Line Interface (CLI) Protocol (continued) Device Commands (continued) Command Description Admin Fact Def set device <0‐16> Get / Set the device ID for cluster applications. Set a device ID of 0 for single Axess applications. A device ID of 1 makes the unit a master, and a device ID of 2-16 makes the unit a remote in cluster configurations. These commands are only valid when directly connected to the Axess, rather than as remote units in a cluster.
VI. Command Line Interface (CLI) Protocol (continued) Group Commands Command Description Admin get groups Returns a list of the groups that the current user has rights to. No get group Returns the details of the selected group. No set group Controls the selected group. No add group Adds a new group. 20 characters max. Up to 8 groups maximum.
VI. Command Line Interface (CLI) Protocol (continued) Web Server Commands Command Description Admin get web Returns the current web server settings of the root Axess. Yes set web enable Enable or disable the root Axess web server. Set the root Axess web server’s port. Web standard port is 80. If changed, access the Axess using http://xxx.xxx.xxx.xxx: Yes Yes Yes 80 SurgeX recommends changing the web port on all Axess units that are accessible from the internet.
VI. Command Line Interface (CLI) Protocol (continued) AutoPing Commands Command Description Admin get autoping <1‐16> Returns the settings and state of the selected autoping. Yes set autoping <1‐16> ipaddress Set the IP address of the selected autoping in dotted decimal. Yes 0.0.0.0 set autoping <1‐16> action Set the action of the selected autoping. On-Follow, OnLatch, Off-Follow, Off-Latch, Cycle, Cycle-Once, or None.
VI. Command Line Interface (CLI) Protocol (continued) Event Commands Command Description Admin get events Returns a list of all pending events. Yes get event Returns the details of the selected event. Yes add event Creates a new event. Up to 16 events can be created. Yes Fact Def The default time and date will be the time and date that the event is added. The default action is none, and the default repeat is never. del event Deletes the selected event.
VI. Command Line Interface (CLI) Protocol (continued) Time Commands Command Description Admin Fact Def get time Returns the current time and NTS settings. Yes set time server Sets the address of an NTS server for the root Axess to query. Yes 129.6.15.29 set time usents Enables or disables the ability of the root Axess to connect to an NTS. Yes Yes set time zone <‐12 to 12> Sets the time zone of the root Axess.
VII. Advanced Operation DTMF Control The Axess can be controlled from dial up connections using handset dialing tones (touch tones). Use of DTMF control requires a unique PIN number set for each user. This PIN is set using the command line interface, and must be 4 to 10 digits long. Program a PIN code of 0 to disable a user’s ability to use DTMF control. DTMF Call Sequence 1. Dial the phone number connected to the Axess. Upon connection a prompt tone will be heard. 2. Enter the PIN followed by the # key.
VII. Advanced Operation (continued) Timed Events The Axess provides the ability to turn On, Off, or Cycle outlets based on time and date. Each individual outlet or group can be set to operate a selected command at a specific time and date. The Timed Events are programmed through the Setup & Control Utility or the CLI interface. Up to 16 events can be created. Each event can be assigned to one outlet or group and repeated on a regular basis. Administrative rights are required to set up and manage any event.
VII. Advanced Operation (continued) AutoPing The AutoPing feature allows the Axess to automatically detect failed equipment and perform a timed reboot or other power control function (like turning on an indicator or siren). Set any IP address to be periodically pinged. When the Axess no longer detects a response from the address, the programmed power control function is actuated. Up to 16 AutoPing channels are available, and each AutoPing can be assigned to an outlet or group.
VII. Advanced Operation (continued) CLI Operation and Setup To view the status of any of the AutoPing channels, issue the get autoping <1‐16> command. Axess > get autoping 1 IP Address: 192.168.1.
VII. Advanced Operation (continued) Certificate Upload Utility (CUU) The Certificate Utility (CUU.exe) is designed to create and distribute Secure Socket Layer (SSL) certificates to Axess units and the PCs that communicate with them. Although the Axess is shipped with a certificate installed, this certificate will generate a warning message when connecting to the Axess when using SSL. For most customers, this error message can be easily ignored and secure connection to the Axess continues.
VIII. Email Notification Email can be automatically sent for outlet changes, AutoPing triggers, voltage alarms, and current alarms.
IX. SNMP Up to four SNMP managers can be set. Each manager will receive Trap notifications for outlet changes, autoping, voltage alarms, and current alarms. Set the SNMP manager IP addresses using the set snmp ipaddress command. Enable or Disable SNMP for any manager with the set snmp enable command. The Axess MIB is available at surgex.com. Syslog The Axess contains a built in Syslog client. When enabled, it will send Syslog formatted UDP messages on port 514.
XII. Setup and Control Utility (SCU) The Axess Setup and Control Utility (SCU) is designed to facilitate installation, configuration, and management of one or more Axess units. With the Setup Utility, users can: 1. Automatically discover multiple Axess units on a local network. 2. Add additional Axess units not on the local network. 3. Download existing configurations from installed Axess units. 4. Save existing configurations for later use or as backup. 5. Open saved configurations for change management.
XIII. Compliance Statements FCC Part 15 Regulation This equipment has been tested and found to comply with the limits for a Class A digital device, pursuant to Part 15 of the FCC rules. These limits are designed to provide reasonable protection against harmful interference in a residential installation. This equipment generates, uses, and can radiate radio frequency energy, and if not installed and used in accordance with the instructions, may cause harmful interference to radio communications.
XIV.Specifications Parameter Load Rating Power Requirement (no load) Surge Let-through Voltage (6000 Volt Surge) UL 1449 Adjunct Classification Test Results Maximum Applied Surge Voltage Maximum Applied Surge Current Maximum Applied Surge Energy Endurance (C62.