
Installation Instruction


5. Press the mounting plate onto the clean surface. Press for at least 30 sec.
NOTE
Do not use screws when mounting the plate. It may affect the machine’s ROPS
structure.
6. Let the glue harden for a couple of minutes.
NOTE
Please note that it can take up to 8 hours until the glue has hardened and reached full
strength.
Install quick coupler switch
The machine must be equipped with a switch that can be locked in the off position. The quick coupler
switch is mounted in a spare location in the instrument panel, easily accessible to the machine opera-
tor. The panel switch for the quick coupler lock switch must be located so that it is not confused with
other similar switches or switches with similar functions.
The buzzer for indication of open quick coupler lock may not be plugged or removed. The signal must
be clearly audible when normal work is underway. Clearly mark this switch in the panel by placing the
sticker enclosed between the switch and socket. If the machine has an existing tool attachment the
switch for it must be marked with sticker.
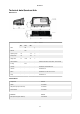
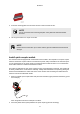
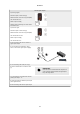
1. Remove original quick coupler switch and place the red sticker (upper) between the button [1] and
the socket [2].
000029-D
1
2
Note: Image above shows an example of a switch.
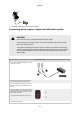
2. Place the yellow sticker (lower) between the quick coupler [3] and the socket [4].
Quantum
17