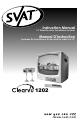
Instruction Manual 12” Wired Security Surveillance Systems Manuel D'Instruction Systèmes De Surveillance De Sécurité De câble Par 12" 1202 now you can see www.svat.
TABLE OF CONTENTS ENGLISH PAGE # Table Of Contents . . . . . . . . . . . . . . . . . . . . . . . . . . . . . . . . . . . . . . . . . . . . . . . . . Introduction / Whats Included . . . . . . . . . . . . . . . . . . . . . . . . . . . . . . . . . . . . . . . . Product Features . . . . . . . . . . . . . . . . . . . . . . . . . . . . . . . . . . . . . . . . . . . . . . . . . Installation / How To Operate . . . . . . . . . . . . . . . . . . . . . . . . . . . . . . . . . . . . . . . .
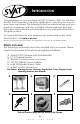
INTRODUCTION Congratulations on your purchase of SVAT’s ClearVu 1202. You will soon find out that this product has many applications, some that we may not even have mentioned. The following instruction manual will go over your products, its features, and how to install it. Please read over all of the instructions and maintenance information so you can extend the life of this great product. For more information on your wired security system and on any other SVAT product, visit www.svat.com.
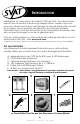
Product Features (see diagrams below) The camera uses a 4 pin DIN connection in the back. This connection, using one plug, contains the power, audio and video for the camera. The power for the camera is being received from the monitor. Camera is equipped with 6 infrared LEDS which let you view the action in near total darkness.
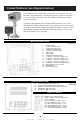
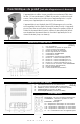
Installation CAUTION: Before connecting the power and switching the monitor ON make sure all cameras are connected properly. 1. 2. Locate the area you would like to place your camera. Please note that you have a maximum distance of 60ft supplied with this unit. You will have to rotate the camera bracket to uncover the screw insertion areas. Install the camera accordingly. Note: the camera can operate standing alone but screws will provide more support. (Picture on right) 3.
Troubleshooting Please read this manual carefully before using this product. If you have any difficulties using this unit, please consult the following checklist. No Picture or Sound: - Make sure the power adapter is properly plugged. The red LED above the POWER button should be illuminated. - Double check all the camera wiring is plugged in correctly. Do NOT use CH 1-4 and VIDEO 1-4 INPUTS at the same time. You must only use either DIN or BNC jacks.
PRODUCT WARRANTY We take quality very seriously. This is why all of our products come with a one year warranty from the original purchase date against defects in workmanship and materials. If you have warranty or support issues please contact us using any of the following methods: SVAT Electronics USA 2315 Whirlpool St., Unit 333 NIagara Falls, New York USA 14305 SVAT Electronics Canada 4080 Montrose Road Niagara Falls, ON Canada L2H 1J9 Phone: 866.946.7828 Fax: 888.771.1701 Email: support@svat.
INTRODUCTION Félicitations sur votre achat de ClearVu 1202 de SVAT. Vous découvrirez bientôt que ce produit a beaucoup d'applications, certains que nous avons pu même ne pas avoir mentionnés. Le manuel d'instruction suivant ira au-dessus de vos produits, ses dispositifs, et comment l'installer. L'excédent svp lu tout des instructions et de l'information d'entretien ainsi de vous peut prolonger la vie de ce grand produit.
Caractéristiques du produit (voir des diagrammes ci-dessous) L'appareil-photo utilise 4 une goupille raccordement DIN dans le dos. Ce raccordement, à l'aide d'une prise, contient la puissance, l'acoustique et la vidéo pour l'appareil-photo. La puissance pour l'appareil-photo est reçue du moniteur. L'appareil-photo est équipé de 6 LED infrarouges qui vous laissent regarder l'action dans l'obscurité totale proche.
Installation ATTENTION : Avant de relier la puissance et commuter le moniteur assurez-vous DESSUS que tous les appareils-photo sont reliés correctement. 1. 2. Localisez le secteur que vous voudriez placer votre appareil-photo. Veuillez noter que vous avez une distance maximum de 60ft fournis avec cette unité. Vous devrez tourner la parenthèse d'appareil-photo pour découvrir les secteurs d'insertion de vis. Installez l'appareil-photo en conséquence.
Dépannage Veuillez lire ce manuel soigneusement avant d'employer ce produit. Si vous avez n'importe quelles difficultés en utilisant cette unité, consultez svp la liste de contrôle suivante. Aucune image ou bruit : - assurez-vous que l'adapteur de puissance est correctement branché. La LED rouge au-dessus du bouton de PUISSANCE devrait être illuminée. - le double contrôle tout le câblage d'appareil-photo est branché correctement. N'utilisez pas ch 1-4 et VIDÉO 1-4 ENTRÉES en même temps.
GARANTIE DE PRODUIT Nous prenons la qualité très sérieusement. C'est pourquoi tous nos produits viennent avec une garantie d'un an de la date originale d'achat contre des défauts en exécution et matériaux. Si vous avez les issues de garantie ou de soutien satisfont nous contactent employant n'importe laquelle des méthodes suivantes : SVAT Electronics USA 2315 Whirlpool St., Unit 333 NIagara Falls, New York USA 14305 SVAT Electronics Canada 4080 Montrose Road Niagara Falls, ON Canada L2H 1J9 Phone: 866.
www.svat.com Disclaimer: SVAT does not endorse of any of SVAT products for any illegal activites. SVAT is not responsible or liable in any way shape or form for any damage, vandalism, theft or any other action that may occur while a SVAT product is in use by the purchaser. Déni : SVAT n'approuve d'aucun de produits de SVAT pour aucun activites illégal.