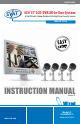
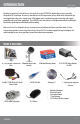
SVAT ELECTRONICS now you can see 4CH 15" LCD-DVR All-In-One System H.264 DVR with 4 Indoor/Outdoor Hi-Res Night Vision Security Cameras COMPLETE SYSTEM INSTRUCTION MANUAL Version 1.0 www.svat.com Model #: CLEARVU11 www.svat.
IMPORTANT! PLEASE READ! NEED HELP? DO NOT RETURN THIS PRODUCT TO THE STORE Please contact a SVAT customer support representative first regarding any additional information on product features, specifications or assistance with set-up. Please contact us via one of the methods below: Email: support@svat.com Online live web chat: Visit www.svat.com Toll free telephone: 1.866.946.7828 Toll free fax: 1.888.771.1701 For more product information visit www.svat.com Note: This is manual version 1.
IMPORTANT! PLEASE READ! PRODUCT WARRANTY INFORMATION Please visit our website at www.svat.com for information about your product’s warranty. We take quality very seriously. This is why all of our products come with a one year warranty from the original purchase date against defects in workmanship and materials. If you have warranty or support issues please contact us using any of the following methods: Phone: 1.866.946.7828 Fax: 1.888.771.1701 Email: support@svat.com Website: www.svat.
TABLE OF CONTENTS SVAT ELECTRONICS now you can see Table of Contents INTRODUCTION................................................................................................................................................................ 3 WHAT IS INCLUDED.......................................................................................................................................................... 3 BUTTON FUNCTIONS AND CONNECTIONS...................................................
TABLE OF CONTENTS SVAT ELECTRONICS now you can see HDD FORMAT/CLEAR.....................................................................30 PASSWORD...............................................................................................................31 SYSTEM SETUP..........................................................................................................32 RS-232/422/485 SETUP............................................................................................
INTRODUCTION SVAT ELECTRONICS now you can see You have just purchased a state of the art, ultra sleek, all-in-one LCD/DVR. This digital video system is especially designed for DIY surveillance. Your new system contains a H.264 compression system, which means that you will get more high quality video in less storage space. H.264 compression is a revolutionary way to store data and is highly compatible with surveillance applications.
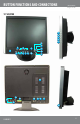
BUTTON FUNCTIONS AND CONNECTIONS SVAT ELECTRONICS now you can see 15" LCD/DVR 2 1 4 3 5 9 6 7 8 10 25 26 27 28 29 15 14 13 12 11 16 23 21 24 20 19 18 17 22 30 CLEARVU11 4
BUTTON FUNCTIONS AND CONNECTIONS 1. 2. 3. 4. 5. 6. 7. 8. 9. 10. 11. 12. 13. 14. 15. 16. 17. 18. 19. 20. 21. 22. 23. 24. 25. 26. 27. 28. 29. 30.
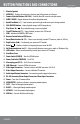
BUTTON FUNCTIONS AND CONNECTIONS SVAT ELECTRONICS now you can see REMOTE CONTROL 2 1 4 3 11 5 6 7 8 9 10 12 13 14 15 16 17 18 19 21 22 23 20 1. Alarm Reset – Cancels alarm activation/silences buzzer 2. REC – Force manual recording 3. Rewind (◄◄) – Rewinds in playback mode 4. Fast Forward (►►) – Fast forwards in playback mode 5. Step Forward - (► )- Moves playback ahead one frame 6. ( ) Back-up– Creates a backup 7. Play/Pause (►/ ) – Plays or pauses recorded images 8.
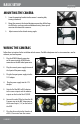
BASIC SETUP SVAT ELECTRONICS now you can see MOUNTING THE CAMERA 1. Screw the mounting bracket into the camera’s mounting hole, turning it clockwise. 2. Mount the camera in the desired location no more than 60 feet from the DVR unless you have purchased additional wiring. You may wall mount or desk mount these cameras. 3. Adjust cameras to the desired viewing angles. WIRING THE CAMERAS Follow these instructions for the installation of each camera.
BASIC SETUP SVAT ELECTRONICS now you can see POWERING THE SYSTEM 1. Insert the power supply wire into the rear DC 12V Port on the LCD/DVR. 2. Plug the mouse into the PS2 port at the back of the LCD/DVR (recommended). 3. Insert the power cord into the power supply. 4. Plug the power cord into a power outlet. 5. Turn on the master switch on the back right of the system. 6. Press POWER on the top panel of the system if it doesn’t start after turning on the master switch.
GENERAL INFORMATION SVAT ELECTRONICS now you can see MAIN SCREEEN NOTE: The following instructions are described for use with the remote control. Front panel buttons may not match with the following directions. It is recommended that you use the included mouse or remote for full function. You must be logged in to access all the DVR menus. Please refer to page 13 for login instructions. The split-window screen, as shown above, is the main screen after system start-up.
GENERAL INFORMATION SVAT ELECTRONICS now you can see TEXT INPUT (To be used with remote control) There are certain circumstances where the system requires the user to enter text, such as system login, camera title setup, and so on. Below are the instructions on how to enter text using the remote control: 1. Press ENTER to edit the highlighted option. The flashing cursor will be shown to indicate the editing point.
GENERAL INFORMATION SVAT ELECTRONICS now you can see USING THE MOUSE To make use of the mouse when operating the DVR please move the cursor to the bottom of the screen. You will see the icons of the mouse functions displayed. When you move the cursor over the icons, you will see the name of that icon. Below is a list of the icons and what their use is. Using the mouse is the simplest way of operating the DVR. 1. Menu – Used to call up the full menu 2. Search – Used to call up the search options 3.
GENERAL INFORMATION SVAT ELECTRONICS now you can see COMMON ICONS VIDEO ADJUSTMENT ICONS USING THE MOUSE MOTION DETECTION SETUP USING THE MOUSE Move the cursor to Menu -›Setup -› Camera -› Motion setting -› Detection setting Move the cursor to the bottom of the screen, the icons of motion detection will be displayed. PTZ SETUP USING THE MOUSE The PTZ camera functions and their corresponding icons are shown below.
GENERAL INFORMATION SVAT ELECTRONICS now you can see ALPHA-NUMERIC KEYBOARD MAIN MENU While in the split-window display, press MENU (MENU/ESC) to call up Menu display as shown. We recommend using the mouse. With the mouse the menu is found by dragging the cursor to the bottom of the screen. If you are using the remote, simply press the menu button. There are a variety of displays under the Menu display.
MAIN MENU SVAT ELECTRONICS now you can see In Login/Logout menu, follow the Text Input method to enter the Login name and Password • Press ▲▼ to highlight login name, Use the text input method to enter the login name. Press Enter • Press ▲▼ to highlight password name, Use the text input method to enter the login name. Press Enter. • Press ENTER to login the system. • To logout of the system, just press ▲▼ to highlight and select the Logout option, and then press ENTER.
MAIN MENU SVAT ELECTRONICS now you can see VIDEO ADJUSTMENT In Menu display, press ▲▼ to change the highlighted option to Video Adjustment, and then press ENTER to call up Video Adjustment display as shown. There are 4 items which can be adjusted, including Brightness, Contrast, Hue, and Saturation. The operations are as below: • ▲▼ - Press these buttons to select the items. • Numeric (CH1 – CH4) - Press these buttons to select the camera you wish to adjust .
MAIN MENU SVAT ELECTRONICS now you can see NOTES: 1. 2. 3. 4. DO NOT format the DVD disc for better performance and compatibility. Before using USB pen drive, please format it to FAT32 file system by Windows XP or higher. The backup device has to be connected by the system software before it can be used to read/write. Some backup devices may have compatibility problems. Please contact Customer Support at 1-866-9467828 for any issues you may have. 5.
MAIN MENU SVAT ELECTRONICS now you can see From the setup menu, you can access various aspects of the system, including camera setup, schedule setup, network setup and password setup. • • • ▲▼- Press these buttons to change the highlighted item. ENTER - Press this button to enter the setup of the highlighted option. For the details of each option, please refer to the corresponding sections. ESC (MENU/ESC) -- Press this button to escape from Setup Menu display, and return to Menu display.
MAIN MENU SVAT ELECTRONICS now you can see CAMERA SETUP In Setup Menu display, press ▲▼ to change the highlighted option to Camera, and then press ENTER to call up Camera Setup display as shown. The Camera Setup allows the administrator to define the attributes for each camera. Up to 4 cameras can be connected to the system. This menu allows you to adjust various aspects for each camera.
MAIN MENU SVAT ELECTRONICS now you can see Video loss settings are very important for surveillance, since anytime you lose footage, you lose valuable information. The Clearvu11 can perform various tasks when it detects loss of any video, depending on howit is setup. You can adjust the settings for each individual camera.
MAIN MENU SVAT ELECTRONICS now you can see MOTION DETECTION The Clearvu11 has bulit in motion detection available for each camera . Press ENTER or +/- to check/uncheck this item. The default setting is “” - checked. MOTION SETTINGS This is the link used to setup the motion settings for this camera. Press ENTER on Settings to call up Motion Setup menu for the camera.
MAIN MENU SVAT ELECTRONICS now you can see • Detection Settings - Calls up a grid system used for masking areas of the camera’s view. Fully explained on the next page. • Buzzer – this option allows you to choose to activate the internal buzzer (or not) when motion of this camera is detected. Press ENTER or +/- to check/uncheck this item. The default setting is “” - checked • Log – this option allows you to choose to log your events. Press ENTER or +/- to check/uncheck this item.
MAIN MENU SVAT ELECTRONICS now you can see DETECTION SETTINGS This menu allows you to setup the motion detection settings, including detection area and sensitivity, when motion is detected for this camera. 10 being the most sensitive and 1 being the least sensitive. Press ENTER in Settings to call up Motion Detection Setup (as shown) for this camera.
MAIN MENU SVAT ELECTRONICS now you can see DWELL TIME Dwell time refers to how long the video of the motion detection will stay on the screen. If Call By Event is set to Motion, Alarm, or Both. Press +/- buttons to adjust the value (3 seconds-60 minutes, discrete) to choose the “dwell time”. AUDIO The AUDIO IN corresponding to this camera. If selected, the audio data for the selected AUDIO IN will be recorded with the video data for this camera.
MAIN MENU SVAT ELECTRONICS now you can see The general operations are as below: • ▲▼◄►- Press these buttons to select the items. The display will scroll left/right if the selected item is not shown on the screen. • Numeric (CH1-CH4) - Press these buttons to select the camera. • COPY ( ) - Press this button to copy all the settings - excluding detailed Motion settings, Video Loss settings, Title/Audio - of the focus camera to all the following cameras. (E.g.
MAIN MENU SVAT ELECTRONICS now you can see • Post-record – to define how long after this alarm input is triggered the Focus Camera shall be intensively recorded at Event Record IPS. Press +/- buttons to adjust the value (0 second - 60 minutes, discrete). • Alarm Out – to define which Alarm Output will be triggered when this alarm input is triggered. Press +/buttons to select none (N/A) or one of the Alarm Outputs (1-2). • Buzzer – to activate the internal Buzzer or not when this alarm input is triggered.
MAIN MENU SVAT ELECTRONICS now you can see Following is a brief description of each item and its specific operations: • Total Pages – total pages for the SEQ Display Type. The maximum number varies according to the display type. Press +/- buttons to select the desired number from the available list. • Dwell Time – the dwell time (3 ~ 60 seconds) for each page of this display type. Press +/- buttons to change the value.
MAIN MENU SVAT ELECTRONICS now you can see SCHEDULED RECORD SETUP In Setup Menu display, press ▲▼ to change the highlighted option to Scheduled Record, and then press ENTER to call up Scheduled Record Setup as shown The Scheduled Record Setup allows the administrator to define when and how to record with the system. There are up to 16 time segments (T1 – T16) for each weekday. Each time segment will allow you to set up recording settings for certain periods of the day.
MAIN MENU SVAT ELECTRONICS now you can see • Normal – normal record mode, including, A/V (Audio/Video), V (Video only), or No (No Video). Press +/buttons to change the value. The general operations are as below: • ▲▼◄►- Press these buttons to select the items. The display will scroll left/right if the selected item is not shown on the screen. • COPY ( ) - Press this button to copy the settings of the focus weekday to all the following weekdays. (E.g.
MAIN MENU SVAT ELECTRONICS now you can see The following is a brief description of each item and its specific operations: • Size (GB) – the total HDD storage in GB (Giga-Byte) for Alarm Record and Normal Record respectively. This item is just for information. Please refer to the section on HDD format/clear for detailed information and setup. • Auto Overwrite – allows you to automatically overwrite the recorded video/audio from HDD#1 when the Alarm/Normal Record disk drive capacity is full.
MAIN MENU SVAT ELECTRONICS now you can see HDD FORMAT/CLEAR In HDD Setup display, press MODE to call up HDD Format/Clear screen as shown. The HDD must be formatted before it can be used to record video/audio. The HDD Format/Clear screen allows the administrator to format and/or clear each HDD, and set the size for Alarm Record option and Normal Record option for each HDD. The general operations are as below: • MODE - Format Press this button to format the HDD.
MAIN MENU SVAT ELECTRONICS now you can see • ESC (MENU/ESC) - Press this button to escape from this screen, and return to HDD Setup display. If the Save dialog is shown, press ENTER to exit and save, ESC (MENU/ESC) to exit without saving. Following is a brief description for each item and its specific operations: • Size (GB) – the total storage in GB (Giga-Byte) for the HDD if it has been formatted. This item is just for information. • Alarm Record(%) – Alarm Record Size (in percentage) for this HDD.
MAIN MENU SVAT ELECTRONICS now you can see Following is a brief description for each item and its specific operations: • Login Name – please follow the Text Input method • Password – this item accepts numbers only. Please follow the Text Input method. • Level – the password level (Administrator, Supervisor, or Operator) for this user.
MAIN MENU SVAT ELECTRONICS now you can see RS-232/422/485 SETUP In Setup Menu display, press ▲▼ to change the highlighted option to RS-232/422/485, and then press ENTER to call up RS232/422/485 Setup as shown. The RS-232/422/485 Setup allows the administrator to setup RS-232 control port, and RS422 or RS-485 control port. Please refer to the manuals for the connected devices - PTZ cameras – to set these items in RS-232/422/485 Setup.
MAIN MENU SVAT ELECTRONICS now you can see NETWORK SETUP The general operations are as below: • ▲▼◄►- Press these buttons to select the items. • ESC (MENU/ESC) - Press this button to escape from this screen, and return to Setup Menu display. If the Save dialog is shown, press ENTER to exit and save, ESC (MENU/ESC) to exit without saving. Following is a brief description for each item and its specific operations: • Net Type – Static IP, PPPoE, or DHCP.
MAIN MENU SVAT ELECTRONICS now you can see E-MAIL SETUP In Network Setup, press ENTER to call up E-mail Setup as shown when the highlighted option is E-mail. The E-mail Setup allows the administrator to set all e-mail related parameters. When an event occurs and E-mail is enabled for the corresponding action, an e-mail will be sent based on the parameters set here. Contact ISP or E-mail provider to acquire the SMTP server and authentication information.
MAIN MENU SVAT ELECTRONICS now you can see ADVANCED NETWORK SETUP In Network Setup, press ENTER to call up Advanced Network Setup as shown when the highlighted option is Adv. The Advanced Network Setup allows the administrator to set advanced network parameters. If the user is not familiar with network administration, please DO NOT modify the items in this dialog. The general operations are as below: • ▲▼- Press these buttons to select the items.
MAIN MENU SVAT ELECTRONICS now you can see FACTORY DEFUALTS If you choose to reset your DVR, highlight the Factory Default tab. You will be prompted to either confirm or cancel resetting to factory defaults. Press ESC to cancel or Enter to fully restore your DVR to the factory settings. SOFTWARE UPGRADE (Administrator mode only) In Menu display, press ▲▼ to change the highlighted option to Software Upgrade, and then press ENTER to call up Software Upgrade display as shown.
NETWORKING GUIDE SVAT ELECTRONICS now you can see Before you start let’s make sure that you have everything you need to do this properly. You should have these ready and connected before beginning: n DVR connected to a router. n Router connected to the Internet. n A PC or laptop that is connected to the same router that the DVR is connected to. The PC can be connected by a wired or wireless connection. n Internet Explorer 5.0 or greater (To check the version of Internet Explorer: Open IE.
NETWORKING GUIDE SVAT ELECTRONICS now you can see NOTE: If you look at the router there should be a green “link” light indicating that the DVR is properly connected to the port that it was plugged into. If this light is on, you can proceed to finding the DVR’s IP Address. FINDING THE DVR’S IP ADDRESS Once the DVR is connected to the router you will need to find the IP address of the DVR. This is referred to as the “Internal IP Address” of the DVR. To check the DVR’s IP address: 1. 2. 3. 4. 5. 6.
NETWORKING GUIDE SVAT ELECTRONICS now you can see PREPARING YOUR COMPUTER FOR VIEWING THE DVR Any computer that is accessing the DVR will need to be configured to install and run ActiveX controls and the Microsoft Visual C++ 2005 SP1. (This will require you to be logged into the computer as an Administrator). Either of the following 2 methods will prepare your computer for this: Method 1 (Recommended): Add the DVR’s IP address to the Trusted Sites in Internet Explorer. 1. Open up Internet Explorer. 2.
NETWORKING GUIDE SVAT ELECTRONICS now you can see Method 2: 1. Open Internet Explorer. Go to the drop down menu in the Tools area and select Internet Options. 2. Select the Security Tab and then click on the Custom Level button in this tab. 3.
NETWORKING GUIDE SVAT ELECTRONICS now you can see Install the ActiveX controls and Microsoft Visual C++ 2005 SP1 After typing the IP address into the Internet Explorer address bar and pressing ENTER: 1. There will be a yellow information bar that pops up below the address bar in Internet Explorer. Click on the yellow information bar and then select “Install ActiveX control”. Please be patient as the installation process can take 1-2 minutes. 2.
NETWORKING GUIDE SVAT ELECTRONICS now you can see CONFIGURING YOUR ROUTER (PORT FORWARDING) TO VIEW THE DVR EXTERNALLY * Your router will need to be configured properly before being able to view the DVR from a location different than the DVR* Port forwarding is a necessary step that opens a path on your home/business network to allow you to view your DVR from outside your network (over the Internet).
NETWORKING GUIDE SVAT ELECTRONICS now you can see CONNECTING THE DVR USING A D-LINK ROUTER (EXAMPLE) In this example a D-Link D1-604 router was used. The steps for your router may be similar to the following steps. These instructions have also been created without a firewall in place. If you have a firewall, please consult a computer technician or your network administrator. You need to configure the router to forward the port numbers that the DVR uses.
NETWORKING GUIDE SVAT ELECTRONICS now you can see 4. Select the Virtual Server tab. • Select the Enabled check box. • In the Name field type in “DVR80”. • In the Private IP field enter the DVR’s IP address. • In the Protocol field, select Both (This will enable both TCP and UDP). • In the Private port enter the port number you need to forward. By default this DVR is set to port 80. Use port 80 unless you have a reason to change the DVR to another port (not recommended).
NETWORKING GUIDE SVAT ELECTRONICS now you can see DYNAMIC DNS Instead of having to remember and enter your IP address every time you want to access the DVR online, you can set up the DVR so that it is associated with a website URL (domain name) that is easy for you to remember. 1. Open internet explorer and type http://www.dyndns.com in the address bar. 2. Create a new account by clicking the “Create Account” link. 3. Enter your preferred user name, email address, and password. 4.
NETWORKING GUIDE SVAT ELECTRONICS now you can see 8. 9. 10. 11. Click on the “Services” button located on the top menu bar. Click on the Dynamic DNS link. Click on the “Get Started” link located on the menu on the right side of the screen. Type in a host name (subdomain name). We recommend you use your name, company name, or something that is easy for you to remember. 12. Choose a domain name from the dropdown menu. We recommend using the dyndns.org suffix. 13.
NETWORKING GUIDE SVAT ELECTRONICS now you can see To configure the DVR to work with DDNS: 1) 2) 3) 4) 5) 6) Press Menu and Select Login / Logout Type in the username and password. (default username is “aa”. Default password is “11” Select Setup Select Network Change the Net Type to static. Note that the DHCP IP information should be copied over to Static. Navigate to DDNS and press - / + to choose the DDNS website you have created. Our instructions were for DynDNS.org.
NETWORKING GUIDE SVAT ELECTRONICS now you can see REMOTE VIEWING Now that you know your external IP address, you can perform a test to ensure your DVR is accessible from outside your network (over the internet). 1. Open Internet Explorer, and in the address bar type in the External IP Address you just acquired from www.whatsmyip.org. It should be similar to the following: http://74.11.213.177 2. Press ENTER.
NETWORKING GUIDE SVAT ELECTRONICS now you can see 5. - Click on this icon to enable/mute the audio input from the PC, button down for enable, button up for mute. If enabled, the audio input from the PC will be sent to the DVR. The default setting is ‘mute’. 6. - Click on this icon to enable/mute the audio output from the camera for the focus window, button down for enable, button up for mute. The default setting is ‘mute’. 7. 8.
NETWORKING GUIDE SVAT ELECTRONICS now you can see 14. - Click on this icon to call up search-PC-video dialog. Please select the file, and then click on Open. Now, you may use the playback buttons to play the recorded video/audio in the file. 15. - Click on this icon to show/hide full PTZ control panel. The user can click on the PTZ Panel (but outside of any object in it) (to call up the Context menu) to move it. Setup- Click on this icon to call up Setup dialog. 16. 17.
SEARCH MENU SVAT ELECTRONICS now you can see There are three ways to search the recorded video/audio for playback: (a) Search by time, (b) Search by event, (c) Search archived files. In split-window display, press SEARCH button to call up Search Menu display as shown. The user’s operations are described as the followings: • ▲▼- Press these buttons to change the highlighted item. • ENTER - Press this button to enter the corresponding Search display of the highlighted item.
SEARCH MENU SVAT ELECTRONICS now you can see The general operations are as below: • ▲▼- Press these buttons to select the desired fields. • ESC (MENU/ESC) - Press this button to escape from this screen, and return to split-window display. • SEARCH / MODE - Press this button to start searching the recorded video/audio with the selected search time and video/audio type for playback. The search result will be shown on the bottom of this dialog if it failed.
SEARCH MENU SVAT ELECTRONICS now you can see backward playback. Each time this button is pressed, the backward playback speed will become faster, from 2X, 4X, 8X, up to 16X, and then back to 2X. • Single Step ( ► ) on the remote controller, ( ►/del) on the front panel) - Press this button to play the recorded images frame by frame. ) - Press this button to copy or stop copying the playback video/audio to the storage device • Copy ( connected to the USB port. The Backup display will be shown as below.
SEARCH MENU SEARCH BY EVENT SVAT ELECTRONICS now you can see The screen for Search By Event - Log display, is shown below: There are four different types of event logs, including Alarm, Motion, Video Loss, and System. Up to 1000 of the most recent event logs can be stored in the system. The general operations are as below: • ▲▼◄►- Press these buttons to select the items. • ESC (MENU/ESC) - Press this button to escape from this screen, and return to split-window display.
SEARCH MENU SVAT ELECTRONICS now you can see The Backup display will be shown. Please note that this kind of backup without playback is performed in the background, and the user can still do almost all the operations. Playback/Archive For Search By Event In Log display, press ENTER to enter Event Playback display of the selected event log, or press Play Button (►/ ) to playback directly. This display is the same as full screen display of the main display, and the playback buttons remain effective.
SEARCH MENU SVAT ELECTRONICS now you can see NOTE : The format of the filename is camNN-YYYYMMDD-hhmmss.h264, where NN stands for camera number, YYYY year, MM month, DD date, hh hour, mm minute, and ss second. Playback For Archived Files In Search Archived Files display, press ENTER to enter Archived File Playback display of the selected file, or press Play Button (►) to playback it directly. This display is the same as full screen display of the main display, and the playback buttons remain effective.
PDA/MOBILE PHONE REMOTE VIEWING SVAT ELECTRONICS now you can see The following is a brief description of each item and its specific operation. - will apply your changes - Q1, 1-4 will choose whether to view quad screen or an individual camera - IS-30S will choose your refresh rate - Alarm Outputs 1 and 2 (Unchecked for normal, Checked for Triggered) Administrator can trigger the alarm output and uncheck to set back to normal. - Status Indicators for alarm inputs 1-4.
CD SOFTWARE AND ARCHIVE VIEWING SVAT ELECTRONICS now you can see To run the HEM Player under Microsoft® Windows® XP or Windows® 2000, please select Start >Programs->Hyper Electronics Mappers->HemPlayer, and the screen will be shown as below. Since this utility is a free player utility for archived files, from USB backup or remote backup, some of the functions are disabled. The mouse cursor will change to “Hand” type if it’s on those enabled function icons.
CD SOFTWARE AND ARCHIVE VIEWING SVAT ELECTRONICS now you can see M4V/H.264 TO AVI CONVERSION UTILITY To run the M4V/H.264 to AVI Conversion Utility, please select Start->Programs->Hyper Electronics Mappers->M4V2AVI or double-click on the file AVI_ Converter.EXE, and the screen will be shown like the one to the right. • Please select the archived video footage for the source file. • Select the target directory for the converted audio/video files • Click OK to begin the conversion. The converted .
TROUBLESHOOTING GUIDE Cannot see icons or access the menu (using the mouse) SVAT ELECTRONICS now you can see • Move the mouse cursor to the bottom of the screen. A task bar of available options will appear. You will need to login before you can utilize most of the functions. Some icons are missing (using • If you can not view the icons that appear on the mouse menu click on the mouse) icon ( ) to reveal the hidden icons next to it. Password information is saved in login.
TROUBLESHOOTING GUIDE SVAT ELECTRONICS now you can see My screen is grey after viewing saved footage • This grey screen is one of the viewing modes the DVR can go into. From the live viewing mode press the “Mode” button to change the selected camera to a playback screen. Press the “Mode” button once more to switch to a full screen playback screen. Press the “Mode” button once more to switch back to live monitoring.
TROUBLESHOOTING GUIDE Remote control is not working. SVAT ELECTRONICS now you can see • You first need to log in to the DVR before being able to use the remote control functions On the Remote control: 1. Press Menu 2. Select Login / Logout 3. Enter Username 4. Enter Password 5. Select Login You can now navigate through the menu with the remote control or exit the menu to use other features that the remote control has. • Make sure that the batteries are installed correctly.
TROUBLESHOOTING GUIDE SVAT ELECTRONICS now you can see Web viewer is very small and does not look like the manual This DVR is fully functional with Internet Explorer 6.0 or greater. If you are using a different browser then you will be redirected to the wap.htm version of the web interface. This is the same interface that would be used on a mobile device. This mode will allow you to view a single or all 4 cameras simultaneously and adjust your refresh rate.
TROUBLESHOOTING GUIDE “Warning: Connect to device DVR#........... Failed message while using Internet Explorer.” when I try to view the software over the web. SVAT ELECTRONICS now you can see • If you see this dialogue box using the Internet Explorer web viewing software: • It means that viewing software can not connect to one of the DVRs that it is configured to use. You need to remove any DVR’s that are not currently being used. • Click on Device Config. This will pull up the Device List.
SPECIFICATIONS System Video Audio Record Display CLEARVU11 SVAT ELECTRONICS now you can see O.S Embedded Linux 2.6 Multiplex Sixfold operation - simultaneous record, live, playback, backup, control, & remote access Certification FCC, CE, LVDS, etc. FCC, CE, LVDS, etc.
SPECIFICATIONS Playback Alarm Network Control Setup CLEARVU11 SVAT ELECTRONICS now you can see Frame rate (IPS) & Resolution NTSC – 30 / 720*480, 60 / 720*240, 120 / 360*240 PAL – 25 / 720*576, 50 / 720*288, 100 / 360*288 Search Date/time, Camera, Alarm, Motion, & Video Loss Operation Play, Fast Forward, Backward, Pause, Stop, etc. Remote I.E. and HEM can also Print HDD Half-size DVR - 1 set of 3.5“ HDD, Max.
SPECIFICATIONS Reliability SVAT ELECTRONICS now you can see System recovery Auto power on after power loss recovery Timer Built-in real time clock Security Multi-level password (3 levels, up to 18 accounts) Power DC12V-5A 18W Max. Operating Temperature 0oC ~ +50oC Camera Specifications (CMOS Model) Image sensor 1/4” CMOS Color Outdoor use Yes IP Rating IP55 Resolution 400 TV Lines Night Vision Yes Number of IR LEDs and Range 11, up to 20ft IR LED control Auto Min.
SPECIFICATIONS SVAT ELECTRONICS now you can see Camera Specifications (CCD Model) Image Sensor 1/4 “ CCD Color Resolution 420 TV Lines Outdoor Use Yes IP Rating IP65 Focal Length 3.6 mm Focus Type Fixed Night Vision Yes Number of IR LEDs and Range 12, up to 15 ft IR LED Control Automatic, CDS Sensor Min.
NOTES AREA CLEARVU11 SVAT ELECTRONICS now you can see 70
SVAT ELECTRONICS now you can see VISIT US ON THE WEB! Product Information Specification Sheets User Manuals Software Updates Quick Start Guides Firmware Upgrades www.svat.com Disclaimer SVAT does not endorse any of SVAT products for any illegal activities. SVAT is not responsible or liable in any way shape or form for any damage, vandalism, theft or any other action that may occur while a SVAT product is in use by the consumer. Model# CLEARVU11 www.svat.