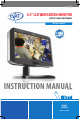
SVAT ELECTRONICS now you can see 8.5" LCD WIDESCREEN MONITOR with 2 Camera AV Inputs ACCESSORY - MONITOR INSTRUCTION MANUAL Version 1.1 Model# CLEARVU7 www.svat.
SVAT ELECTRONICS now you can see !IMPORTANT! PLEASE READ! NEED HELP? DO NOT RETURN THIS PRODUCT TO THE STORE Please contact a SVAT customer support representative first regarding any additional information on product features, specifications or assistance with set-up. Please contact us via one of the methods below: Email: support@svat.com Online live web chat: Visit www.svat.com Toll free telephone: 1.866.946.7828 Toll free fax: 1.888.771.1701 For more product information visit www.svat.
SVAT ELECTRONICS now you can see PRODUCT WARRANTY INFORMATION Please visit our website at www.svat.com for information about your product’s warranty. We take quality very seriously. This is why all of our products come with a one year warranty from the original purchase date against defects in workmanship and materials. If you have warranty or support issues please contact us using any of the following methods: Phone: 1.866.946.7828 Fax: 1.888.771.1701 Email: support@svat.com Website: www.svat.
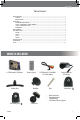
SVAT ELECTRONICS now you can see Table of Contents WHAT IS INCLUDED.......................................................................................................................................................... 1 . MONITOR ............................................................................................................................................................... 2 . REMOTE CONTROL .................................................................................................
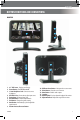
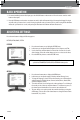
SVAT ELECTRONICS now you can see BUTTON FUNCTIONS AND CONNECTIONS MONITOR 3 4 1 5 2 14 6 7 8 13 15 9 10 11 12 1. 8.5" LCD Screen - Displays your footage. 2. Power Button - Turns LCD Monitor On /Off. 3. 3.5mm Headphone Jack - Connect onto stereo headphones. 4. AV1/AV1 In Port - Connection to video input source. 5. Power Input - DC power input (12V) 6. AV1/AV2 Button - Switches input channels. 7. Pict Button - Changes the picture setting. 8.
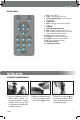
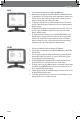
SVAT ELECTRONICS now you can see REMOTE CONTROL 1 Mute – Turns audio off. 2. Power – Turns off power to LCD Screen. 3. Channel Up/Up Navigation – Used to navigate through menus. 4. Volume Down 5. Menu – Enters the onscreen menu and adjusts settings 6. Volume UP 7. Channel Down/Down Navigation 8. Mode - Standard, Soft, Vivid, Light, Personal 9. Call – Displays the input channel you are currently viewing, video format, and current time 10. Timer – Adjusts sleep timer settings 11.
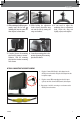
SVAT ELECTRONICS now you can see 4. While continuing to hold these pieces securely, insert side for bolt (including bolt) into the center and other side piece as shown above. 5. While holding the adjustment 6. If you need to adjust the mounting plate or adjustment head as shown, thread the wing head, loosen the wing nut nut onto the bolt by turning the slightly, adjust, and retighten. wing nut clockwise. 7. If needed, loosen the mounting 8.
SVAT ELECTRONICS now you can see 4. If the camera supports audio, connect the RCA audio cable of the camera (red or white) to one of the audio inputs (red or white) on the 3.5mm to RCA (female) cable adapter. 5. Ensure that the cameras are plugged in. OPTION 2: CONNECTING TO A DVR 1. Plug the 3.5mm to RCA (female) cable adapter into the AV1/IN port on the monitor. 2. Plug the other end of the RCA cable adapter (not included) into the female end of the 3.5mm to RCA (female) cable adapter.
SVAT ELECTRONICS now you can see BASIC OPERATION 1. For manual switching between video Inputs, press the AV1/AV2 button on the monitor or AV on the remote control to switch between video inputs. 2. Press the AUTO button on the monitor to activate auto mode, which will automatically cycle between both inputs. Pressing it once will set the cycle interval to 4 seconds. Pressing it again will set the cycle interval to 6 seconds.
SVAT ELECTRONICS now you can see CLOCK SYSTEM CLEARVU7 1. Press the menu button three times to display the CLOCK menu. 2. In this menu you can adjust the Time, On-Time, Off-Time, and Attention Mode time 3. To adjust the time, select it and press the volume down button to adjust the hour. Press the decrease volume button to adjust the minute. You must set the time before you can adjust the other settings in this menu. 4.
SVAT ELECTRONICS now you can see TROUBLESHOOTING Before calling technical support, try the following troubleshooting tips: Problem Solution - Check all connections to make sure camera/DVR is powered on and connected to the AV1 or AV2 input of the monitor. No picture displayed on LCD screen - Make sure the monitor is powered on. - Ensure that the camera/DVR connected supports sound and that sound is enabled on the camera/DVR.
SVAT ELECTRONICS now you can see SPECIFICATIONS Display........................................................................................................................................ 8.5" Color LCD Resolution.......................................................................................................................................... 480×234 Source of Light...................................................................................................................................
SVAT ELECTRONICS now you can see Crime Stoppers Worldwide Statistics Arrests Made 753,975 Cases Cleared 1,200,585 Rewards Paid $88,590,398 Property Recovered $1,937,437,996 Drugs Seized $7,159,096,086 Total $ Recovered as of August 13, 2008 $9,096,534,082 As of Oct 15, 2008.
SVAT ELECTRONICS now you can see VISIT US ON THE WEB! ► Product Information ► Specification Sheets ► User Manuals ► Software Updates ► Quick Start Guides ► Firmware Upgrades www.svat.com Disclaimer SVAT does not endorse any of SVAT products for any illegal activities. SVAT is not responsible or liable in any way shape or form for any damage, vandalism, theft or any other action that may occur while a SVAT product is in use by the consumer. Model# CLEARVU7 www.svat.