SVAT ELECTRONICS Now You Can See Handheld DVR System w/ Color Pinhole Camera COMPLETE SYSTEM Instruction Manual Model # CV1002DVR www.svat.
SVAT ELECTRONICS Now You Can See PRODUCT WARRANTY & REGISTRATION Please visit our website at www.svat.com to apply for your products warranty registration. The warranty registration for is located under the support tab on the SVAT website. We take quality very seriously. This is why all of our products come with a one year warranty from the original purchase date against defects in workmanship and materials.
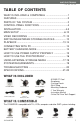
SVAT ELECTRONICS Now You Can See TABLE OF CONTENTS WHAT IS INCLUDED & COMPATIBLE ................................1 FEATURES............................................................................2 PARTS OF THE SYSTEM ....................................................3 CONTROL PANEL FUNCTIONS ..........................................4 INSTALLATION ..................................................................4-5 MAIN SETUP ..................................................................
SVAT ELECTRONICS Now You Can See Do not Plug and unplug the power cord, it may result product malfunction. Do not install the product in an environment where the humidity is high. Unless the product is waterproof or weatherproof, otherwise poor image quality may occur. Do not drop the product or subject them to physical shocks. Except for vandal-proof or shockproof product, otherwise malfunctions may occur. Never keep the product to direct strong light. It can damage the product.
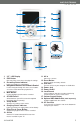
SVAT ELECTRONICS Now You Can See 1. 2.5" LCD Display 2. ESC Button Exits out of the menu when changing the settings 3. Recording Status Indicator Lights up red when in record mode 4. Navigational Buttons/Fast Forward & Rewind Used to navigate through the menu, these buttons are also used to control the playback of a recorded movie 5. Mark Button Used to highlight specific movies recorded 6. CF/HDD Switch Switch between your CF Card and the optional Hard Drive (Sold separately) 7.
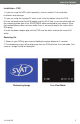
SVAT ELECTRONICS Now You Can See Control Panel functions SETUP From main menu to any function’s settings and initial settings. CF~HDD Storage media switching: between CF card and HDD. MARK Select file: By selecting the file you want to edit, Mark it and then you can delete files. ?/ESC Exit: leave the current running screen, and go back to the previous screen. Select functions and PLAY button. Installation (Spy Eye Camera) 1.
SVAT ELECTRONICS Now You Can See Installation - PVR 1. If you are using the HDD (sold separately), refer to section 9.1 for hard drive installation and warnings. 2. If you are using the included CF card, insert it into the bottom slot of the PVR. 3. Insert the black end of the RCA adapter into the AV IN jack. Insert the yellow end into the remaining yellow jack of the RCA/POWER cable connected to your camera.
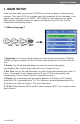
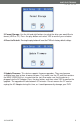
SVAT ELECTRONICS Now You Can See 1. MAIN SETUP Under live view mode, you can press SETUP key to enter the page of setting up basic functions. Then, press ESC key to enable your setting and back to live view mode. In the page of main setup, please use RIGHT / LEFT button to select value for each option. Some of them should be entered to submenu through pressing PLAY key. It will be introduced in the following section. 1.1 Main setup page 1 1.
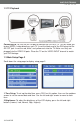
SVAT ELECTRONICS Now You Can See 1.2 TV Playback Connecting to TV: Use the AV Out port to connect the PVR to a TV. This will allow you to play MPEG 4 video directly on your TV. Insert the black end of the RCA plug into the AV OUT jack. Insert the red, white, and yellow ends into the TV. Make sure they are plugged into the VIDEO IN ports. Place the TV on the VIDEO INPUT channel to watch your PVR footage. 1.3 Main Setup Page 2 Scroll down the setup page to display setup page 2. 1.
SVAT ELECTRONICS Now You Can See 3. Format Storage: Use the left and right buttons to select the drive you would like to format (HDD or CF). Press the play button and select YES to confirm your selection. 4. Reset to Default: Pressing the play button will reset the PVR to its factory default settings. 5. Update Firmware: This device supports firmware upgrades. They may become available from time to time at www.svat.com.
SVAT ELECTRONICS Now You Can See 1.4 Main setup page 3 Scroll down to enter the third menu setup page, with the following options: 1. About: Enter this mode using the play button to see the current firmware version installed. 2. Timer Rec: Press the left and right buttons to select the mode of timer recording (by time, by day, by week, cancel). Press the play button to change the date and time for the selected mode. Use the up and down buttons to select the desired time/date to start recording.
SVAT ELECTRONICS Now You Can See By Week Choosing a specific day and time in one week and determine how long it records. 3. Motion Record: Use the left and right buttons to switch the motion recording on and off and press the play button to confirm. Motion Setup: Press the PLAY key on this option to enter the Motion Area Detection screen. The screen will be divided into 16 areas.
SVAT ELECTRONICS Now You Can See 2. VIDEO RECORDING 2.1 connecting with other devices Connecting to TV: Your TV must have video output jacks. Plug the black end of the RCA adapter into the video input of your PVR. Plug the yellow, red, and white ends into the video outputs of your TV. Connecting to DVD Player: The PVR can connect to DVD players or related products. It will save the video as MPEG 4 format (.ASF). Plug the black end of the RCA adapter into the video input of your PVR.
SVAT ELECTRONICS Now You Can See Connecting to DV or Digital Camera: Plug the black end of the RCA adapter into the video input of your PVR. Plug the yellow, red, and white ends into the video outputs of your DV or Digital Camera. 2.2 Video recording function: 1. Enter live view mode by pressing ESC key if you are in the page of main setup or playback 2. Press the RECORD button for 1-2 seconds on the side of your PVR and start to recording. 3. To stop recording, press “ESC” button. 4.
SVAT ELECTRONICS Now You Can See 3. SWITCHING BETWEEN ST ORAGE DEVICES At any time, you can press the CF~HDD button to switch between the storage devices. In playback mode, pressing the CF~HDD button will show / play the files in either one of the storage drive. Under video record mode, pressing the CF~HDD button will record the files into either one of the storage drives. 4. PLAYBACK The playback mode is one of the main functions on your PVR. It can play only ASF file format (video recorded by PVR).
SVAT ELECTRONICS Now You Can See Warning: After file deletion the files can not be recovered. Back up the files and confirm the deletion before deleting. 5. CONNECTING WITH PC Connecting with PC: Through the USB cable, you can connect the PVR with your PC and access the CF card or 20GB external HDD. If you have both the CF card and the HDD installed, unplug one of them before connecting the USB cable, as connecting both to the computer at the same time can cause errors. 6.
SVAT ELECTRONICS Now You Can See 7. HOW T O USE POWER SUPPLY PROPERLY The rechargeable battery of the PVR is a Li-Ion Battery. Before using please read the following carefully in order to use the power supply properly. 1. If the battery is not full, make sure that the battery is charged before use. 2. When the device is not in use, switch unit off to maintain the battery. 3. In colder places, the unit will consume more power. Please keep this device in warm places in order to increase the usable power.
SVAT ELECTRONICS Now You Can See 8. HOW T O USE THE PVR PROPERLY We recommend that you read this chapter carefully before use. The manufacturer disclaims any liability for damage which may result as a consequence of improper use or use contrary to the instructions contained herein: Environmental Conditions: 1. Do not use PVR in humid or dusty environments: 2. Do not expose this product to direct sun or high temperatures, such as a closed car in summer. 3.
SVAT ELECTRONICS Now You Can See 9. USING EXTERNAL ST ORAGE MEDIA For your PVR there are two external storage media: CF card and 20GB external HDD (optional accessory). Warning: 1. During data recording, please do not remove the external storage device (CF Card or HDD), because this action may cause the damage of the external storage device. 2. Please do not use external storage device under strong static electricity conditions to avoid any loss of data caused by static electricity. 3.
SVAT ELECTRONICS Now You Can See 9.2 Installation of external hard drive 1. Please remove the plastic flap from the back of the machine. 2. At the same time please press the buttons on the both sides of the hard drive slightly. 3. Adjust the hard drive docking connection to the machine and press slightly. If you hear the clicking sound, the assembly is successful. 4. Please push the locking button to let the machine and the hard drive match (on the bottom of the hard drive).
SVAT ELECTRONICS Now You Can See 9.3 Removing the external hard drive 1. Before removing the hard drive, please push the locking button to the left slightly. 2. At the same time please press the buttons on both sides of the hard drive slightly and pull back gently. Then you can remove the hard drive. Warning: 1. Before removing the external hard drive, please note that power supply of the device must be off, or it may cause damage to the hard drive. Same when you are using the CF card. 2.
SVAT ELECTRONICS Now You Can See 11.
SVAT ELECTRONICS Now You Can See 12. SPECIFICATIONS INDOOR PVR Display............................................................2.5" Color TFT-LCD Functionality ..................................................Simplex Video Compression ........................................MPEG4 ASF Resolution ......................................................704 x 240 Recording Frame Rate ..................................30 FPS Recording Time ..............................................
SVAT ELECTRONICS Now You Can See Housing Color ................................................Pure White Power Input ....................................................9V DC 500mA Power Adapter Input ......................................120V 60Hz Operating Temperature ..................................41°F ~ 104°F Operating Humidity ........................................30% ~ 80% Dimensions ....................................................2.8" x 4.1" x 0.8" Weight .................................
SVAT ELECTRONICS Now You Can See SVA SVAT SUPPORTS CRIME STOPPERS STOPPERS Crime Stoppers programs are operated as non-profit charities and are managed by a volunteer board of directors who raise funds and pay rewards to individuals who anonymously call with information that helps solve crime. Rewards are paid for tips that lead to the arrest and indictment of people charged with felony offenses, and to date Crime Stoppers statistics show a conviction rate of approximately 95%.
SVAT ELECTRONICS Now You Can See SVA SVAT SUPPORTS CRIME STOPPERS STOPPERS To receive more information about Crime Stoppers or to make a charitable donation please fill in the fields below, cut on the dotted line and mail in. CRIME STOPPERS INTERNATIONAL Crime Stoppers International is an organization of community based civilian Crime Stoppers programs, which assist police in solving crime. You can find more information about Crime Stoppers at www.c-s-i.
SVAT ELECTRONICS Now You Can See www.svat.com Disclaimer S VAT d o e s n o t e n d o r s e a n y o f S VAT p r o d u c t s f o r a n y i l l e g a l a c t i v i t i e s . S VAT i s n o t r e s p o n s i b l e o r l i a b l e i n a n y w a y shape or form for any damage, vandalism, theft or any o t h e r a c t i o n t h a t m a y o c c u r w h i l e a S VAT p r o d u c t i s i n u s e b y t h e p u r c h a s e r. Model # CV1002DVR www.svat.