SVAT ELECTRONICS now you can see Do-It-Yourself Compact DVR Security System w/ 4 Hi-Res Indoor/Outdoor Night Vision CCD Surveillance Camera COMPLETE SYSTEM INSTRUCTION MANUAL Version 1.0 Model# CLEARVU2 www.svat.
SVAT ELECTRONICS now you can see !IMPORTANT! PLEASE READ! NEED HELP? PLEASE DO NOT RETURN THIS PRODUCT TO THE STORE Please contact a DEFENDER customer support representative first regarding any additional information on product features, specifications or help with set-up. Please contact us via one of the methods below: Email: Online live web chat: www.svat.com/support support@svat.com Toll free telephone: Toll free fax: 1.866.946.7828 1.888.771.
SVAT ELECTRONICS now you can see PRODUCT WARRANTY & REGISTRATION Please visit our website at www.svat.com to apply for your product’s warranty registration. We take quality very seriously. This is why all of our products come with a one year warranty from the original purchase date against defects in workmanship and materials. If you have warranty or support issues please contact us using any of the following methods: Phone: 866.946.7828 Fax: 888.771.1701 Email: support@svat.com Website: www.svat.com 1.
SVAT ELECTRONICS now you can see TABLE OF CONTENTS INTRODUCTION................................................................ 2 PRODUCT FEATURES.......................................................... 3 WHAT’S INCLUDED............................................................ 4 BUTTONS & CONNECTIONS................................................. 4 INSTALLATIONS................................................................ 5 Camera Installation Tips.........................................
SVAT ELECTRONICS now you can see Buzzer Setup...................................................... 16 Motion Alert............................................................................. 16 Video Loss Alert........................................................................ 16 HDD Full Alert........................................................................... 16 Buzzer Time............................................................................. 17 Time Search....
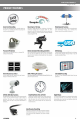
SVAT ELECTRONICS now you can see PRODUCT FEATURES CLEARVU2 3
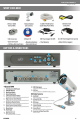
SVAT ELECTRONICS now you can see WHAT’S INCLUDED BUTTONS & CONNECTIONS CLEARVU2 4
SVAT ELECTRONICS now you can see INSTALLATIONS Camera Installation Tips • • • • Camera(s) should be installed between 8 and 13 feet above the area to be monitored. Ensure there are no obstructions in the camera’s view, to maximize viewing area. Ensure that the sunshade is positioned to avoid glare and position cameras away from direct sunlight. Decide whether the camera will be wall-mounted or if it will sit on a desk/table top.
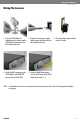
SVAT ELECTRONICS now you can see Wiring The Cameras 1. Plug the 4 PIN DIN female connection on the camera into the 4 PIN DIN male connection on the 60 ft video/power wire. 2. Plug the camera’s power supply into the power jack located on the 60 ft video/power wire. 4. Attach the BNC connectors to the VIDEO IN ports and VIDEO OUT port on the back of the DVR. 5. Connect the 60ft video/power wire’s male RCA plug to the VIDEO IN port for channels 1~4. 3.
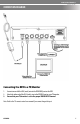
SVAT ELECTRONICS CONNECTiON DIAGRAM now you can see Connecting the DVR to a TV/Monitor 1. 2. 3. Connect one end of the RCA (male) wire to the VIDEO OUT port on the DVR. Attach the other end of the RCA (male) wire to the VIDEO IN port on your TV/monitor. Ensure that your TV/monitor is set to the proper VIDEO INPUT channel.
SVAT ELECTRONICS now you can see Powering On 1. The power adapter comes in two pieces. Assemble the power adapter by plugging the power cord into the power brick, as shown on the diagram on the previous page. Plug the three pronged power cord into a power outlet. (It is strongly recommended to use a surge protected power bar and Uninterrupted Power Supply (UPS) backup. This will prevent power surges or outages which may cause damage to the DVR or hard drive.
SVAT ELECTRONICS now you can see Record Mode While you are recording you will see a screen similar to the following: 1. The block icon (□) beside each camera channel indicates that the camera channel is recording. Note :in this example that camera 1 and camera 3 is not recording. 2. The text on the bottom left corner of the screen indicates the method of recording (EACH/QUAD). 3. The letter in brackets indicates the recording mode (T=TIME RECORD / A=MOTION ACTIVATED RECORD / M = MIXED RECORD).
SVAT ELECTRONICS now you can see 3. Press to pause your footage. 4. Press to view your footage in reverse. 5. Press to fast forward your footage. Press it again to change the fast forward speed (FF1, FF2, FF3). 6. Press the button to stop playback and return to Live Mode. Note: A maximum of 63 events can be recorded MAIN MENU to enter system setup. Use the • Press channel buttons (1-4) to enter a password. The default password is 111111.
SVAT ELECTRONICS now you can see Time Setup Ensure that your system time is accurate so that your recorded footage will be labeled with the correct event time. 1. Use the ▲/1▼/3 buttons to select the value you want to change (year, month, day, time). 2. Press the ►/4 to change the value. to confirm the date/ 3. Press time change Password Setup On this screen you can change your password. You can also choose to disable or enable the Menu Password and Stop Rec Password.
SVAT ELECTRONICS now you can see Load Default Use this option to reset the DVR to factory defaults. Please note that this will erase all your custom settings, but your recorded footage will be preserved. To reset your DVR to factory defaults and erase your custom settings: Select “LOAD DEFAULT” and press ►/4 twice to confirm. After the reset is complete, power off the DVR and power on again, by switching the power bar on and off. Language Setup Press ►/4 to toggle between English and Chinese.
SVAT ELECTRONICS now you can see Camera Setup Camera Enable This option allows you to enable/disable camera channels. Use the ▲/1▼/3 buttons to select the camera channel you want to enable/disable. Then press the ►/4 button to enable or disable that camera channel. Camera Title This option allows you to enable/disable the camera title display. If you use custom camera titles, you must enable camera title display for them to appear.
SVAT ELECTRONICS now you can see 4. 5. 6. 7. Motion Sensitivity - Press ►/4 to set up the motion sensitivity level (1-5, 1 being the most sensitive). Hue – Press ►/4 to adjust the color of the camera. Contrast – Press ►/4 to adjust the camera contrast. Brightness - Press ►/4 to adjust the camera brightness. CH1-CH4 Title To rename the camera titles, select the letter you want to change using the ▲/1▼/3 buttons and press ►/4 to change the letter. The “V” cursor indicates which letter you are changing.
SVAT ELECTRONICS now you can see Video Quality Press ►/4 to select between Low, Normal and High quality settings. Lower quality settings will record a lower quality picture but will allow you to record more footage. Higher quality settings will record a higher quality picture but will use more storage space on the DVR’s hard drive. Timer Rec Frame Rate Press ►/4 to change the timer record frame rate. This is the frame rate used when the DVR is scheduled to record by time (T).
SVAT ELECTRONICS now you can see Time Recording [T] The DVR will record continuously during the set time. Motion Recording [A] The DVR will record only when motion is detected during the set time. Time Motion (Mixed) [M] The DVR will record continuously during the set time, but when motion is detected it will record using the frame rate you set in “Motion Rec Frame Rate.
SVAT ELECTRONICS now you can see Buzzer Time Press ►/4 to adjust the amount of time in seconds (0-30 sec) that alerts will sound. You can also set the alert to continuous or off. Event List Time Search Use this option to search the DVR for a specific recorded event by time. 1. Use the ▲/1▼/3 buttons to select the Year/Month/Day and Hour/Minute/Second, and press ►/4 to change the values. 2. Press to start playing the video footage at the specified time (if it exists). 3.
SVAT ELECTRONICS now you can see Use this option to back up your recorded footage onto a USB flash drive for viewing on your PC. You must use the included software CD to view recorded footage on your PC (not Mac compatible). In the USB Device Setting subscreen, the following options are available: 1. Copy 2. Format 3. Erase Video Data IMPORTANT: Before copying your footage to the USB drive for the first time, you must format the drive for use in the DVR.
SVAT ELECTRONICS now you can see 5. Use the ▲/1▼/3 buttons to select the hour, minute and second from which you want to start backing up footage. Use the ►/4 button to change the values. To confirm this selection, press . 6. Select End Time, and press ►/4. 7. Use the ▲/1▼/3 buttons to select the hour, minute and second from which you want to stop backing up footage. Use the ►/4 button to change the values. To confirm this selection, press . 8. Select COPY, then press ►/4.
SVAT ELECTRONICS now you can see HDD Size This number indicates the size of the hard drive (in megabytes). HDD Used This number indicates how full the hard drive is (in megabytes). HDD Format To erase the hard drive, select this option and press ►/4. Enter your password to confirm. Warning: This will erase all your recorded footage. DVR PLAYER SOFTWARE To view recorded footage on your computer, you must use the included player software.
SVAT ELECTRONICS now you can see Software Installation 1. Place the CD-ROM that was included with the DVR system into your computer’s CD-ROM drive. If your computer does not automatically open the CD folder, go to Start>My Computer and double-click on the CD-ROM icon. 2. Copy and paste the program called Video Player onto the C: of your computer (My Computer>C:) 3. Create a shortcut to this program. Right click on the program and select Send to > Desktop (Create Shortcut). 4.
SVAT ELECTRONICS now you can see Capturing Images/Video to your Computer 1. Press the button to capture a picture/screenshot of the DVR footage. Screenshots will be stored in JPEG format, in C:\Capture_MYS. These JPEG picture files can now be stored or emailed. 2. Press the button to record video footage to your computer. Before clicking the button, ensure that the video is paused. A window will appear, showing that the video is capturing. Press “Stop Capture” when you are done capturing.
SVAT ELECTRONICS now you can see DVR PLAYER TROUBLESHOOTING No display on television 1. Make sure all RCA and power cables are plugged in securely and in their proper places. 2. Make sure your television is on the correct channel (input mode). DVR not recording 1. Make sure recording is enabled in each camera’s setting. Go to >Camera Setup>Camera Setting and enable recording for each camera if it has been disabled. 2.
SVAT ELECTRONICS now you can see SPECIFICATIONS 4 Channel DVR Functionality Video Compression Live Resolution Recording Frame Rate Recording Time Recording Resolution Recording Method Recording Qualities Recording Modes Recording Media Auto Resume Recording HDD Type Storage Capacity Video Format Video Loss Alarm Video Inputs Video Display Output Live Frame Rate Live Display Back-up/File Transfer Play Search Mode Play Speed Play Mode OSD & System Menu Display OSD Language Display Time and Date Stamp Displa
SVAT ELECTRONICS now you can see CCD Color Camera Camera Type Image Sensor Resolution Outdoor Use IP Rating Focal Length Focus Type Night Vision No. of IR LEDs and Range IR LED Control Video Output Min.
SVAT ELECTRONICS now you can see SVAT SUPPORTS CRIME STOPPERS Crime Stoppers programs are operated as non-profit charities and are managed by a volunteer board of directors who raise funds and pay rewards to individuals who anonymously call with information that helps solve crime. Rewards are paid for tips that lead to the arrest and indictment of people charged with felony offenses, and to date Crime Stoppers statistics show a conviction rate of approximately 95%. CLEARVU2 P.O.
SVAT ELECTRONICS now you can see SVAT SUPPORTS CRIME STOPPERS To receive more information about Crime Stoppers or to make a charitable donation please fill in the fields below, cut on the dotted line an mail in. CRIME STOPPERS INTERNATIONAL Crime Stoppers International is an organization of community based civilian Crime Stoppers programs, which assist police in solving crime. You can find more information about Crime Stoppers at www.c-s-i.org.
SVAT ELECTRONICS now you can see NOTES Customer Information Card User’s Name: Company Name: Address: Postal Code: Phone Number: Email: Model Number of Product: Serial Number of Product: Purchase Date: Place of Purchase: NOTE: We recommend that you keep a record of your purchase receipt with your manual for any future returns or support issues. CLEARVU2 www.svat.
SVAT ELECTRONICS now you can see VISIT US ON THE WEB! ► Product Information ► Specification Sheets ► User Manuals ► Software Updates ► Quick Start Guides ► Firmware Upgrades www.svat.com Disclaimer SVAT does not endorse any of SVAT products for any illegal activities. SVAT is not responsible or liable in any way shape or form for any damage, vandalism, theft or any other action that may occur while a SVAT product is in use by the purchaser. Model# CLEARVU2 www.svat.