Instruction Manual 12" Quad System with 4 B/W CCD Cameras Manuel D'Instruction Système de quadruple de 12"avec 4 appareils-photo de CCD de B/W Q1204 now you can see www.svat.
TABLE OF CONTENTS ENGLISH PAGE # Table Of Contents . . . . . . . . Introduction / Whats Included System Features . . . . . . . . . Installation . . . . . . . . . . . . . Wiring Diagram . . . . . . . . . . How To Operate . . . . . . . . . System Setup . . . . . . . . . . . Troubleshooting . . . . . . . . . . Specifications . . . . . . . . . . . Warranty . . . . . . . . . . . . . . . . . . . . . . . . . . . . . . . . . . . . . . . . . . . . . . . . . . . . . . . . . . . . . . . . . . . . . . . . . . .
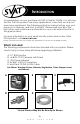
INTRODUCTION Congratulations on your purchase of SVAT’s ClearVu Q1204. You will soon find out that this product has many applications, some that we may not even have mentioned. The following instruction manual will go over your products, its features, and how to install it. Please read over all of the instructions and maintenance information so you can extend the life of this great product. For more information on your wired security system and on any other SVAT product, visit www.svat.com.
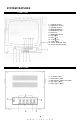
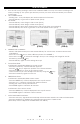
SYSTEM FEATURES FRONT VIEW 1. V-HOLD control 2. Brightness control 3. Contrast control 4. MODE/ENTER key 5. FREEZE/VCR key 6. AUTO key 7. ZOOM/SETUP key 8. CH1/ key 9. CH2/ key 10. CH3/ key 11. CH4/ key 12. Power Indicator LED 13. Power On/Off Switch BACK VIEW 1. 2. 3. 4. 5. DC Power Input Video Input (DIN) VCR Output: Video Out (BNC) VCR Input (BNC) Video Input (BNC) 4 w w w . s v a t .
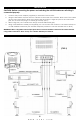
INSTALLATION CAUTION: Before connecting the power and switching the unit ON make sure all wiring is connected properly. 1. 2. 4. 5. Connect the power adapter (supplied) to the back of the monitor. Using the DIN cable connect the four cameras to the back of the monitor. Both ends of the cable are the same and will fit in both the camera and the monitor. Align the pins on the connection jack, do not force the plug in, it should go in freely.
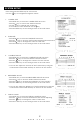
HOW TO OPERATE 1. 2. 3. Turn the unit on by pressing in the button marked POWER. You may encounter a buzzing noise when powering up.
SYSTEM SETUP * Press and hold the SETUP key for 2-3 seconds * Use the keys to navigate through the menus 1. CAMERA TITLE - Press SETUP key to enter the CAMERA TITLE sub-menu - Press the key to choose the desired camera - Use the key to change the characters - To move to the next character use the key - Press the SETUP key to save and go back to the main menu 2.
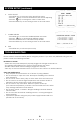
SYSTEM SETUP (continued) 6. AUTO ADJUST - Press SETUP key to enter the AUTO ADJUST sub-menu - Press the keys to choose desired item that needs adjusting - Press the keys to change the value of each item - Press the SETUP key to save and go back to the main menu 7. ALARM HISTORY - Press SETUP key to enter the ALARM HISTORY sub-menu - Press the keys to scroll through different pages - Press the MODE button to clear the history records - Press the SETUP key to save and go back to the main menu 8.
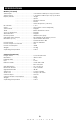
SPECIFICATIONS Monitor (12” Quad) Video input . . . . . . . . . . . . . . . . . . . . . . . . . Video output . . . . . . . . . . . . . . . . . . . . . . . . Display Modes: . . . . . . . . . . . . . . . . . . . . . . ...................... ...................... ...................... ...................... PIP window . . . . . . . . . . . . . . . . . . . . . . . . . Zoom . . . . . . . . . . . . . . . . . . . . . . . . . . . . . . Video Feeze . . . . . . . . . . . . . . . . . . . . . . . . Timer . . . . . .
PRODUCT WARRANTY We take quality very seriously. This is why all of our products come with a one year warranty from the original purchase date against defects in workmanship and materials. If you have warranty or support issues please contact us using any of the following methods: SVAT Electronics USA 2315 Whirlpool St., Unit 333 NIagara Falls, New York USA 14305 SVAT Electronics Canada 4080 Montrose Road Niagara Falls, ON Canada L2H 1J9 Phone: 866.946.7828 Fax: 888.771.1701 Email: support@svat.
INTRODUCTION Félicitations sur votre achat de ClearVu Q4 de SVAT. Vous découvrirez bientôt que ce produit a beaucoup d'applications, certains que nous avons pu même ne pas avoir mentionnés. Le manuel d'instruction suivant ira au-dessus de vos produits, ses dispositifs, et comment l'installer. L'excédent svp lu tout des instructions et de l'information d'entretien ainsi de vous peut prolonger la vie de ce grand produit.
CARACTÉRISTIQUES DU SYSTÈME VUE DE FACE 1. Commande de V-HOLD 2. Contrôle de luminosité 3. Commande de contraste 4. Le MODE/ÉCRIVENT la clef 5. Clef du GEL/magnétoscope 6. Clef AUTOMATIQUE 7. Clef de ZOOM/SETUP 8. CH1/ LÈVENT la clef 9. CH2/ verouillent VERS LE BAS 10. CH3/ Clef GAUCHE 11. CH4/ BONNE clef 12. Indicateur De Puissance LED 13. Commutateur "marche- arrêt" VUE ARRIÈRE 1. Entrée D'Alimentation CC 2. Entrée Visuelle (DIN) 3. Le Magnétoscope A produit : Vidéo Dehors (BNC) 4.
INSTALLATION ATTENTION : Avant de relier la puissance et commuter l'unité assurez-vous DESSUS que tout le câblage est relié correctement. 1. 2. 4. 5. Reliez l'adapteur de puissance (fourni) au dos du moniteur. En utilisant le câble DIN reliez les quatre appareils-photo au dos du moniteur. Les deux extrémités du câble sont identiques et s'adapteront dans l'appareil-photo et le moniteur. Alignez les goupilles sur le cric de raccordement, ne forcez pas la prise dedans, il devrait entrer librement.
Comment Fonctionner : 1. Tournez l'unité dessus en renversant le commutateur à "I" position.You peut rencontrer un long bruit de ronflement en mettant sous tension. Le système vous rappelle juste que vous avez les canaux inutilisés (pas appareil-photo relié) 2. MODE DE PLEIN ÉCRAN : - serrant CH1 - la clef 4 montrera le canal désiré dans le plein écran - appuyez sur la touche de MODE pour aller de nouveau au mode de QUADRUPLE (FIG-2) 3.
COMMENT FONCTIONNER (suite) * Exécuté dans le mode de PLEIN écran : - Appuyez sur la touche de GEL, F1234 est montré dans le coin gauche supérieur - Serrez le GEL encore pour unfreeze l'appareil-photo courant 7.
INSTALLATION de SYSTÈME (suite) 5. MODE D'AFFICHAGE - Serrez POUR INSTALLER la clef pour écrire le sous-menu de MODE d'AFFICHAGE - Appuyez sur les touches HAUT/BAS pour choisir l'article désiré qui a besoin s'ajuster - Appuyez sur les touches de LEFT/RIGHT pour changer la valeur de chaque article - Serrez POUR INSTALLER la clef pour sauver et aller de nouveau au menu principal 6.
CARACTÉRISTIQUES Moniteur (12 "Quadruple) Entrée visuelle . . . . . . . . . . . . . . . . . . . . . . . Rendement visuel . . . . . . . . . . . . . . . . . . . . Modes D'Affichage . . . . . . . . . . . . . . . . . . ...................... ...................... ...................... ...................... Fenêtre de PIP . . . . . . . . . . . . . . . . . . . . . . Bourdonnement . . . . . . . . . . . . . . . . . . . . . Feeze Visuel . . . . . . . . . . . . . . . . . . . . . . . . Temporisateur . . . . . . . .
GARANTIE DE PRODUIT Nous prenons la qualité très sérieusement. C'est pourquoi tous nos produits viennent avec une garantie d'un an de la date originale d'achat contre des défauts en exécution et matériaux. Si vous avez les issues de garantie ou de soutien satisfont nous contactent employant n'importe laquelle des méthodes suivantes : SVAT Electronics USA 2315 Whirlpool St., Unit 333 NIagara Falls, New York USA 14305 SVAT Electronics Canada 4080 Montrose Road Niagara Falls, ON Canada L2H 1J9 Phone: 866.
www.svat.com Disclaimer: SVAT does not endorse of any of SVAT products for any illegal activites. SVAT is not responsible or liable in any way shape or form for any damage, vandalism, theft or any other action that may occur while a SVAT product is in use by the purchaser. Déni : SVAT n'approuve d'aucun de produits de SVAT pour aucun activites illégal.