Clearvu S400 4 Indoor Camera Surveillance System User's Manual Système D'intérieur de Surveillance de Caméra Quatre. Le Manuel D'Utilisateur w w w . s v a t .
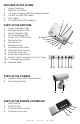
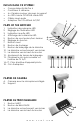
INCLUDED IN THIS SYSTEM: 1. 2. 3. 4. 5. 6. 4 Input Switcher Remote Controller 4 x Color Camera With Mounting bracket 4 x 30ft of 4 PIN DIN cable A/V cable 10V 600mA AC/DC Adaptor 1 2 PARTS OF THE SWITCHER 1. Power indication LED 2. Setting indication LED 3. Mute indication LED 4. Channel display LED 4 5. Power ON / OFF button 5 6. Setting button 6 7. Mute button 8. Storage button 9. Channel scan button 10. Channel down button 11. Channel up button 12. Scan time adjustment 13.
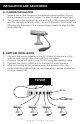
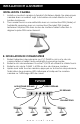
INSTALLATION AND ADJUSTMENT A. CAMERA INSTALLATION 1. 2. Install or mount the camera at the desired indoor location. Do not place camera in a location subject to direct sunlight or bright light. The coaxial cable supplied has one end with a DIN connector (Male) and the opposite end with a DIN connector(Female). Slowly insert the DIN plug into the back of the camera being careful to align the DIN plug correctly. B. SWITCHER INSTALLATION 1. 2. 3. 4.
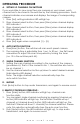
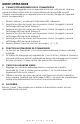
OPERATING PROCEDURE A. SETTING UP CHANNELS ON SWITCHER If you would like to view more then one camera on your screen, each channel has to be stored in the switcher by the following procedure. Each channel indicates one camera and displays the image of corresponding camera. 1. Press [Set], setting indication LED will light up 2. Press channel select button, then press [Store] when channel display LED indicates 1. 3. Press channel select button, then press [Store] when channel display LED indicates 2. 4.
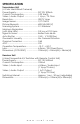
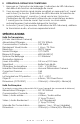
SPECIFICATION Transmission Unit (4 Color Hard Wired Cameras) Power Supply........................................DC12V 200mA Current Consumption..........................0.22 Watts Video / Audio Output ........................1 Vp-p / 75 Ohm Resolution..............................................330 TV Lines Image Sensor........................................1/3" CMOS Picture Elements ..................................628 (H)×582 (V) Scanning System..................................
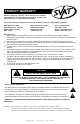
PRODUCT WARRANTY We take quality very seriously. This is why all of our products come with a one year warranty from the original purchase date against defects in workmanship and materials. If you have warranty or support issues please contact us using any of the following methods: SVAT Electronics USA 2315 Whirlpool St., Unit 333 NIagara Falls, New York USA 14305 SVAT Electronics Canada 4080 Montrose Road Niagara Falls, ON Canada L2H 1J9 Phone: 866.946.7828 Fax: 888.771.1701 Email: support@svat.
INCLUS DANS CE SYSTÈME : • • • • • • Commutateur Entré Par 4 Contrôleur À distance 4 x Caméra couleur de avec le support 4 x 30ft 4 de la GOUPILLE câble DIN Câble visuel audio Adapteur De 10V 600mA AC/DC 1 2 PARTS OF THE SWITCHER 1. 2. 3. 4. 5. 6. 7. 8. 9. 10. 11. 12. 13.
INSTALLATION ET AJUSTEMENT INSTALLATION CAMERA. 1. 2. Install ou montent caméra à l'endroit d'intérieur désiré. Ne placez pas caméra dans un endroit sujet à la lumière du soleil directe ou à la lumière lumineuse. The coaxial fourni a une extrémité avec un connecteur DIN (Male) et l'extrémité opposée avec un connecteur (Female) DIN. Insérez lentement la prise DIN dans le dos de caméra faisant attention à aligner la prise DIN correctement. B. INSTALLATION DE COMMUTATEUR 1. 2. 3. 4.
MODE OPÉRATOIRE A. CANAUX D'ÉTABLISSEMENT SUR LE COMMUTATEUR Si vous voudriez regarder puis un appareil-photo sur votre écran, chaque canal doit être stocké dans le commutateur par le procédé suivant. Chaque canal indique un appareil-photo et montre l'image de l'appareilphoto correspondant. 1. 2. 3. 4. 5. 6. B. 1. 2. Serrez [ placez ], en plaçant l'indication LED s'allumera. Serrez le bouton de canal, puis la pression choisis [ magasin l'affichage LED de canal indique 1.
E. 1. 2. 3. OPÉRATION À DISTANCE DE CONTRÔLEUR. Appuyez sur [ le bouton de balayage ], indicateur de LED s'allumera, des débuts de fonction de balayage de canal. Vous pouvez choisir le canal simple surveillant en appuyant sur [ canal vers le haut ] le bouton (l'indicateur de LED s'allumera, la Manche de commutateur lèvera 1 canal) ou [ canal vers le bas ] le bouton (l'indicateur de LED s'allumera, la Manche de commutateur avalera 1 canal) pour le choix de canal.
GARANTIE DE PRODUIT Nous prenons la qualité très sérieusement. C'est pourquoi tous nos produits viennent avec une garantie d'un an de la date originale d'achat contre des défauts en exécution et matériaux. Si vous avez les issues de garantie ou de soutien satisfont nous contactent employant n'importe laquelle des méthodes suivantes : SVAT Electronics USA 2315 Whirlpool St., Unit 333 NIagara Falls, New York USA 14305 SVAT Electronics Canada 4080 Montrose Road Niagara Falls, ON Canada L2H 1J9 Phone: 866.
If you require more information on this product or other SVAT products visit www.svat.