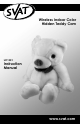
Wireless Indoor Color Hidden Teddy Cam UC1301 Instruction Manual www.svat.
IMPORTANT SAFETY PRECAUTIONS PLEASE READ BEFORE USE Congratulations on your new purchase of SVAT’s UC1301 Teddy Cam. Please read through carefully before installing or using this system. • All the safety and operating instructions should be followed and read before the product is operated. • The safety and operating instructions should be retained for future reference. • All warnings on the product and in the operating instructions should be adhered to. • This product is not a toy.
INTRODUCTION The SVAT UC1301 Wireless Indoor Color Hidden Teddy Cam allows you to discretely keep an eye on your children. The Teddy Cam is very easy to install, the transmitter is discretely hidden, and you don’t have to worry about messy wiring through your infant’s room. This smart and cuddly bear is the perfect solution for affordable baby monitoring. MAIN FEATURES: •High Resolution Color CMOS Camera •High Performance Audio/Video Receiver •Operating frequency of 2.
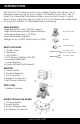
INSTALLATION TEDDY CAM 1. The Teddy Cam can be powered by either a 9 volt battery or with the included AC Adapter. 2. Move the Teddy Cam to the desired location. NOTE: The transmission range of the Teddy Cam is up to 150ft. Real distance depends on its operating environment. If you are receiving interference, try shortening the transmission range. Reposition and/or adjust the Teddy Cam if video transmission is being degraded by obstructions in its operating environment. 3.
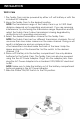
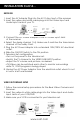
INSTALLATION Cont’d... RECEIVER 1. Insert the AV Adapter Plug into the AV Output port of the receiver 2. Insert the yellow and white cable plugs into the Video Input and Audio Input Jacks of your TV. Receiver Audio Input 3.5 Plug White Plug TV Video Input Yellow Plug AV Cable Bear Video Camera 3. Connect the AC Power Adapter to the 9V Power Input Jack of the receiver. 4. Select the desire channel (1-4). Make sure it matches the transmission channel of the Teddy Cam. 5.
TROUBLESHOOTING Please read this user’s manual carefully before using. If you still have difficulties to use the product, consult the following syndrome, which will help you solve most common problems. No picture after turning on the TV 1. Check the power supply. •Ensure that both the transmitter and receiver are properly connected and set to the same channels. •Ensure both the transmitter and receiver power indicators illuminate. 2. Ensure the video cable is well connected. 3.
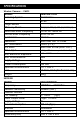
SPECIFICATIONS Wireless Camera -- CMOS MODEL Scanning System DESCRIPTION 2:1 Interlace NTSC Image Sensor Efficiency Pixels Horizontal Scan Frequency Vertical Scan Frequency Synchronize Resolution Min. Illumination S/N Ratio Video Input Auto Electronic Exposure Auto White Balance Supply Voltage Power Consumption Operation Environment Lens Weight 1/3" CMOS Image Sensor 510 (H) X 492 (V) 628 (H) X 582 (V) 15750 Hz 15625 Hz 60 Hz 50 Hz Internal More than 300 TV Lines 3 LUX (F1.
PRODUCT WARRANTY We take quality very seriously. This is why all of our products come with a one year warranty from the original purchase date against defects in workmanship and materials. If you have warranty or support issues please contact us using any of the following methods: SVAT Electronics USA 2315 Whirlpool St., Unit 333 NIagara Falls, New York USA 14305 SVAT Electronics Canada 4080 Montrose Road Niagara Falls, ON Canada L2H 1J9 Phone: 866.946.7828 Fax: 888.771.1701 Email: support@svat.
If you require more information on this product or other SVAT products visit www.svat.com __________________________________________________________________________________________________________________ FCC STATEMENT: This equipment has been tested and found to comply with the limits of a Class B digital device, pursuant to Part 15 of the FCC Rules. These limits are designed to provide reasonable protection against harmful interference in a residential installation.