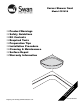
Corner Shower Seat Model CS1616 Product Warnings Safety Guidelines Kit Contents Required Tools Preparation Tips Installation Procedure Cleaning & Maintenance Surface Repair Warranty Information R ea B da ef n or d e Un In d st er al s lin ta g nd Register your warranty at www.swanstone.com.
The Swanstone Assurance — if our product is properly installed and maintained, as stated in these instructions, it will not leak. Remember – Safety First IMPORTANT NOTICE The Swan Corporation, the makers of the Swanstone Wall Systems and Panels, cannot anticipate every possible circumstance that might involve a potential hazard during the installation of our product(s). The warnings and instructions in this installation guide are, therefore, not all-inclusive.
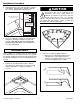
Safety Guidelines Personal Protection Be sure to use all personal protective equipment, such as sturdy work boots, preferably with steel toes, gloves, and hard hat, if necessary, to ensure your own safety. To prevent possible damage to your hearing, always wear ear protection, such as earmuffs or earplugs, when working around power tools. IMPORTANT NOTICE IMPORTANT NOTICE: Indicates that equipment or property damage can result if instructions are not followed.
Safety Guidelines General Information General Information particles from going into the air. Always work in a wellventilated area. Always use an OSHA approved dust mask when cutting, drilling, or sanding Swanstone products. Required Tools Tape measure Level and pencil Power Tool Hazard To prevent personal injury or possible death, always follow the electrical safety recommendations of the power tool’s manufacturer. Do not use power tools in an unsafe manner.
General Information Installation Procedure Preparation Tips Corner Shower Seat Installation The mounting surface must be free of dirt, film, waxes, or any other residues. The shower seat is a corner mount design that can add comfort and convenience to your shower. It is designed to coordinate with Swanstone tub & shower walls, floors, and accessories. The molded run-off channel means water will not pool on top of the seat. Caulking Tips Follow the instructions on the caulking tube.
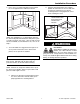
Installation Procedure 2. Use 2-1/2” to 3” long #12 drywall screws to attach the 2 x 6 supports to the stud wall, as shown. b. Using the mounting bracket as a template, position the bolt holes over the line and mark the bolt hole locations. Be sure that the mounting bracket is snug against the corner before marking the holes.
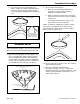
Installation Procedure 4. Drill six pilot holes at the marked locations, using the 3/16” drill bit. Drill through the wall panel and into the 2 x 6 inch support block installed earlier. CAUTION The locking tabs on the underside of the Swanstone seat must engage behind the stainless steel bracket to prevent the seat from moving away from the wall. Do not apply adhesive until you have trial fit the seat and made sure the locking tabs fully engage.
Installation Procedure b. If the wall corner is not exactly 90 degrees square, it will be necessary to sand the sides of the seat in order to achieve a proper fit. Use a coarse grit (60 grit) sandpaper when sanding the seat. 9. Set the shower seat into place. a. Make sure the locking tabs molded into the underside of the seat engage behind the stainless steel support bracket. b. Apply a continuous bead of silicone around the outer perimeter of the shower seat to completely seal the joint.
Maintenance and Surface Repair Care and Cleaning Surface Repair The Swanstone products are stain and abrasion resistant; however, the finish requires reasonable care. Light Scratches Use 400 grit sandpaper to remove light scratches in the surface. IMPORTANT NOTICE Deep Scratches or Gouges Because cleaning products change over time, always check the manufacturer’s instructions to make sure it is compatible with solid surface acrylic.
Warranty LIMITED WARRANTY FOR RESIDENTIAL APPLICATIONS LIMITED WARRANTY FOR COMMERCIAL APPLICATIONS If a Swanstone product covered by this warranty is found to be defective in materials or workmanship, after inspection by an authorized Swan Corporation representative, we will repair, or at our option, exchange the product for a similar model. This warranty extends for a designated period of time, so long as it remains in use in its original place of installation.
Save these Installation Instructions for future reference. They provide important information on cleaning, maintenance, and surface repair of Swanstone products. www.swanstone.