
Installation Guide
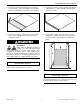
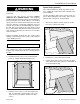


2. Place the back wall panel, finished side facing up,
on a flat surface. Place the template over the wall
panel and carefully trace the outline of the template.
3. Remove the template and place pieces of masking
tape over the area where the saw contacts the
Swanstone panel.
Dust Hazard
When cutting or drilling the Swanstone
product, use a dust collection method
which prevents dust particles from
going into the air. Always work in a well-ventilated area.
To keep the area well-ventilated, open windows and use
exhaust fans. Always use an OSHA approved dust mask
when cutting, drilling, or sanding Swanstone products.
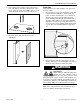
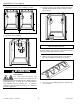
Any cutout for accessories should have rounded corners
(sharp corners can promote stress cracks).
4. Cut the panel using a circular saw with a 60-80 tooth
carbide blade or a saber saw with a bi-metal blade
(14 teeth per inch).
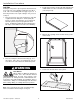
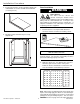
5. Dry fit the back panel, and make any necessary
adjustments. Temporarily secure the back panel to
the wall in order to properly fit the front and rear
panels.
DO NOT force a panel to fit a bowed or curved wall as it
may break; furthermore, the resiliency of the panel can
break the silicone bond to the wall surface.
IMPORTANT NOTICE
IMPORTANT NOTICE
WARNING
Installation Procedure
800-325-7008 11 The Swan Corporation – Swanstone