
Installation Guide


This process is not recommended for the do-it-yourself
homeowner.
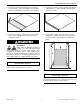
Using hot melt glue in place of bracing requires
application by a qualified installer. This temporary
bonding method must hold the panel to the wall during the
24 hour curing time of the silicone adhesive. The hot melt
glue by itself is not sufficient to bond the panel to the wall.
Therefore, improper or inadequate application of the hot
melt glue may result in insufficient bonding of the panel to
the wall. Due to the weight of the panel, failure to follow
this recommendation may allow it to detach itself from the
wall, causing possible injury to someone in or around the
shower enclosure.
Improper installation methods may also result in water
damage or other damage to floors, walls, or other portions
of your building or home.
Do not use a home applicator, craft-type hot melt glue
gun. Using this type of glue gun will NOT hold the panels
in place long enough for the silicone to bond properly to
the wall.
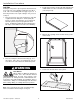
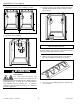
3. Install back panel (1) first. Then, install left hand
panel (2). Finally, install right hand panel (3).
4. Firmly press the surface of each panel against the
wall. It is important to apply hand pressure to the
entire surface of the panel to bond it to the wall
surface.
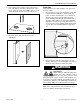
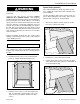
Apron Strips (optional)
If the wall and wall panel extends beyond the shower
base, adding apron strips will provide a finished look to
your installation.
The two small apron strips can be cut from scraps of a
panel. When cutting these apron strips, make sure the
finished edge of the panel is facing outward.
1. Measure the distance from the top of the shower
base to the outside of the panel.
2. Cut two pieces of the Swanstone material.
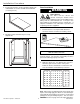
3. Hold the apron strips in place and scribe the angle
of the shower base onto each piece. Remember, do
not cut the finished edge.
1
2 3
IMPORTANT NOTICE
WARNING
Installation Procedure
800-325-7008 15 The Swan Corporation – Swanstone