
Installation Guide


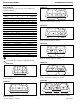


3. Measure 5/16" (8 mm) inside the initial sink outline and
draw a second line inside the first. Draw a 1-1/2" radius at
each corner. The second inside line will be the cutout line.
4. Drill a starter hole inside of the cutout line.
5. Use a saber saw and cut the opening in the countertop
following the inside pencil line. Trial fit the sink to check for
proper fit.
Note: All Swanstone sinks are manufactured with one
predrilled hole. Optional locations for additional holes are
located on the underside of the sink using marks which are
cast into the sink. Follow Steps 6 and 7 for drilling additional
holes to meet the requirements of the sink faucet or other
accessories.
6. If necessary, identify the location of additional holes for the
faucet or other accessories and drill a 1/4” pilot hole from
the back side of the sink.
7. Drill the additional hole(s), using the 1/4” pilot hole for a
guide, with a 1-3/8” hole saw.
8. Apply a bead of caulk (not included) to the underside of
the sink flange and place the sink in the opening.
9. Tighten the sink retaining screws evenly.
KS-008
KS-007
KS-006
KS-005
KS-004
KS-003
KS-002
R 1-1/2”
5/16”
The Swan Corporation – Swanstone 6 800-325-7008
Installation Procedure