
Installation Guide
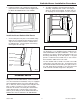
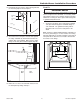


14. Push down firmly to lock the wall mounting tabs into
the mounting clips on the back panel.
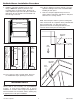
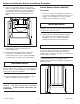
15. The bottom of the side panel must fit flush against
the ledge of bathtub (A) and should extend to the
outside edge of the bathtub. Make sure the upper
flange on the side panel and back panel align (B).
16. Make sure to remove the nail which was bent over
the back panel top flange in Step 2.
Final Fit
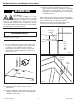
DO NOT deform the alcove panel attachment flange to
achieve a tight fit to the wall studs. If necessary, install
tapered shims between the attachment flange and wall
stud before securing the alcove panel with roofing nails
or galvanized drywall screws.
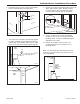
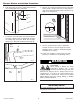
1. Anchor the top flange on the back panel by drilling
3/16" pilot holes through the horizontal flange at
each wall stud. Use galvanized roofing nails or
drywall screws to secure the back panel to the
studs.
Note: Moisture resistant wallboard will be installed over
the alcove panel flanges. For best results, when using
galvanized drywall screws, drill a shallow countersink at
each pilot hole to allow the screw head to fit flush with
the surface of the flange.
ABS-021
IMPORTANT NOTICE
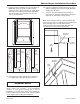
Back
Wall
Side
Panel
ABS-017a
B
ABS-018a
Bathtub
Ledge
Side
Panel
A
Mounting
Tab
Mounting
Clip
ABS-015
Side Panel
Back Panel
800-325-7008 15 The Swan Corporation
Bathtub Alcove Installation Procedure