
Installation Guide
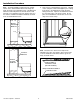


Optional Shower Floor Toe-nailing Procedure
If desired, after the shower floor has been set into a
mortar base and leveled, follow this optional procedure
for toe-nailing the shower floor to the framework.
The shower floor must be set in a bed of mortar
to properly hold it in place. Nails may also be
added, but are not necessary to hold the
shower floor in place. To prevent damage to
the shower floor and possible water or other damage to
floors, pipes, walls, or other portions of your building or
home, do not nail or screw through any part of the
shower floor. If nails are used, they must be installed
above the shower floor flange and not through it.
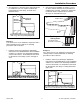
1. Drive large head (roofing) nails into the studs just
above the top of the shower floor flange, at a slight
downward angle until the head is flush with the edge
of the shower floor lip.
2. Tap the head of the nail downward so it is just above
the flange. Do not put side or downward pressure
against the flange.
Care and Cleaning
Swan products are stain and abrasion resistant;
however, the finish requires reasonable care.
Because cleaning products change over time, always
check the manufacturer’s instructions to make sure it is
compatible with plastic. DO NOT use a cleaner if the
label indicates it should not be used on plastics. DO NOT
use spray-on cleaners that require daily use without
immediately rinsing with water to stop the chemical
cleaning reaction because damage will result and void the
warranty.
Day-To-Day Cleanup
Simply wipe the surfaces with a clean towel to remove
watermarks and residues. All Swan products can be
cleaned with warm water, a soft cloth, and normal
household detergents or cleansers, such as Fantastic,
Formula 409, Clorox Clean-up, Handy Andy, Mr. Clean,
or Lestoil. Always rinse off cleaners within five minutes
of application.
If necessary, use an abrasive cleaner such as Ajax or
Comet with a nylon brush or pad to remove build up on
the shower floor pebble surface. Do Not use steel wool
or a wire brush. This will damage the surface.
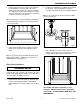
Caulking Joints
If silicone caulking was applied after installation of the
wall panels or tile, inspect the caulking joints monthly for
damage or any signs of separation from the mating
surface. Cracks in the caulking will allow water to leak
into the surrounding surfaces. Reapply caulking to
any joint showing signs of wear or cracking. Failure
to inspect and repair caulking joints will void the
warranty.
Surface Repair
Light Scratches
Use 400 grit sandpaper to remove light scratches in the
surface.
Deep Scratches or Gouges
For deeper scratches or gouges, use 220 or 320 grit
sandpaper. A “Scotchbright pad” can be used to blend
the repair into the surrounding area.
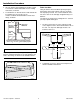
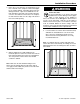
IMPORTANT NOTICE
YES NO
WARNING
Installation Procedure Maintenance & Surface Repair
The Swan Corporation – Swanstone 18 800-325-7008