
Installation Guide


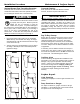


3. Level the barrier-free shower floor in both directions
and make sure all support ribs and the front edge of
the shower base make firm contact with the subfloor.
If any part of the shower floor is not completely
supported, proceed to Steps 5a through 5d; if it is
fully supported, skip Step 5.
Note: Optional, but not required, fasten the shower floor
to the framework by toe-nailing above the floor flange,
refer to the Optional Shower Floor Toe-nailing Procedure
section in this manual. Do not drive nails through any
part of the shower base, as stated below.
Do Not Use Nails
To prevent damage to the shower floor and
possible water or other damage to floors, pipes,
walls, or other portions of your building or
home, do not nail or screw through the shower floor to
secure it to the framework. Nails are not necessary to
hold the shower floor in place, but if nails are used they
must be installed above the shower flange and not
through it. Refer to the specific instructions in this manual
for the proper installation of these optional nails.
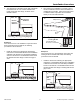
Note: The ideal installation results when the outside
surface of the wall board and shower floor flange are
flush, as shown in the illustration below. This dimension
allows the Swan wall panels or alternate shower wall
material, to rest against the lip of the shower floor once
the moisture-resistant wall board is installed, as shown
in the second illustration below.
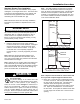
Note: The barrier-free shower floor ramp can be
installed on the same floor surface as the shower floor
or can be installed on raised floor surface (up to 1/2”
thick), as shown below.
4. Place the barrier-free shower floor ramp into all eight
of the stainless steel clips to prevent the shower
ramp from moving. The front (thin) edge of the
shower floor ramp must completely contact the floor
surface.
Ramp Installed on
Raised Floor Level
(1/2” max. thickness)
Ramp and Shower Installed on
Same Floor Level
Swanstone
Wall Panel
Moisture
Resistant
Wallboard
Moisture
Resistant
Wallboard
1/2”
WARNING
800-325-7008 15 The Swan Corporation – Swanstone
Installation Procedure