
Installation Guide
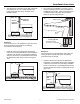
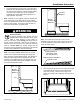


3. Place the shower floor into the rough opening and
firmly press it into the mortar/thinset. The exposed
front bottom edge(s) of the shower floor should
contact the subfloor.
4. Level the shower floor in both directions, and allow
the mortar/thinset to cure for 24 hours. Once cured,
the mortar/thinset will prevent the shower floor from
moving without the use of any mechanical fasteners.
5. Refer to Floor Drain Installation section in this
manual to complete the shower floor installation
procedure.
Barrier-Free Shower Floor and Ramp
Installation
The barrier-free shower floor is designed to be installed
directly on the subfloor and should fit in the rough
opening with a recommended 3/16” gap between the
shower floor and the framework.
If the installation of the barrier-free shower floor requires
the attachment of the barrier-free shower ramp, it is
essential that the eight stainless steel clips, included
with the ramp, be attached to the threshold of the
barrier-free shower floor before final installation.
If the floor is not level and flat, the shower floor must be
set in a bed of mortar to provide adequate support, as
described in Step 5. Install the shower floor using a
mortar mixture or an equivalent material, such as
thinset. If the floor is perfectly level and flat, you may
skip Step 5.
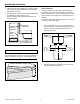
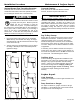
1. Attach each of the eight stainless steel clips to the
underside of the shower floor threshold, positioned
so they will be located between alternating structural
ribs on the underside of the shower floor ramp.
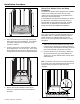
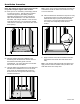
2. Place the shower floor in the opening. Make sure
the recommended 3/16” gap exists between the
shower floor, the side wall framework, and the back
wall framework.
Note: The bottom of the clips must contact the subfloor.
If necessary, shim under the barrier-free shower floor for
subfloor contact to prevent the clips from being
dislodged.
IMPORTANT NOTICE
The Swan Corporation – Swanstone 14 800-325-7008
Installation Procedure