™ Advanced security made easy ™ Keypad PIR Alarm SW351-KCH Operating Instructions SW351-KCH www.swannsecurity.
Table of Contents Package Contents / IMPORTANT - Read Before Installing 2 Overview 3 Mounting the PIR Alarm Unit 4 Detection Area 5 Operating the Alarm Unit 6 Maintenance and Technical Specifications 7 Technical Support / Warranty Information Rear Cover Package Contents PIR Alarm Unit Mounting Hardware Mounting bracket IMPORTANT - Read Before Installing • Do not expose any part of the alarm unit to any sudden shocks (such as being dropped or struck).
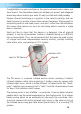
Overview Congratulations on your purchase on this passive infrared motion alarm unit from Swann! This stand-alone alarm unit will help you protect and safeguard almost any indoor location you want. It’s easy to install and totally wireless. Passive infrared technology is a popular in the security industry, and can detect a person in motion at more than a dozen feet away.
Mounting the PIR Alarm Unit Mounting To mount the PIR alarm unit, you’ll need the following tools: • A screwdriver • A drill (for hardwood or masonry) The alarm unit should be mounted between 5ft/1.8m and 7ft/2.6m high, and be angled a few degrees towards the ground (see the coverage diagram, below). Of course, your situation is unique, and you may need to alter the height and angle of the sensor to meet your particular needs (such as looking up a flight of stairs). To mount the alarm unit: 1.
Detection Area Detection Area: The PIR sensor has a range of approximately 110 degrees horizontally, and approximately 70 degrees vertically (see diagram). You can test the functionality of the motion sensor as well as the detection area by setting up the sensor, setting it to chime mode and then moving about in the area you want to protect. It will chime each time it detects movement, allowing you to obtain a very accurate impression of the field of view.
Operating the Alarm Unit Alarm / Chime Mode The switch to select the mode the sensor operates in can be found in the battery compartment. You can access it by removing the sensor from its mounted position, and opening the battery compartment. Alarm Mode: When the sensor detects movement whilst the unit is in alarm mode, it will not activate immediately. There is a thirty second delay, to allow you (or other persons who know the passcode) to disarm the sensor before it goes off.
Maintenance and Technical Specifications Passcode Your passcode must be four digits long, and should be something that you will remember. Try to avoid obvious combinations (such as 1234 or similar). To set your passcode: • If you’ve already mounted the alarm unit, remove it from its mounting bracket. • Open the battery compartment on the rear of the alarm. • Locate the button labeled LEARN. • Press this button. • Then, enter your four digit passcode.
Helpdesk / Technical Support Details Swann Technical Support All Countries E-mail: tech@swannsecurity.com Telephone Helpdesk USA toll free 1-800-627-2799 (Su, 2pm-10pm US PT) (M-Th, 6am-10pm US PT) (F 6am-2pm US PT) USA Exchange & Repairs 1-800-627-2799 (Option 1) (M-F, 9am-5pm US PT) AUSTRALIA toll free 1300 138 324 (M 9am-5pm AUS ET) (Tu-F 1am-5pm AUS ET) (Sa 1am-9am AUS ET) NEW ZEALAND toll free 0800 479 266 UK 0203 027 0979 See http://www.worldtimeserver.