Advanced-Series Four Channel H.
Before You Begin FCC Verification: NOTE: This equipment has been tested and found to comply with the limits for Class B digital device, pursuant to part 15 of the FCC Rules. These limits are designed to provide reasonable protection against harmful interference in a residential installation.
Table of Contents Before You Begin 2 Table of Contents 3 Overview 4 Important Information & Package Contents 5 Front Panel 6 Rear Panel 7 Remote Control 8 Connecting Cameras 9 Navigating the Menus 10 - 11 Starting the DVR 12 The Main Menu 13 The Camera (Display Setup) Menu 14 The Record Setup Menu 15 The Record Schedule 16 The Network Menu 17 Video Search, File List & USB Backup 18 Backup 19 Playback 20 Playing Back
Overview Congratulations on your purchase of the DVR! You’ve chosen a versatile, powerful and great value security monitoring and recording solution for your home or business. Let’s just take a moment to talk about some of the great features that the DVR offers and some of the things to think about before installing the system. 4 Channel Monitoring and Recording The DVR can monitor and record four channels simultaneously. You can configure the recording modes for each of the four channels independently.
Important Information • • • • • • • • • IMPORTANT GUIDELINES Do not expose the DVR to moisture. Water is the arch-enemy of electrical components and also poses a high risk of electric shock. Avoid dusty locations. Dust has a tendency to build up inside the DVR case, leading to a high risk of failure or even fire. Only install the DVR in a well ventilated space. The circuitry and hard drive in the DVR produces a significant amount of heat, and this heat needs a way out.
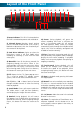
Layout of the Front Panel 9 10 11 12 13 14 18 1 2 3 4 5 6 7 8 15 16 17 19 1) Power Indicator: This LED is illuminated when the DVR is connected to power and switched on. 2) Infrared Sensor: Monitors signals coming from the infrared remote control. If this sensor is blocked or obstructed, then the functionality of the remote will be impaired. 3) Hard Drive Indicator: Lights up when the hard drive is active. It will flash rapidly when recording or searching (in time with the read/ write cycles).
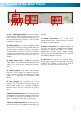
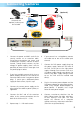
Layout of the Rear Panel 5 8 7 9 6 2 1 4 3 1) CH1 ~ CH4 (Video Inputs): These are the four camera inputs, labelled as per their channel in the DVR’s interface. Thus, plug the camera you want to be associated with Channel 1 into the port marked CH1 and so on. footage. 2) Video Outputs: This sends a composite video signal out of the DVR. Each of the two ports can be connected to separate monitors.
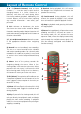
Layout of Remote Control 1) 0 ~ 9 (Numeric Buttons): Used to input numbers. 1 ~ 4 can be used as quick channel changing buttons in a similar manner to a television, and these will work during either live-viewing mode or playback. Additionally, the numeric buttons will be used when inputting any numerical information – most often, your password. 2) ALL: Activates or deactivates the entire area shown on screen to be armed for Motion Detection recording mode.
Connecting Cameras 1 2 Note: Cameras and accessories are optional, and may not be included. 3 4 1. 2. Connect the power and BNC ends of the security camera to an extension cable. Ensure these connections are secure, and shielded from weather, moisture or other hazards. Though Swann cameras use low voltage DC power supplies, there is still the possibility of short circuits if water gets into the power plug or socket.
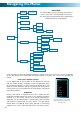
Navigating the Menus Camera IMPORTANT: The DVR displays the menu on only one output at a time. If the DVR is not displaying the menu on the screen you have connected, press and hold the REWIND button to swap displays.
IMPORTANT - Remembering to Apply Your Changes When you’re using the menus to change settings or values, none of your changes will be saved until you choose the “Apply” option, which is usually located in the lower right-hand corner of the screen. Always select the APPLY button before leaving a menu if you want to save the changes that you have made. There are two reasons why the “Apply” button needs to be expressly selected.
Starting the DVR Once the DVR has been connected to power it will switch itself on automatically. The DVR takes approximately 45 seconds to boot up, during which time the image to the right will be displayed. The default mode of the DVR is live-viewing mode. This is the mode which monitors the images coming from your cameras in real-time, and allows you to configure your recording and channel options. The DVR automatically starts in live-viewing mode, with multi-view enabled.
The Main Menu The MAIN MENU of the DVR. In this picture, the mouse cursor is currently highlighting the CAMERA icon. Camera (Display Setup): The camera menu contains all the options for setting up how the DVR interfaces with and displays the images from the cameras connected to it. This is where channels are enabled or disabled in live viewing, and where the AUTOSEQ (Automatic Sequence) function can be configured. Record: Where you can configure the recording options for the DVR.
The Camera (Display Setup) Menu The DISPLAY SETUP MENU of the DVR. In this picture, the mouse cursor is currently highlighting the CH1 title field. Naming Channels You can change the name of any channel from the default (and rather drab) “CHx” to anything that you would like (provided it’s short enough to fit in the box). A descriptive name on each channel often makes it easier to remember what camera is where, and which channel would have captured an event you might be looking for.
The Record Setup Menu In the RECORD SETUP menu you can choose which channels will be active during recording, change the recording quality, enable & disable audio, select record mode and pack time (the maximum size of each recorded file). This menu contains many of the most important settings on the DVR, and correctly configuring them is important to its ongoing smooth operation. Enabling / Disabling Recording Choose whether the channel you’ve selected will be recorded or not here.
The Recording Schedule The SCHEDULE screen. In this image, the schedule is configured to record constantly between 0:00 (12:00AM) Friday morning until midnight Monday, except between 12:00 and 19:00 (7:00PM) on Saturday afternoon, when it will record when triggered by the alarm settings. At all other times, the DVR is configured not to record anything at all. The first step in setting the schedule is choosing which channel you’d like to set the schedule for.
The Network Menu This is the NETWORK SETUP screen. This is the most technically complex aspect to setting up the DVR, and does require a working knowledge of network technologies. If you are unfamiliar with networking, then we suggest talking with a professional - ideally, the same person who installed your network, as they’ll know exactly how it’s configured and how best to setup the DVR.
Video Search, File List & USB Backup The VIDEO SEARCH screen. This is your first stop when you want to locate, playback or back up a recording. There are a couple of ways to search. You can either search by date and time, and then locate your event on an exported list of files, or you can jump straight into the event log and search manually through all incidents. Video Search In the VIDEO SEARCH screen you can search for a specific day for a recording and view it in playback mode.
Backup • • • • • • • • • • Preparing a USB Flash Drive Most, but not all, USB flash drives are compatible with the DVR. The flash drive will have to be formatted with the correct file structure, which is FAT32. This can be done via a compatible computer, or you can have the DVR itself format the USB flash drive. To do this: • Insert the flash drive into the USB slot on the rear of the DVR. • Open the Main Menu, and select Device Management. From the Device Management menu, select HDD Management.
PlayBack This is an example of the PLAYBACK interface, currently playing back four channels simultaneously in quad view. Channels 1, 3 and 4 were actively recording. Channel 2 was not recording at this time hence the display appears blank. (The image content has been intentionally blurred.) The playback controls are displayed across the bottom of the screen. They are as follows: Playback Controls The playback controls work in a similar manner to those you’ll find on a DVD player or VCR.
Playing Backed Up Footage on a PC The video files which the DVR backs up are not playable by standard multimedia software. This means that your usual media player is not going to be able to open or display footage from the DVR. The main reason for this is that footage from the DVR is always made of multiple channels of video which are synchronised into one data stream. Fortunately, the DVR automatically copies the program you need to play back the footage to the same USB flash drive you back up footage to.
Device Management & HDD Menu This is the DEVICE MANAGEMENT menu. Here you’ll find options to customise and configure settings for: • Your Hard Drive • Alarm Settings • PTZ (Pan, Tilt, Zoom) Devices • Access from Mobile Devices • Motion Detection HDD For accessing information about your hard drive. This is where you go to correct or analyze any problem with your hard drive.
HDD Menu (ctd) & PTZ Menu OVERWRITE: When enabled, the DVR will record over the files already stored on the hard drive. Using the overwrite option is advisable, as the DVR will always be able to record events as they happen. However, it does mean that you’ll need to get important events off the HDD before they’re overwritten. You can choose how much footage the DVR will overwrite by selecting it from this menu.
The Alarm Menu From this menu you can configure the DVR to emit an alarm tone from it’s internal buzzer, or configure the DVR to send an ‘Auto-Mail’ email alert when motion is detected or other events occur. Copy To: A quick way to copy the settings for the current channel to any or all other channels. MD Alarm: Whether the DVR’s Motion Detection function will trigger an alarm event.
Auto Email Setup You can configure the DVR to automatically send you email alerts when it detects an alarm event. Please note that this function is not compatible with all email servers - as the email the DVR sends is procedurally generated, many email servers misidentify it as spam. We recommend setting up a free webmail account with a compatible email provider, such as Gmail, which is compatible with the DVR’s auto-email system. Step 1 In the DEVICES menu, navigate to the ALARM submenu.
Mobile Devices & Motion Detection Menu For more information about accessing the DVR via a mobile device, see page 35. USER NAME: This is the user name that you’ll need to use when logging into the DVR via a mobile device. The default user name is “admin” - but this can be set to anything you desire. We suggest changing this setting to something unique, to aid in preventing unauthorized access to the data stored on the DVR.
Motion Detection Configuration Say, for example, you are trying to monitor your front yard, whilst in the background there is a busy street, and the cars driving past continually set off the motion detection. What can you do about it? Setting only part of the camera’s view to be motion sensitive might be the answer. This is useful in a number of circumstances, such as monitoring one particular door at the end of a busy hallway, or a backyard with a tree that keeps blowing in the wind.
System Setup and Date & Time Menus The SYSTEM SETUP menu is where most of the advanced settings for the DVR hide out. Most of the time, there isn’t much you’ll need to change here. However, a few settings might need tweaking from time to time, particularly when you’re first configuring the DVR. So here’s a quick rundown of what’s what. DATE/TIME: Allows you to set the date and time. The DVR will retain an accurate time even whilst turned off - there is a small battery attached to the main circuit board.
Password and Video Setup Menus Setting your Password The system password allows you to protect the DVR’s settings & recording. Without the password the DVR menu cannot be accessed. We strongly advise that you set a password as soon as possible to prevent unauthorized access to the DVR, either locally or remotely. It is this same password can must be entered for remote viewing the first time. To set your PASSWORD: • Select a user account to edit using the tick box labeled SEL.
Language, Info and Maintenance Menus Language Menu Using the mouse or the arrow buttons, select the drop-down menu of languages. • Choose the language that best suits your needs. • Confirm your choice by pressing select or left clicking the option. A Note on Languages: Unless you really want to change the language of the DVR menus, stay away from this setting.
PTZ Controls You can bring up the PTZ Setup window by pressing the PTZ button on the remote control, or by right-clicking the mouse in the live view mode, and choosing PTZ. Note: the features which will be usable depend on the capabilities and limitations of your PTZ system. Here, you’ll be able to aim the camera, as well as alter aspects of the lens and iris configuration. We’ll explain a little more about what each of these does: 2 3 4 5 1 6 7 1.
Remote Access The primary requirements for accessing the DVR via the Internet are: A High-Speed Internet Connection Video uses a lot of data, so you’ll need a fast Internet connection in order to get smooth playback and monitoring remotely. Note that upload speed refers to the rate at which an Internet connection can send data, not receive it. Most Internet plans are ‘asymmetrical’, which means they can download data faster than they can upload it.
Public and Private IP Addresses The IP address used by the DVR, whether entered manually (STATIC) or assigned by the dynamic host (DHCP) is the private IP address of the DVR. The private IP address is used to locate the DVR on your private network. However, to access the DVR from a remote location via the Internet, you’ll need to know your home networks public IP address.
Remote Access via Internet Explorer The easiest way to access your DVR remotely is via an Internet browser. These instructions will detail how to access the DVR via Microsoft Internet Explorer®. This section assumes that you’ve already configured the DVR and your network to operate properly. Remotely accessing the DVR via Internet Explorer (IE) is a great way to test if your network is functioning as it should. At the time of writing, the DVR supports up to 3 users accessing the DVR remotely at a time.
Remote Access from a Mobile Device The DVR supports access from mobile devices, such as mobile phones with Microsoft Windows Mobile® as their operating system, as well as the increasingly popular iPhone. To correctly configure your DVR for remote access via a mobile device, or indeed any remote access, it is important to have your network and Internet connection configured correctly. Typically, this is matter of forwarding ports from your router to specific devices (in this case, your DVR).
Changing or installing a Hard Drive Note: the following instructions are for installing or changing the hard drive. If your DVR already has a hard drive pre-installed, and you don’t want to change it, disregard these steps. 1. Ensure the DVR is switched off and unplugged from mains power. 2. Locate and remove the 4 screws on the rear of the DVR, and the 2 from each side. 3. Pull up the top case of the DVR. 4. Locate the 2 screws holding down the hard drive chassis.
Troubleshooting Problem: I’m not getting a picture on my TV or monitor! Solution: There are a couple of things that could be going on. Here are a couple of theories: • If you’ve connected the DVR to a TV via the VIDEO OUT port, ensure that the composite video cable (BNC to RCA) connects the MAIN VIDEO OUT on the DVR to a VIDEO IN on your television. Check that the TV is set to the right channel (AV, Channel 0, Video, Composite). Try using a different video input on the television.
Technical Specifications DVR Video Video Format Video Inputs Video Outputs Display Resolution Display Frame Rate PAL or NTSC 4 x Composite BNC Inputs 2 x Composite BNC Outputs, 1 x VGA Out NTSC: 704 x 480, PAL: 704 x 576 (Composite Video) VGA: Up to 1400 x 900 NTSC: 30fps, PAL: 25fps Audio Audio Inputs Audio Output 4 x RCA Audio Input 2 x RCA Audio Output Recording Compression Format H.
Warranty Information Swann Communications USA Inc. 12636 Clark Street Santa Fe Springs CA 90670 USA Swann Communications Unit 13, 331 Ingles Street, Port Melbourne Vic 3207 Swann Communications LTD. Stag Gates House 63/64 The Avenue SO171XS United Kingdom Limited Warranty Terms & Conditions Swann Communications warrants this product against defects in workmanship and material for a period of one (1) year from it’s original purchase date.
Helpdesk / Technical Support Details Swann Technical Support All Countries E-mail: tech@swannsecurity.com Telephone Helpdesk USA toll free AUSTRALIA toll free 1-800-627-2799 1300 138 324 (Su, 2pm-10pm US PT) (M 9am-5pm AUS ET) (M-Th, 6am-10pm US PT) (Tu-F 1am-5pm AUS ET) (F 6am-2pm US PT) (Sa 1am-9am AUS ET) USA Exchange & Repairs NEW ZEALAND toll free 1-800-627-2799 (Option 1) 0800 479 266 UK (M-F, 9am-5pm US PT) 0203 027 0979 See http://www.worldtimeserver.