™ Advanced security made easy ™ Advanced Digital Wireless Camera and Receiver ADW-200 Operating Instructions SW344-YDW www.swannsecurity.
Before You Begin IMPORTANT Before connecting power to the camera or receiver, ensure that the antennas are properly attached to both devices. Operating the ADW-200 without the antennas in place can cause damage to the unit, and may void your warranty. FCC Verification: NOTE: This equipment has been tested and found to comply with the limits for Class B digital device, pursuant to part 15 of the FCC Rules.
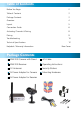
Table of Contents Before You Begin 2 Table of Contents 3 Package Contents 3 Overview 4 Layout 5 Connection Guide 6 Activating Channels & Pairing 8 Pairing 9 Troubleshooting 10 Technical Specifications 12 Helpdesk / Warranty Information Rear Cover Package Contents ADW-200 Camera with Stand A/V Cable ADW-200 Receiver Operating Instructions 2 X Antennas Security Stickers 5V Power Adapter for Camera Moun
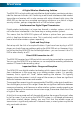
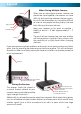
Overview A Digital Wireless Monitoring Solution The ADW-200 is a high quality yet cost effective digital wireless monitoring solution, ideal for home or business use. Combining a robust and interference-free wireless transmitter and receiver with a color camera with active infrared night vision, the ADW-200 can be used as a complete monitoring solution or as a part of a larger security solution, perhaps integrated with a DVR and alarm system.
Layout When Placing Multiple Cameras Antenna Light Sensor Lens When two or more digital wireless cameras are placed too close together, the receiver can have difficulty distinguishing between the two signals, for much the same reason as it would be difficult to listen to two people standing side by side and both talking at the same volume. Keep your cameras as far apart as possible – ideally, at least 6 ~ 9 feet (approximately 2 ~ 3 meters).
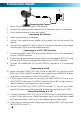
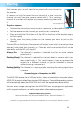
Connection Guide 1 3 2 Connecting the Camera 1. Attach the antenna to the rear of the camera. 2. Connect the supplied power adapter (5V) to the power input on the camera. 3. Plug the power adapter in to a wall socket. Connecting the Receiver 4. Attach the antenna to the receiver. 5. Connect the supplied power adaptor to the power input on the rear of the receiver. 6. Connect the supplied A/V cable to the A/V OUT port on the rear of the receiver (the plug looks like a miniature headphone jack).
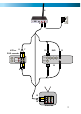
4 6 8 VCR or DVD recorder 7 5 10 DVR 11 Input Input Output Output 12 9 13 INPUT 1 INPUT 3 OUTPUT 14 Television 7
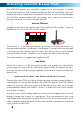
Activating Channels & Loop Mode The ADW-200 receiver can potentially support up to four cameras. It cannot display all of these at a time, however. Rather, you can use Loop Mode, which will sequentially display images from one camera at a time. As you can have between one and four cameras paired with the receiver, you’ll need to set how many channels are active, and which channels they are. Activate Channels Located on the rear of the receiver you’ll find a series of DIP switches.
Pairing Each camera you use will need to be paired with one channel on the receiver. A camera can only be paired to one channel at a time, and one channel can only have one camera paired with it. Thus, pairing a channel to a camera will replace any camera previously paired with it. To pair a camera: The Pairing Button • Activate the channel you want to pair a camera to, as described on page 8. • Set the receiver to the channel you want to pair a camera to.
Troubleshooting Guide Problem: I’m only see a blank screen where I want to see my images. Solutions: 1. Make sure that both the camera and the receiver are receiving power from their supplied power adapters. 2. Ensure that the camera is properly paired with the receiver by following the instructions on page 9. 3. Check that the channel you are displaying is the one paired with the camera. Try turning other channels off. 4.
Technical Specifications Image Sensor Video Quality Number of Effective Pixels Minimum Illumination Day/Night Mode White Balance Signal / Noise Ratio Electronic Shutter Gain Control Backlight Compensation Wide Dynamic Range Lens Viewing Angle Video 1/4” CMOS 380 TV Lines VGA (640 x 480), QVGA (320 x 240) 0 Lux (IR On) Color during day / switches to B&W at night Automatic < 48dB 1/60 - 1/15, 000 NTSC, 1/50 - 15, 000 PAL Automatic Yes No 6mm 53 degrees Microphone Audio R
Helpdesk / Technical Support Details Swann Technical Support All Countries E-mail: tech@swannsecurity.com Telephone Helpdesk USA toll free 1-800-627-2799 (Su, 2pm-10pm US PT) (M-Th, 6am-10pm US PT) (F 6am-2pm US PT) USA Exchange & Repairs 1-800-627-2799 (Option 1) (M-F, 9am-5pm US PT) AUSTRALIA toll free 1300 138 324 (M 9am-5pm AUS ET) (Tu-F 1am-5pm AUS ET) (Sa 1am-9am AUS ET) NEW ZEALAND toll free 0800 479 266 UK 0203 027 0979 See http://www.worldtimeserver.