
Communications Home Security System User Manual


888
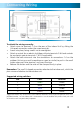
Completing Installation
All that’s left to do is attach power to the system, and to mount the indoor and
outdoor units on the brackets which have already been placed.
To attach power:
Attach the plug on the end of the supplied 12V power supply to the plug on •
the rear of the indoor unit.
Plug the power supply into a wall socket. If necessary, turn the wall socket •
on.
The system should now have power.•
It is not necessary to separately connect power supply to the outdoor unit, as •
power is supplied from the connection to the indoor unit.
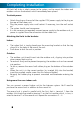
Attaching the Units to the brackets:
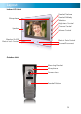
Indoor:
The indoor Unit is simply placed over the mounting bracket so that the top •
clasps fit in the holes in the rear of the unit.
Push down to lock the unit in position.•
Outdoor:
The outdoor unit should insert into the outdoor unit, clipping into position •
when pressed back and up.
To secure it firmly and to prevent tampering, the outdoor unit can be screwed •
into position.
To do so, remove the round soft rubber plug on the bottom of the outdoor •
unit.
When the unit is in the correct position (ie. inserted fully into the bracket) •
insert the supplied smaller screw into this hole and tighten.
Re-apply the rubber plug to prevent unwanted moisture/water entering the •
unit.
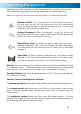
Using more than one indoor unit:
You can connect a second indoor unit to the Intercom system. You’ll need to
purchase the second unit in addition to the current kit.
The second unit is wired in parallel with the first: that is, terminal 1 from the
outdoor Unit should be wired to terminal 1 on the first monitor which, in turn, is
wired to terminal 1 of the second unit. Repeat for connections 2 ~ 4.