SAFE by Swann App Manual SWWHD-INTCAM SWWHD-INDCAM SWWHD-OUTCAM SWWHD-FLOCAM 1 English
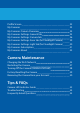
Contents Getting Started Installing the SAFE by Swann App 5 Creating a SAFE by Swann Account 6 Pairing the Camera 7 Swann Smart Security Camera (SWWHD-INTCAM) 8 Swann Floodlight Camera (SWWHD-FLOCAM) 10 Swann Indoor Camera (SWWHD-INDCAM) 12 Swann Outdoor Camera (SWWHD-OUTCAM) 14 Setting the Camera Date and Time 16 Updating the Camera Firmware 17 Modes: Overview 18 Modes: Customizing your Modes 19 Modes: Adjusting Motion Sensitivity 20 About the App Interface Camera Dashboard Camera Dashboa
Profile Screen My Cameras My Cameras: Camera Overview My Cameras: Settings: General tab My Cameras: Settings: Camera tab My Cameras: Settings: Siren tab (for Floodlight Camera) My Cameras: Settings: Light tab (for Floodlight Camera) My Cameras: Subscription My Cameras: About 32 33 34 35 36 39 40 41 42 Camera Maintenance Changing the Wi-Fi Network Restarting the Camera Turning Off the Camera (SWWHD-INTCAM) Factory Resetting the Camera Removing the Camera from your Account 45 47 48 49 50 Ti
Getting Started
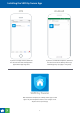
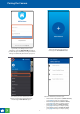
Installing the SAFE by Swann App iOS Android If you have an Apple iPhone, download the latest version of the SAFE by Swann app from the Apple App Store. If you have an Android smartphone, download the latest version of the SAFE by Swann app from Google Play (tap Apps > Play Store). SAFE by Swann After installation completes, the SAFE by Swann app icon will appear on your smartphone‘s Home screen or Apps screen. Tap the icon to open the app.
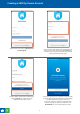
Creating a SAFE by Swann Account ? At the bottom of the screen, tap Don’t have an account? Sign Up. Enter your name, email address, and a password for your new account. To enter your location, tap Location, type in the name of your city in the search bar, then select the desired city from the search results. Read the “SAFE by Swann Terms and Conditions”, then tap Sign Up to accept the terms and conditions and create your account. Check your email inbox for a verification email from SAFE by Swann.
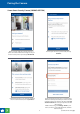
Pairing the Camera Sign in with your SAFE by Swann account information. Select the Remember Me checkbox if you want the app to remember your login credentials and sign in automatically the next time you open it. If this is the first time you're pairing a camera, tap the + Pair Camera button. You can also pair more cameras (one at a time) to your account by opening the menu and selecting the Pair Camera option.
Pairing the Camera Swann Smart Security Camera (SWWHD-INTCAM) Before you start, make sure you have access to a power source that's within the coverage area of your router or access point. To proceed, tap Get Started. Connect your camera to a power outlet, then tap Continue. Enable pairing mode on your camera by following the on-screen instructions, then tap Continue. ? 8 The Wi-Fi network that your phone is currently using will be the network your camera joins.
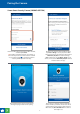
Pairing the Camera Swann Smart Security Camera (SWWHD-INTCAM) Enter and confirm the password for your Wi-Fi network, and then tap Connect. TIP Your Wi-Fi network password is case sensitive, so enter it exactly the same as it was created or as found on your router. Toggle to ensure that you have entered your Wi-Fi password correctly. Connect to the camera's temporary Wi-Fi hotspot.
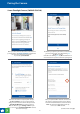
Pairing the Camera Swann Floodlight Camera (SWWHD-FLOCAM) Before you start, make sure the camera is installed and powered. Refer to the Quick Start Guide included with the camera for installation instructions. To proceed, tap Get Started. The first time you power up the camera, it automatically goes into pairing mode—the LED is blinking blue. Tap Yes to continue. If the LED is not blinking blue, tap No and follow the onscreen instructions to put the camera into pairing mode.
Pairing the Camera Swann Floodlight Camera (SWWHD-FLOCAM) Enter and confirm the password for your Wi-Fi network, and then tap Connect. TIP Your Wi-Fi network password is case sensitive, so enter it exactly the same as it was created or as found on your router. Toggle to ensure that you have entered your Wi-Fi password correctly. Upon returning to the app, this screen appears showing the progress of the camera pairing. Once pairing is complete, you'll be prompted to enter a name for the camera.
Pairing the Camera Swann Indoor Camera (SWWHD-INDCAM) ? Before you start, make sure you have access to a power source within the coverage area of your Wi-Fi router. To proceed, tap Get Started. Connect your camera to a power outlet, then tap Continue. The first time you power up the camera, it automatically goes into pairing mode—the LED is blinking blue. Tap Yes to continue. If the LED is not blinking blue, tap No and follow the on-screen instructions to put the camera into pairing mode.
Pairing the Camera Swann Indoor Camera (SWWHD-INDCAM) Select your preferred Wi-Fi network connection for the camera by tapping the down arrow to display a list of Wi-Fi networks that the camera has found. Note: The Swann Indoor Camera will only connect to a 2.4GHz network. Enter and confirm the password for your Wi-Fi network, and then tap Connect. TIP Your Wi-Fi network password is case sensitive, so enter it exactly the same as it was created or as found on your router.
Pairing the Camera Swann Outdoor Camera (SWWHD-OUTCAM) Before you start, make sure you have access to a power source within the coverage area of your Wi-Fi router. To proceed, tap Get Started. Connect your camera to a power outlet, then tap Continue. The first time you power up the camera, it automatically goes into pairing mode — the LED is blinking blue. Tap Yes to continue. Connect to your camera's temporary Wi-Fi hotspot.
Pairing the Camera Swann Outdoor Camera (SWWHD-OUTCAM) Select your preferred Wi-Fi network connection for the camera by tapping the down arrow to display a list of Wi-Fi networks that the camera has found. Note: The Swann Indoor Camera will only connect to a 2.4GHz network. Enter and confirm the password for your Wi-Fi network, and then tap Connect. TIP Your Wi-Fi network password is case sensitive, so enter it exactly the same as it was created or as found on your router.
Setting the Camera Date and Time Tap My Cameras. From the dashboard, tap the drawer icon to open the menu. Select your camera. ? Tap About. 16 Scroll down to Time At Camera Location and tap the Sync to Phone Time button. Your camera will sync its time zone, date and time to the clock on your phone.
Updating the Camera Firmware From time to time firmware updates will be available for your camera. For example, you may be prompted to update your camera once it is set up. These updates improve the performance, security, and functionality of your camera. For the best experience, you are strongly recommended to keep your camera current with the latest firmware. When a new firmware is available for your camera, "CAMERA UPDATE IS AVAILABLE" will appear in the camera tile.
Modes: Overview Modes let you put your cameras into a preferred state with a press of a button, enabling you to arm and disarm your cameras with ease. When armed, your cameras will monitor your home for activity and record video when motion is detected. Three different modes are available for your cameras — Home, Away and Night. Each mode has its preset default settings for your convenience but can be completely customized to suit your situation and environment.
Modes: Customizing your Modes Modes are not limited to their default behavior and is fully customizable to accommodate your household security needs. You can choose which cameras are armed or disarmed for the Home, Away and Night modes. Tap the Select the mode you want to customize. icon in the Modes selection panel. Select the cameras that you want to arm or disarm for the selected mode using the toggle.
Modes: Adjusting Motion Sensitivity You can apply different motion sensor sensitivity level to each camera, independently for Home, Away and Night modes. Go to Modes, select the mode, and make sure the camera is armed. You can configure the camera's motion sensitivity level only when it is armed. Go to the camera's settings via My Cameras. Drag the "Motion Sensitivity" slider left or right to set how sensitive the camera is to motion during the chosen mode, for example, Home mode, as shown above.
About the App Interface
Camera Dashboard 1 2 3 4 5 6 7 8 ? 1 Open the menu where you can edit your account profile, manage camera settings, pair a camera, view the user manual, and more. For more information, see "Menu" on page 31. 2 Customize the layout of the camera dashboard according to your personal preference. To learn how to organize and rearrange tiles on the camera dashboard, see "Camera Dashboard: Layout Customization" on page 24. 3 The name of the camera.
Camera Dashboard 10 9 11 9 12 (SWWHD-FLOCAM model only) The light control tile. Tap to manually turn on or off the camera's floodlights. Drag up or down slowly within the tile to increase or dim the brightness of the floodlights. Note: The camera's floodlights will automatically turn on when motion is detected at night. You can adjust how long the floodlights will stay on when triggered by motion detection via the camera's Settings > Light tab.
Camera Dashboard: Layout Customization 1 2 5 6 3 4 7 1 ? 8 You can swap positions between camera tiles. Simply tap and hold a camera tile then drag it over the top of another camera tile and release when the tiles have swapped positions. You can also drag the camera tile to the left or right edge of the screen to put it on the previous or next page. 2 Tap to resize to a small tile. 3 Tap to resize to a large tile. Only a single large camera tile can be displayed on a page.
Live View Screen - Smart Security Camera (SWWHD-INTCAM) 1 2 3 4 1 2 3 4 ? End the camera’s live video stream and return to the dashboard. Access and adjust the camera's settings such as camera name, live video quality, Wi-Fi connection, motion detection sensitivity and cloud subscription. To learn more about the available camera settings, see "My Cameras: Settings: Camera tab" on page 36. Mute/unmute the live video. The video screen.
Live View Screen - Floodlight Camera (SWWHD-FLOCAM) 1 2 3 4 5 7 1 2 3 4 8 9 10 End the camera’s live video stream and return to the dashboard. Access and adjust the camera's settings such as camera name, live video quality, Wi-Fi connection, motion detection sensitivity and cloud subscription. To learn more about the available camera settings, see "My Cameras: Settings: Camera tab" on page 36. Mute/unmute the live video. The video screen.
Live View Screen - Indoor Camera (SWWHD-INDCAM) 1 2 3 4 5 1 2 3 4 ? 6 7 8 End the camera’s live video stream and return to the dashboard. Access and adjust the camera's settings such as camera name, live video quality, Wi-Fi connection, motion detection sensitivity and cloud subscription. To learn more about the available camera settings, see "My Cameras: Settings: Camera tab" on page 36. Mute/unmute the live video. The video screen.
Live View Screen - Outdoor Camera (SWWHD-OUTCAM) 1 2 3 4 5 1 2 3 4 ? 6 7 End the camera’s live video stream and return to the dashboard. Access and adjust the camera's settings such as camera name, live video quality, Wi-Fi connection, motion detection sensitivity and cloud subscription. To learn more about the available camera settings, see "My Cameras: Settings: General tab" on page 35. Mute/unmute the live video. The video screen.
Activity Screen 1 4 2 3 1 Go back to the previous screen. 2 Tap the left or right arrow to view the previous or following day’s activity timeline. 3 The timeline shows the activity history for all of your cameras such as motion detection events and manually captured photos and videos (SWWHD-INDCAM/OUTCAM/FLOCAM models only), with the most recent activity of the day at the top. 4 ? • To refresh the timeline, swipe down on the screen.
Playback Screen 1 2 3 4 ? 5 6 7 8 1 Go back to the Activity screen. 2 Delete the video. This will also remove the corresponding event from the activity timeline. Be sure to download the clip to your phone first if it contains important footage that you want to keep or review later. 3 The video screen. Turn your phone sideways to watch the video in landscape view. Make sure your phone’s screen orientation is set to auto-rotate or unlocked. 4 Rewind the video back to the beginning.
Menu 1 2 3 4 5 6 7 8 9 10 1 Close the menu. 2 Update your profile picture and change your SAFE by Swann account password. For more information, see "Profile Screen" on page 32. 3 View the list of cameras associated with your SAFE by Swann account and manage camera settings. For more information, see "My Cameras: Camera Overview" on page 34. 4 Configure Wi-Fi network connection and register a camera to your SAFE by Swann account.
Profile Screen 1 2 3 4 1 Shows your profile picture. Tap the + button to set up or edit your profile picture. 2 Tap to edit your name. 3 Shows the email address registered with your account. 4 ? Tap to change your account login password. To save your new password, tap the Save button at the bottom of the screen, then confirm the password change by entering your current account login password. The Save button is greyed out once the new password has taken effect.
My Cameras 1 1 ? Lists all of the cameras that are registered to your account. Tap on the name of the camera to view and manage the camera's settings, cloud subscription, as well as finding out detailed hardware status and network information.
My Cameras: Camera Overview 1 2 3 4 5 6 7 1 Displays the image of the type of camera. 2 Shows the name of the camera. 3 Shows the cloud storage plan the camera is currently subscribed to. 4 Tap to view and manage camera settings. For details about available camera settings, see "My Cameras: Settings: General tab" on page 35. 5 Tap to view details about the camera's current cloud storage plan and manage the subscription.
My Cameras: Settings: General tab 1 2 3 1 2 3 ? Tap to change the name of the camera. Shows the name of the Wi-Fi network to which the camera is connected. If multiple networks are available in your home and you would like to change the Wi-Fi connection, tap the Update Wi-Fi button. To learn more, see "Changing the Wi-Fi Network" on page 45. Shows the current timezone, date and time of the camera.
My Cameras: Settings: Camera tab 1 2 3 1 If the video is flickering, try changing to one of the following settings so your camera’s frequency matches with the electrical frequency of your environment: Indoor 50Hz (for Australia/UK), Indoor 60Hz (for North America) or Outdoor (for Outside/Natural lighting) TIP In Outdoor mode, the camera will dynamically adjust exposure based on ambient light levels.
My Cameras: Settings: Camera tab 4 5 4 When the camera is in an armed state, you can adjust the camera's motion sensor sensitivity level that will be applied for the current mode by dragging the slider left or right.
My Cameras: Settings: Camera tab 6 7 ? 6 Tap View Camera Backup to access the last 7 days of video recordings stored on the camera’s internal memory. You can individually download the motion event clips to your phone then play them on your phone's video player app. 7 Tap the Format Card button to clear the camera’s internal memory and permanently erase all recordings on it.
My Cameras: Settings: Siren tab (for Floodlight Camera) 1 2 3 1 Tap the dropdown arrow to choose how long the siren will sound when triggered either by motion detection or manually with the siren tile. The shortest duration you can choose is 5 seconds and the longest is 5 minutes. 2 Select the volume level between Low, Medium, and High for both the siren and 2-way audio. 3 ? Select whether to sound the siren when the camera detects motion. By default, this is set to No.
My Cameras: Settings: Light tab (for Floodlight Camera) 1 1 Tap the dropdown arrow to choose how long the floodlights will stay on when triggered by motion detection during night time. The options available are: 30 seconds, 1 minute, 2 minutes, 5 minutes, 10 minutes and 15 minutes.
My Cameras: Subscription 1 2 1 Displays information about the camera's current cloud storage plan of the camera’s cloud storage subscription. 2 Tap the Update Subscription Plan button to manage the camera's subscription to the SAFE by Swann cloud storage service. TIP Your camera comes with 2 days of free cloud storage.
My Cameras: About 1 2 3 4 5 6 7 8 9 1 2 Displays the camera’s name. 3 Displays the camera’s manufacturer name. 4 Displays the camera’s model code. 5 Displays the camera’s serial number. 6 Displays the camera's connection state. 7 ? Displays information about the camera’s firmware version. When a new version of the firmware is available, the Update Firmware button is displayed. To learn how to update your camera, see "Updating the Camera Firmware" on page 17.
My Cameras: About 10 11 ? 10 (SWWHD-INTCAM model only) Displays the camera’s power charge state—"Battery Powered" or "Charging". 11 (SWWHD-INTCAM model only) Displays the camera’s remaining battery level.
Camera Maintenance
Changing the Wi-Fi Network You can easily change the Wi-Fi network that your camera is connected to if your home has multiple Wi-Fi access points. Tip: We recommend choosing the access point closest to the camera location for best signal strength. ? Go to your camera's settings, then under Wi-Fi Network, tap the Update Wi-Fi button. Tap Select Wi-Fi Network. A list of Wi-Fi networks that the camera has found is displayed. Tap the Wi-Fi network that you want the camera to join.
Changing the Wi-Fi Network Tap the Save button. The app returns to the camera settings screen. The Wi-Fi network to which your camera now connects is shown under Wi-Fi Network. Note: After changing the Wi-Fi network, your camera will save and restart with the new Wi-Fi settings. This can take up to 3 minutes.
Restarting the Camera If you are having difficulties with your camera, try restarting it. A simple restart can often fix connectivity issues quickly. Swann Smart Security Camera Using a small, narrow object, such as a paper clip or a sim ejector tool, press the Reset button (see figure on the right for location) for 2 seconds. The camera will restart and automatically reconnect to Wi-Fi. This can take up to 2 minutes.
Turning Off the Camera (SWWHD-INTCAM) You can turn your camera off completely at any time. We recommend doing this if you're taking the camera to a distant location, for example, your holiday residence, to help protect the integrity of the device. To turn your camera off: • Press and hold the Pair button (see figure below for location) for 30 seconds. During this time, the camera’s LED turns blue and then goes off. To turn your camera on again: • Press the Pair button momentarily.
Factory Resetting the Camera Factory resetting your camera is usually only necessary for troubleshooting. It isn’t something to do lightly as it will format the internal memory, wipe the current Wi-Fi information, and return all of the camera settings to factory default. Swann Smart Security Camera 1. Press and hold the Reset and Pair buttons (see figure on the right for locations) simultaneously. 2.
Removing the Camera from your Account You can remove the camera from your account, if necessary. For example, if you're giving away your camera, you need to do this first so someone else can set it up under their own account. Once the camera is removed, all activity history including recordings related to the camera will be erased; so make sure to download the videos you'd like to keep to your phone. ? From the menu, select the My Cameras option. Select the camera that you want to remove.
Tips & FAQs
Camera LED Indicator Guide LED Indicator Swann Smart Security Camera (SWWHD-INTCAM) ? Action LED Indicator Connecting to Wi-Fi Fast blinking blue Low Wi-Fi signal strength Alternate blinking blue and red Wi-Fi Pairing mode Slow blinking blue (and IR LEDs blinking red) Live streaming Solid red Motion detection recording Solid red Charging Solid blue Low battery Blinking purple 52
Camera LED Indicator Guide LED Indicator Swann Indoor Camera (SWWHD-INDCAM) ? LED Indicator LED Indicator Swann Outdoor Camera (SWWHD-OUTCAM) Swann Floodlight Camera (SWWHD-FLOCAM) Action LED Indicator Connecting to Wi-Fi Fast blinking blue Low Wi-Fi signal strength Blinking purple Wi-Fi Pairing mode Slow blinking blue (and IR LEDs blinking red) Live streaming Solid red Motion detection recording Solid red 53
Troubleshooting In most cases, setting up and using the camera with the SAFE by Swann app is easy and trouble-free. If you encounter connection or other issues, however, please check this troubleshooting section for help and advice. Should you need additional assistance, please visit support.swann.com. I cannot connect the camera to my Wi-Fi network • Make sure the Wi-Fi network that you want the camera to join is not an unencrypted (open) network.
Frequently Asked Questions I have forgotten my SAFE by Swann account password. How do I reset it? Tap the “Forgot Password” link on the Sign In screen of the SAFE by Swann app and submit the email address that you used to create your SAFE by Swann account. You'll shortly receive an email with instructions on how to reset your account password. Can I access my camera on another phone? Yes. Just install the SAFE by Swann app on your other phone and sign in using the same SAFE by Swann account credentials.
Frequently Asked Questions How do I subscribe to a paid cloud storage plan for my camera? You can easily purchase a cloud subscription for your camera through the app: 1. From the app dashboard, open the menu and select the My Cameras option. 2. Select the camera that you want to purchase a cloud subscription for. 3. Select Subscription. 4. Tap the Update Subscription Plan button to open the SAFE by Swann cloud subscription portal. 5.
The content in this manual is for information purposes only and is subject to change without notice. While every effort is made to ensure that this manual is accurate and complete at the time of publication, no liability is assumed for any errors and omissions that may have occurred. For the latest version of this user manual, please visit: www.swann.com Apple and iPhone are trademarks of Apple Inc., registered in the U.S. and other countries. Google, Android, and Google Play are trademarks of Google Inc.