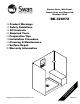
Shower Base, Wall Panel, Bench Seat, and Recessed Shampoo Shelf BK-326072 R ea B da ef n or d e Un In d st er al s lin ta g nd Product Warnings Safety Guidelines Kit Contents Required Tools Preparation Tips Installation Procedure Cleaning & Maintenance Surface Repair Warranty Information Register your warranty at www.swanstone.com.
The Swanstone Assurance — if our product is properly installed and maintained, as stated in these instructions, it will not leak. Remember – Safety First IMPORTANT NOTICE The Swan Corporation, the makers of the Swanstone Wall Systems and Panels, cannot anticipate every possible circumstance that might involve a potential hazard during the installation of our product(s). The warnings and instructions in this installation guide are, therefore, not all-inclusive.
Safety Guidelines CAUTION IMPORTANT NOTICE IMPORTANT NOTICE: Indicates that equipment or property damage can result if instructions are not followed. CAUTION: Indicates a potentially hazardous situation which, if not avoided, may result in minor or moderate injury. It may also be used to alert against unsafe practices.
Safety Guidelines Cutting Hazard The installation of the Swanstone product may require using power tools. Keep hands away from the cutting edge of any tool used in the installation of our product. Placing fingers in or around the cutting blades could result in serious personal injury. WARNING WARNING: Indicates a potentially hazardous situation which, if not avoided, could result in serious injury or death. Sharp Edge Hazard After cutting the edge of a Swanstone panel, it can be sharp.
Safety Guidelines General Information Required Tools (continued) WARNING Clean paper towels or shop towels 2 x 4 lumber as required for bracing (see Bracing Instructions) WARNING: Continued Power Tool Hazard Industrial grade, hot glue gun and glue sticks (optional) To prevent personal injury or possible death, always follow the electrical safety recommendations of the power tool’s manufacturer. Do not use power tools in an unsafe manner.
General Information Unpackaging Preparation Tips Use care when opening the box so that you do not damage the panels. Measure the width of the back wall (with green board) installed. This measurement cannot exceed the width of the Swanstone back panel. If the wall opening is too large, other methods or two panels will be required to cover the wall. This product is shipped to you or your retail center after careful inspection.
Instructions for Covering Pre-Existing Wall Surfaces Swanstone panels can be installed over a variety of products. If you intend to apply the panels to any surface other than those described, consult with a professional contractor. Use the following sections when installing this product over: Old Tile Depending on the condition of the existing wall surface, additional silicone may be required to ensure contact between the substrate and the wall panel.
Installation Procedure Followed carefully, these installation instructions will result in an easy, trouble-free installation of your Swanstone product. Any deviations, additions, and/or deletions from the prescribed installation, without prior written approval of our Customer Service Department, will void the warranty covering this product. Not following the directions could also result in personal injuries, water damage, and other damage to floors, pipes, walls, and other portions of your building or home.
Installation Procedure 2. Install a stud 30-1/2” from the back wall on both sides of the framing. This will provide an adequate anchor for a shower door, if one is installed. Rough Opening and Bench Seat Rough-in dimensions are suggested sizes, and conditions may vary for each installation. If the rough opening (no moisture-resistant drywall) will be larger than 60-1/4”, the back panel (59” wide ) will be too narrow to cover the wall.
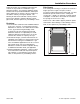
Installation Procedure 4. Construct the bench seat framework using 2 x 4 wood or steel studs. The framework for the seat must be 32-5/8” wide and 11-3/4” deep. The finished dimension of this seat, including the cement board, must be 12-1/4 x 33-1/8”. Construct the framework, as shown. 5. In order to eliminate standing water on the bench seat, cut and place three, 2” wide shims on top of each 2 x 4, as shown. Standard shim stock works well for these shims.
Installation Procedure 2. Remove the base and place up to 1/2” thick layer of mortar or thinset on the floor. This will ensure complete contact and support by the existing subfloor, eliminating shower floor flex during normal use. Taper the mortar/thinset to 1/4” thick around the floor drain. Mix enough material to cover an area approximately 1/2 x 24 x 42”. Do not place the material closer than 2” to the edge of the shower base or the floor drain opening. 7.
Installation Procedure 5. Lubricate both caulk seal gasket (1) and drain pipe (2) with either liquid hand soap or dishwashing liquid, and slide the caulk seal gasket over the drain pipe. IMPORTANT NOTICE Do not use nails or screws to attach the base to the walls or the floor. The mortar/thinset will prevent the shower base from moving without any mechanical fasteners. 6. Complete the installation by snapping strainer plates (3) into place.
Installation Procedure Wallboard Installation IMPORTANT NOTICE Install the wall board with a 1/2” gap above the shower base side lip, the front edge of the shower base, and the floor to prevent possible water (wicking affect) damage to the wall. IMPORTANT NOTICE This shower kit contains a recessed shampoo shelf that fits into a standard wall stud opening. Before covering the studs, determine the location of the recessed shampoo shelf and make sure there are no pipes or electrical wiring in this space.
Installation Procedure 4. Place the seat, with the rounded edges facing out, onto the silicone. Make sure the seat is correctly positioned and place weight on top of the seat to hold it firmly in place. WARNING Fumes Hazard The fumes from the sealants and solvents used by the installer can be harmful if used in an unventilated room. Always work in a well-ventilated area. 2. Clean the backs of each panel with denatured alcohol or another non oil-based cleaning solvent. BK-BS-002b BK-PI-001 Back Panel 1.
Installation Procedure 6. Carefully remove the template. 3. Cut two smaller strips of cardboard and place one of them against the seat surface. Tape the cardboard in place. 7. If the back wall is less than 59” wide, the panel will need to be cut to fit the opening. Use a piece of cardboard to create a template for the side opposite the bench seat. Make sure the cardboard is laying flat on top of the shower base and up against the front wall. Scribe (mark) the cardboard template, as shown.
Installation Procedure 10. Cut the panel using a sabre saw with a bi-metal blade (14 teeth per inch). 8. Place the back wall panel, finished side facing up, on a flat surface. Place the template(s) over the wall panel and carefully trace the outline of the template(s). BK-BP-007 BK-BP-006 IMPORTANT NOTICE 9. Remove the template(s) and place pieces of masking tape over the area where the saw contacts the Swanstone panel. Do not discard the cutoff piece from the back panel.
Installation Procedure 3. Transfer the measurements to the front panel. Front Panel (Left or Right-Side) 1. Place the front panel on top of the shower base and slide it against the back wall panel. Scribe (mark) the panel, as shown. Cut away the excess material to allow the front panel to fit precisely against the back panel. Scribing and cutting the panel will provide a 90 degree corner with no need for corner molding.
Installation Procedure Rear Panel (Right or Left-side) Panel Installation 1. Measure the distance from the top of the bench seat to the top edge of the back panel. Cut the rear panel to this length. WARNING 2. Measure the distance between the shower base and the bottom of the bench seat. Again, cut a piece from the rear panel. Fumes Hazard The fumes from the sealants and solvents used by the installer can be harmful if used in an unventilated room. Always work in a well-ventilated area. 1.
Installation Procedure 3. Install back panel (1) first. Then, install front panel (2). Finally, install rear panels (3 & 4). Apron Strips Apron strips provide a finished look to your installation. The two small apron strips can be cut from the scrap of the back panel. When cutting these apron strips, make sure the finished edge of the panel is facing outward. 1 2 1. Measure the distance from the top of the shower base to the outside of the panel.
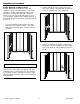
Installation Procedure 4. Place silicone on the back side of the apron strips. Temporary Bracing (if not using industrial hot melt glue gun) Install temporary bracing to hold the four panels in place until the silicone is completely set (usually 24 hours). This will allow proper curing of the silicone. NOTE: An industrial application hot melt glue gun can be used instead of the bracing described in this section. This process is not recommended for the do-it-yourself homeowner.
Installation Procedure 2. Place two braces against each front and rear wall and place two braces against the rear panel of the seat area. 4. Insert small blocks between the front to rear panel braces and the back panel braces. These will apply pressure to the back panel to hold it in place. BK-TB-002 BK-TB-004 3. Install (wedge) four horizontal braces (eight total) against the side wall braces. 5. Remove the braces after 24 hours.
Installation Procedure 1. Using a stud finder, previously marked locations, or other similar method, locate the stud pocket where the recessed shelf will be installed. 3. Mark the measurements, as shown, for the cut out onto the wall panel. Try to center the opening in the stud pocket. The wall stud opening shown is 16” on center, which creates a 14-1/2” opening. 6 1/2" 3/4" 3/4" 20" 19 1/2" BK-RS-001 13" BK-RS-003 2. Mark the wall panel with the stud locations, as shown.
Installation Procedure 6. Cut the opening for the recessed shelf. IMPORTANT NOTICE Do not use oil-based cleaners, such as mineral spirits, to clean the panels. The oil in the cleaner will prevent the panel from adhering properly to the wall. 8. Apply a 1/8” bead of silicone (part of this kit) to the entire inside edge of the recessed shampoo shelf. BK-RS-004 WARNING The fumes from the sealants and solvents used by the installer can be harmful if used in an unventilated room.
Installation Procedure 3. Dry fit the soap dish prior to applying silicone. If the wall is not exactly 90 degrees square, it will be necessary to sand one side in order to achieve proper fit. Use a course grit (60 grit) sandpaper. Soap Dish Installation (Optional) The soap dish is a corner mount design. The soap dishes can be stacked in one corner or placed in opposite corners. 1. Select a desirable height for mounting one or both soap dishes.
Installation Procedure 7. Temporarily secure the soap dish with masking tape, as shown. Remove tape after approximately two hours. Do not place anything on the soap dish for at least 24 hours. 1. Measure and cut the corner moldings to length. If the optional soap dish was installed, cut one piece of molding to fit above the soap dish and one for below the soap dish. BK-SD-005 BK-CM-001c 2. Dry fit the corner molding. Corner Molding (Optional) Installing the corner molding is optional.
Installation Procedure 5. Press the corner molding into place. Remove any excess silicone. WARNING 6. Place at least three pieces of masking tape on each corner molding to hold it in place until the silicone adheres to the wall panel. The fumes from the sealants and solvents used by the installer can be harmful if used in an unventilated room. Always work in a well-ventilated area. 3. Clean the surface of the panels and the back of the molding with denatured alcohol or another non-oil based solvent.
Installation Procedure The installation is now complete. DO NOT discard these installation instructions. PLEASE LEAVE THEM WITH THE HOMEOWNER. Final Caulking Apply a bead of the color-matched 100% silicone sealant and white silicone sealant (included in the kit). IMPORTANT NOTICE Attaching Shower Doors and Accessories Follow the manufacturers’ instructions on the tube for proper application. Allow at least 24 hours for silicone to set before using the shower enclosure. 1.
Maintenance & Surface Repair Care and Cleaning Surface Repair The Swanstone products are stain and abrasion resistant; however, the finish requires reasonable care. Light Scratches Use 400 grit sandpaper to remove light scratches in the surface. IMPORTANT NOTICE Deep Scratches or Gouges Because cleaning products change over time, always check the manufacturers’ instructions to make sure it is compatible with plastic. DO NOT use a cleaner if the label indicates it should not be used on plastics.
Warranty LIMITED WARRANTY FOR RESIDENTIAL APPLICATIONS LIMITED WARRANTY FOR COMMERCIAL APPLICATIONS If a Swanstone product covered by this warranty is found to be defective in materials or workmanship, after inspection by an authorized Swan Corporation representative, we will repair, or at our option, exchange the product for a similar model. This warranty extends for a designated period of time, so long as it remains in use in its original place of installation.
Save these Installation Instructions for future reference. They provide important information on cleaning, maintenance, and surface repair of the Swanstone Wall Systems and Panels. www.swanstone.