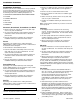
Swanstone Crystal Colors Wall Kits and Panels CCSK72-3636 CCSK72-3648 CCSK96-3636 CCSK96-3648 CCSP-4896 CCSP-3696 Product Warnings Safety Guidelines Kit Contents Required Tools Preparation Tips Installation Procedure Cleaning & Maintenance Warranty Information CCSO-1296 CCSP-3672 CCSO-1272 R ea B da ef n or d e Un In d st er al s lin ta g nd Register your warranty at www.swanstone.com.
Safety Guidelines IMPORTANT NOTICE The Swan Assurance — if our product is properly installed and maintained, as stated in these instructions, it will not leak. Remember – Safety First IMPORTANT NOTICE The Swan Corporation, the makers of the Swan products, cannot anticipate every possible circumstance that might involve a potential hazard during the installation of our product(s). The warnings and instructions in this installation guide are, therefore, not all-inclusive.
Safety Guidelines Lifting Hazard According to the National Institute for Occupational Safety and Health, the recommended maximum safe lifting weight is 51 pounds, with all lifting conditions perfect— minimal forward reach, steady load close to the body, straight back, load between knees and shoulders, and good grips. To avoid personal injury, always use these proper lifting techniques and use two people to move cartons weighing more than 51 lbs.
Safety Guidelines General Information Electrical Shock Hazard Contacting live electrical wiring with power tools or hand tools can cause serious injury or death. Make sure all related circuit breakers are turned OFF. Test for live circuits or wiring inside any wall where installation of the Swanstone product requires cutting into a wall. Electrocution Hazard Water and other liquids conduct electric current and can create a short circuit, resulting in injury or death.
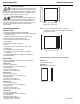
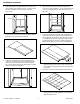
General Information Installation Procedure Allow sufficient time for the parts in this kit to adjust to room temperature. We do not recommend installation of this product at temperatures below 65 degrees. CCSP-4896 One 48” by 96” flat panel CCSP-3696 One 36” by 96” flat panel Sawhorses with 2 x 4 cross-members or a worktable are helpful during the installation process. CCSO-1296 One 11-3/4” by 96” flat panel Always transport the panels vertically.
Installation Procedure Remove or reattach any loose ceramic tiles. Old tiles and front edge ceramic tiles should be reset for appearance only. Installation Procedure Swanstone panels can be installed over a variety of products. If you intend to apply the panels to any surface other than those described, consult with a professional contractor. Use the following sections when installing this product over: Remove any tile accessories attached to the walls.
Installation Procedure Note: For more information on installing apron strips, refer to the Apron Strips (optional) instructions in the Installation Procedure section of this manual. Filler Boards If an existing wall covering (i.e. tile) does not extend to a height equal to the height of the panel, it will be necessary to install a filler board to that height. The filler board must equal the thickness of the existing wall covering (tile). Usually, 1/4” masonite or similar material is adequate.
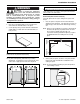
Installation Procedure 2. If the shower base is not perpendicular to the wall, use a level and draw a line around the alcove on all three walls. Measure the distance from the line to the top of the shower base. 5. Take several measurements, bottom-to-top, from the center line to each wall surface. These measurements will ensure the back panel fits the exact contour of the two side walls.
Installation Procedure WARNING IMPORTANT NOTICE DO NOT force a panel to fit a bowed or curved wall as it may break; furthermore, the resiliency of the panel can break the silicone bond to the wall surface. Dust Hazard When cutting or drilling the Swanstone product, use a dust collection method which prevents dust particles from going into the air. Always work in a well-ventilated area. To keep the area wellventilated, open windows and use exhaust fans.
Installation Procedure 3. Place the wall panel, finished side facing up, on a flat surface. Place pieces of masking tape over the area where the saw contacts the Swanstone panel. 4. Cut the panel using a circular saw with a 60-80 tooth carbide blade or a saber saw with a bi-metal blade (14 teeth per inch). 5. Measure the openings for the shower controls and shower head. 7. Cut clearance holes using a router, saber saw, or hole saw. Drill or cut from the finished side of the panel.
Installation Procedure 3. Place the wall panel, finished side facing up, on a flat surface. Place pieces of masking tape over the area where the saw contacts the Swanstone panel. Panel Installation WARNING Fumes Hazard The fumes from the silicone and solvents used by the installer can be harmful if used in an unventilated room. Always work in a well-ventilated area. To keep the area well-ventilated, open windows and use exhaust fans.
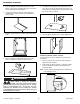
Installation Procedure 4. WARNING This process is not recommended for the do-it-yourself homeowner. Firmly press the surface of each panel against the wall. It is important to apply hand pressure to the entire surface of the panel to bond it to the wall surface. Using hot melt glue in place of bracing requires application by a qualified installer. This temporary bonding method must hold the panel to the wall during the 24 hour curing time of the silicone adhesive.
Installation Procedure 4. Apron Strips (optional) Attach the apron strips to the wall. If the wall and wall panel extends beyond the shower base, adding apron strips will provide a finished look to your installation. The two small apron strips can be cut from scraps of a panel. When cutting these apron strips, make sure the finished edge of the panel is facing outward. 1. Measure the distance from the top of the shower base to the outside of the panel.
Installation Procedure 2. Place two braces against each left and right wall. Corner Soap Shelf Installation The soap shelf is a corner mount design. The soap shelves can be stacked in one corner or placed in opposite corners. 1. Select a desirable height for mounting one or both soap shelves. A height of at least 43” from the shower floor to the soap shelf is recommended. 43" 3. 4. 5. Install (wedge) three horizontal braces (six total) against the left and right wall braces. 2.
Installation Procedure 4. Install the soap shelf using method in Steps 5 or 6. 5. Using the silicone installation method: a. 6. Using the stainless steel screw installation method: a. Pre-install the screws in the underside screw pockets. b. Dry fit the soap shelf and mark the hole locations. c. Drill the four mounting holes using a 3/16” drill bit. d. Apply silicone to the back side of the shelf. e. Attach shelf with screws. f. Wipe off excess silicone.
Installation Procedure Attaching Shower Doors and Accessories 1. Follow the mounting instructions that come with each accessory. 2. Drill pilot holes, where fasteners pass through the wall panels, slightly larger than the fastener. 3. If anchors are being used, drill the hole in the panel large enough for the head of the anchor to fit through the panel and the structural wall behind it. 4. Use 100% clear silicone to seal any holes or joints between the accessory and the wall panel.
Maintenance Warranty Care and Cleaning Warranty The Swanstone products are stain and abrasion resistant; however, the finish requires reasonable care. If a Swan Corporation product covered by this warranty is found to be defective in materials or workmanship, after inspection by an authorized Swan Corporation representative, we will repair, or at our option, exchange the product for a similar model.
Notes The Swan Corporation – Swanstone 18 800-325-7008
Save these Installation Instructions for future reference. They provide important information on cleaning, maintenance, and surface repair of the Swanstone Wall Systems and Panels. www.swanstone.